
GB/CY GB/CY
GB/CY GB/CY GB/CY GB/CY GB/CY GB/CY GB/CY GB/CY GB/CY GB/CY GB/CY
GB/CY GB/CY GB/CY GB/CY GB/CY GB/CY GB/CY GB/CY GB/CY GB/CY GB/CY
GB/CY GB/CY GB/CY GB/CY GB/CY GB/CY HR
HR
GB/CY
Potvrdite Vaš unos pritiskom na tipku SET. Sada
ulazite u izbor jedinice za temperaturu.
Za to pritišćite tipku MODE sve dok se na
LC-displeju ne pojavi °C ili °F.
Potvrdite Vaš unos pritiskom na tipku SET.
Osnovno namještanje ovime je završeno. Slije-
dite upute u prglavlju „Reset računala za
bicikl“, kako bi promijenili osnovne postavke i
ponovno unesite podatke.
Uporaba računala za bicikl
Napomena: Računalo za bicikl koje se ne
upotrebljava duže od 5 minute, automatski
prelazi u režim pripravnosti (Stand-By).
Pritisnite neku tipku kako biste ga ponovno
aktivirali. Prikaz funkcije
8
prikazuje režim u
kojem se trenutno nalazite.
Ponovnim pritiskanjem tipke MODE
11
možete
listati kroz različite režime.
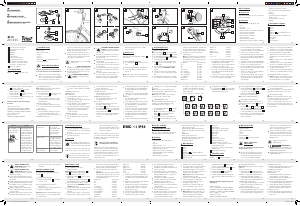
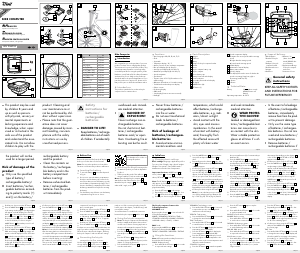
Opis dijelova
1a
Držač
1b
Senzor
1c
Prigušivanje
1d
Poklopac pretinaca za baterije senzora
2
Magnet
3
Bateriija 3 V , tip CR2032 gumbasta
4
Poveznik kabela
5
Presvlaka za senzor
6a
Poklopac pretinca za baterije računlaa za bicikl
6b
Računalo za bicikl
7
LCD zaslon
8
Prikaz funkcija
9
Prikaz vrijednosti sporedne funkcije
10
Prikaz vrijednosti glavne funkcije
11
Tipka MODE
12
Tipka SET
13
Prikaz SCAN
14
Prikaz servisnog intervala
To close the battery compartment cover, use a
coin to assist you to turn the battery compart-
ment cover in clockwise direction.
Press the SET key and keep it pressed to return
to normal operating mode.
Note: Once the batteries are removed, all stored
data will be erased after approx. 20 seconds.
Removing the bike computer
from the bike
Slide out the bike computer by pressing down
the bracket lock (See Fig. L).
To remove the cable ties supernatant
4
, use
other tools to assist (e.g. cutter pilers).
Troubleshooting
Note: This device has delicate electronic compo-
nents. Therefore interference may occur when it is
near devices which transmit radio signals.
Press the MODE button repeatedly until 12 for
the 12-hour format or 24 for the 24-hour format
appears in the LC display.
Confirm your choice by pressing the SET button.
You move on to setting the time.
A four-digit number appears in the LC display.
Enter the current time. Press the MODE button
repeatedly until the desired number appears
as the first digit.
Confirm your choice by pressing the SET button.
Repeat this process for all the remaining digits.
You move on to selecting the servicing interval.
Press the MODE button repeatedly until the
desired number of units of distance to your
next intended bicycle servicing (servicing inter-
val indicator
14
) appears in the LC display.
Note: You have the choice of 200, 400, 600
or 800 km or miles.
Confirm your choice by pressing the SET button.
You move on to selecting the unit of temperature.
Functions
– Menu languages: GB, DE, FR, NL, IT, ES
– Clock
– Stopwatch
– Temperature °C / °F
– Memory function for min. and max. temperature
– Current speed (0–99.9 km / h)
– Mean speed (0–99.9 km / h)
– Highest speed (0–99.9 km / h)
– Speed comparison
– Speed tendency
– Trip timer (max. 9:59:59) (countdown or forwards)
– Odometer (countdown or forwards)
– Total odometer and total cycling time display
– Calories
– Fat-burning
– Scan indicator (functions displayed in
continuous loop)
– Backlight
HR
Ponovite postupak za sve sljedeće znamenke.
Sada ulazite u izbor formata sata.
Pritišćite tipku MODE sve dok se na LCD
zaslonu ne pojavi 12 za 12-satni format ili
24 za 24-satni format.
Potvrdite Vaš unos pritiskom na tipku SET. Sada
ulazite u namještanje vremena.
Na LCD zaslonu pojavljuje se četveroznamen-
kasti broj. Unesite sada trenutno vrijeme. U tu
svrhu pritišćite tipku MODE sve dok se ne
pojavi prva znamenka željenog broja.
Potvrdite Vaš unos pritiskom na tipku SET.
Ponovite postupak za sve sljedeće znamenke.
Sada ulazite u izbor servisnog intervala.
Pritisnite tipku MODE sve dok se ne prikaže
željeni broj kilometara nakon kojeg želite oba-
viti sljedeći servis svog bicikla. (Prikaz intervala
održavanja
14
).
Napomena: Možete birati između 200,
400, 600 i 800 km, odn. milja.
Funkcije
– Jezici izbornika: GB, DE, FR, NL, IT, ES
– Sat
– Štoperica
– Prikaz temperature °C / °F
– Funkcija memorije za min. i maks. temperaturu
– Prikaz brzine (0–99,9 km / h)
– Prikaz prosječne brzine (0–99,9 km / h)
– Prikaz maksimalne brzine (0–99,9 km / h)
– Usporedba brzine
– Trend brzine
– Kontrolni sat vremena vožnje (maks. 9:59:59)
(odbrojavanje ili brojanje)
– Brojač kilometara (odbrojavanje ili brojanje)
– Prikaz ukupne kilometraže i ukupnog vremena
vožnje
– Brojač kalorija
– Prikaz sagorijevanja masnoća
– Prikaz režima Scan (prolaz kroz sve funkcije)
– Pozadinsko osvjetljenje
HRGB/CY
set basic setting data (language, age, weight,
time). The rest of the stored data will be deleted
(except total trip time and total odometer).
Changing the batteries
Note: The batteries of the bike computer must be
replaced when the battery symbol
17
appears on
the LC display
7
.
Press the MODE key
11
and the SET key
12
at the same time and keep them pressed until
the {{-----}} symbol appears in the LC display
7
.
To replace the battery, proceed as shown in
figure A.
To open the battery compartment cover, use a
coin to assist you to turn the battery compart-
ment cover in anti-clockwise direction. Take out
the old battery and replace with a new bat-
tery. Make sure you fit the battery the right
way round (polarity). This is shown inside the
battery compartment.
A two-digit number appears in the LC display.
Now enter your age. Press the MODE button
repeatedly until the desired number appears
as the first digit.
Confirm your choice by pressing the SET butto
n.
Repeat this process for the remaining digit. You
move on to selecting the unit of weight.
Press the MODE button repeatedly until SET
KG or SET LB appears in the LC display.
Confirm your choice by pressing the SET button.
You move on to entering your weight.
A three-digit number appears in the LC display.
Now enter your weight. Press the MODE button
repeatedly until the desired number appears
as the first digit (see Fig. K).
Confirm your choice by pressing the SET button.
Repeat this process for all the remaining digits.
You move on to selecting the time format.
Bike Computer
Introduction
We congratulate you on the purchase of your new
device. You have chosen a high quality product.
The instructions for use are part of the product.
They contain important information concerning
safety, use and disposal. Before using the product,
please familiarise yourself with all of the safety
information and instructions for use. Only use the
unit as described and for the specified applica-
tions. If you pass the product on to anyone else,
please ensure that you also pass on all the docu-
mentation with it.
Proper use
The product is intended for use as a cycle computer.
Not for commercial use.
HR HR HR HR HR HR HR HR HR
HR
Description of parts
1a
Bracket
1b
Sensor
1c
Cushion
1d
Battery compartment cover of sensor
2
Magnet
3
Battery 3 V , type CR2032 button cell
4
Cable tie
5
Sensor cushion plate
6 a
Bike computer’s battery compartment cover
6 b
Bike computer
7
LC display
8
Function indicator
9
Secondary function value display
10
Primary function value display
11
MODE button
12
SET button
13
SCAN indicator
14
Servicing interval indicator
15
Speed comparison indicato
r
▲ higher than your average speed
▼ lower than your average speed
16
Speed tendency indicator:
Acceleration – anticlockwise
rotation
Decelerat
ion – clockwise rotation
17
Battery state indicator
Technical data
Battery: 3 V (CR2032 button cell)
Included items
1 Bike computer
1 Bike computer bracket
1 Magnet
1 Sensor
4 Cable ties
2 Batteries 3 V
, type
CR2032 button cell
1 Operating instructions
General safety advice
KEEP ALL THE SAFETY ADVICE AND INSTRUC-
TIONS IN A SAFE PLACE FOR FUTURE REFERENCE!
This appliance can be used by children aged
from 8 years and above and persons with
reduced physical, sensory or mental capabilities
or lack of experience and knowledge if they
have been given supervision or instruction
concerning use of the appliance in a safe way
and understand the hazards involved. Children
shall not play with the appliance. Cleaning
and user maintenance shall not be made by
children without supervision.
Please note that the warranty does not cover
damage arising from improper treatment, non-
observance of the operating instructions and
safety advice or unauthorised use.
Safety advice concerning
batteries
RISK OF LOSS OF LIFE!
If batteries are swallowed, it can lead to loss of
life. Seek medical attention if a battery is swal
lowed.
Remove the battery if the product is not to be
used for a long period.
CAUTION! RISK OF EXPLO-
SION! Never recharge single-use
batteries!
CAUTION! DANGER OF EXPLO-
SION! Always replace all batteries
at the same time and only use batte
ries
of the same type.
If the battery is exhausted, remove it from the
device immediately. Otherwise the battery is
more likely to leak.
Make sure you insert the battery the right way
round (polarity).
Keep the battery away from children. Do not
throw the battery into a fire. Never short-circuit
it or take it apart.
If your battery leaks, remove it from the device
immediately to prevent the device from being
damaged.
Do not let the fluid from a leaking battery come
into contact with your skin, eyes or mucous
membranes. In the event of contact with fluid
leaking from a battery, thoroughly flush the
affected area with water and / or seek the
advice of a doctor!
Before use
Remove the protective foil from the LC display
7
before first use.
Note: This product is not recommended to use
with E-bikes. Interference from the motor may affect
the performance of the product.
Inserting the battery
To insert the battery
3
, proceed as shown in Fig. A.
To open the battery compartment cover, use a
coin to assist you to turn the battery compartment
cover in anti-clockwise direction. Make sure
you fit the battery the right way round (polarity).
This is shown inside the battery compartment.
To close the battery compartment cover, use a
coin to assist you to turn the battery compart-
ment cover in clockwise direction.
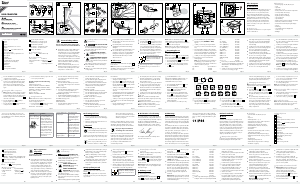
Scan the QR code with your
smartphone and watch the video
to find out how to assemble the
product.
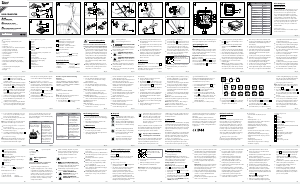
Attaching the bike computer
To attach the device, proceed as shown in
Figs. B to I.
Note: Make sure that the bike computer
6 b
is
attached with less than 70 cm distance to the sen-
sor
1b
. Fix the bike computer to the sensor within a
30° angle as shown in figure B.
Note: Make sure the cable is attached properly. It
must not get caught in the spokes or trail along them.
Preparing for use
Basic settings
Note: The LC display
7
comes on automatically
approx. 2 seconds after the battery
3
is inserted.
You are immediately offered a choice of languages.
Press the MODE-button
11
repeatedly until the
desired language appears.
Confirm your choice by pressing the SET but-
ton
12
. You move on automatically to select
the user profile.
Press the MODE button repeatedly until the
desired
user profile (ADVANCE or EASY)
appears.
Confirm your choice by pressing the SET but-
ton. Now you can choose the wheel size (SET
WS).
A four-digit number appears in the LC display.
Now enter the tyre circumference of your wheel
in mm. Press the MODE button repeatedly until
the desired number appears as the first digit.
Confirm your choice by pressing the SET button.
Repeat this process for each of the three
remaining digits.
Note: You can calculate your tyre
circumference
by multiplying your
tyre diameter by 3.1416.
The following list contains the tyre circumfer
ences
of the most common cycle tyres.
Tyre diameter Tyre circumference
20” 1598 mm
22” 1759 mm
24” 1916 mm
26” (650 A) 2073 mm
26.5” (tubular) 2117 mm
26.6” (700x25C) 2124 mm
26.8” (700x28C) 2136 mm
27” (700x32C) 2155 mm
28” (700B) 2237 mm
ATB24”x1.75 1888 mm
ATB26 x1.4 1995 mm
ATB26 x1.5 2030 mm
ATB26 x1.75 2045 mm
ATB26x2 (650B) 2099 mm
27”x1 2138 mm
27”x1 1 / 4 2155 mm
Now select your desired unit of distance and
speed. Press the MODE button repeatedly until
SET KM KMH or SET MILE MPH appears in
the LC display.
Confirm your choice by pressing the SET button.
You move on to entering your age.
Press the MODE button repeatedly until °C or
°F appears in the LC display.
Confirm your choice by pressing the SET button.
You have now completed the the basic settings.
If you want to change the basic setting data,
follow the steps in “Resetting the bike com-
puter” section and reset all basic setting data
again.
Using the bike computer
Note: If the bike computer remains unused for
more than 5 minutes, it automatically switches
into the stand-by mode. Press any button to reac-
tivate the computer. The function indicator
8
shows the current mode.
Press the MODE button
11
repeatedly to
page through the various modes.
Press the SET button
12
to change into the sec-
ondary function for any function.
Press the SET button and keep it pressed to call
or reset up any saved values.
The bike computer has the following
functions:
Advanced users’ functions:
CLOCK > TOTALODO > TOTAL-TM >
TRIPDIST >
MAXSPEED
> AVGSPEED > TRIPTIME > TEMP >
STPWATCH >
CAL RATE > CALORIE > FAT-BURN >
KM+/- > TIME+/- > SCAN
Beginners’ functions:
TRIPDIST > AVGSPEED > TRIPTIME
Using functions
Note: All the functions and secondary functions
are described in the following list.
CLOCK: - Displays the time
Press the SET button
12
and keep it
pressed for
3 seconds to access the time settings.
TOTAL ODO: - Total odometer
Press the SET button and keep it pressed for
3seconds to access the wheel size settings
and total distance.
TOTAL-TM: Total time cycling
Press the SET button and keep it pressed for
3seconds to make changes to the saved total
time cycling.
TRIPDIST: Trip distance
Press the SET button and keep it pressed for
3seconds to reset the trip distance, the
average speed and the trip time displays to 0.
MAXSPEED: Highest speed
Press the SET button and keep it pressed for 3sec-
onds to reset the maximum speed display to 0.
AVGSPEED: Average speed
TRIPTIME: Trip time
TEMP: Thermometer
Press the SET button and keep it pressed to
switch between °C and °F.
Press the SET button to display the highest tem-
perature (HI) measured so far.
Press the SET button again to display the low-
est temperature (LO) measured so far.
Press and hold down the SET button while the
highest or lowest temperature is displayed to
switch back to the current temperature to
reset the saved data.
STPWATCH: Stopwatch
Press the SET button to start the stopwatch.
Press the SET button again to stop the stopwatch.
Press the SET button and keep it pressed to
reset the stopwatch to 0.
CAL RATE: Current calorie consumption
CALORIE: Calorie meter
Press the SET button and keep it pressed to
reset the calorie counter to 0.
FAT-BURN: Fat burning in grams
Press the SET button and keep it pressed to
reset the fat burning value to 0.
KM: Odometer
Press the SET button and keep it pressed to
change the odometer settings.
The LC display
7
shows the symbol for count-
ing forwards or
backwards (+ or - respectively).
Press the MODE button
11
repeatedly until the
desired symbol is shown.
Confirm your choice by pressing the SET button.
You move on to setting the distance on the
odometer.
A 5-digit number appears in the LC display. En
ter
the desired distance. Press the MODE button
repeatedly until the desired number appears
as the first digit.
Confirm your choice by pressing the SET button.
Repeat this process for all the remaining digits.
TIME: Timer
Press the SET button and keep it pressed to
change the timer settings.
The LC display shows the symbol for counting
forwards or backwards (+ or - respectively).
Press the MODE button repeatedly until the
desired symbol is shown.
Confirm your choice by pressing the SET button.
You move on to the time settings of the timer.
A 5-digit number appears in the LC display.
Enter the desired time. Press the MODE button
repeatedly until the desired number appears
as the first digit.
Confirm your choice by pressing the SET button.
Repeat this process for all the remaining digits.
SCAN: Scan
Note: The scan mode automatically switches
between the trip distance, highest speed, average
speed and trip time displays.
Note: Refer to the section on “Basic settings” to
see how you make or change settings.
Note: To turn off the SCAN function, press the
MODE button to return to clock mode.
CUSTOMIZE mode
Apart from the ADVANCE and EASY mode, you
can make your individual adjustments in the
CUSTOMIZE mode (see procedure).
Press and hold the MODE button
11
to enter
the CUSTOMIZE mode.
Note: By repeatedly pressing the MODE
button
11
, you can toggle between the
ADVANCE and EASY modes.
In the EASY mode, press and hold the SET
button
12
. Press the MODE button to switch
the settings on or off (e.g. time). Choose „On“,
to add the chosen adjustment to the EASY
modes. Choose „Off“, if you do not want to
add the adjustments.
Press the SET button, to confirm your entry.
Using the backlight
Press the SET button
12
to switch on the back-
light temporarily. The backlight automatically
extinguishes after a short period.
Resetting the bike computer
Press the MODE button
11
and SET button
12
at the same time and keep them pressed until
{{----}} appears in the LC display
7
.
Now press the MODE button and keep it
pressed. This allows you to adjust the previously
- If errors occur in the display, remove any such
devices from the vicinity of the product. In the case
of such malfunctions, remove the battery briefly and
then reinsert again.
Problem Solution
Empty LC-display or no
response after putting
the batteries in again
RESET
Remove battery. In the
area marked RESET of the
battery compartment,
touch the plus and minus
terminals at the same time
using a screwdriver. Insert
a 3V battery into the bat-
tery compartment in such
a way that the + terminal
points upwards. Replace
the battery cover on the
battery compartment. The
microprocessor is reset
and restarted.
Speed or distance are
not displayed.
Adjust magnet and
sensor correctly.
- Check that the battery is
inserted with the poles
arranged the right way
round.
Display is black The ambient temperature
is too high or the bicycle
computer was exposed
to direct sunlight for too
long. Remove appliance
from direct sunlight and
let it cool off for a while.
The LC-display shows
irregular symbols.
Remove battery and
replace it again.
Cleaning and care
Do not use any liquids or cleaning agents for
cleaning. Otherwise there is a risk of damaging
the device.
The device should only be cleaned on the out-
side with a soft dry cloth.
Disposal
The packaging is wholly composed of
environmentally friendly materials that
can
be disposed of at a local recycling centre.
Contact your local refuse disposal authority for more
details of how to dispose of your worn-out product.
In the interest of the environment, do not
throw out your product with your house-
hold refuse. Take it to a suitable centre
where it can be disposed of properly.
Your local council will be able to tell you
where the collection centres are located
and their opening times.
Defective or exhausted batteries mu
st be recycled
in accordance with Directive 2006 / 66 / EC and its
amendments
. Return the batteries and / or the
device through the appropriate collection facilities.
Improper disposal of batteries
can damage the environment!
Batteries must not be disposed of with the house-
hold refuse. They may contain toxic heavy metals
and require to be handled as special waste. The
chemical symbols of heavy metals are: Cd = cad-
mium, Hg = mercury, Pb = lead For this reason,
you must dispose of discarded batteries at a
communal disposal centre.
Declaration of conformity
We, OWIM GmbH & Co. KG, Stiftsbergstraße 1,
D-74167 Neckarsulm, hereby declare under our
sole responsibility that the product: Bike Computer,
Model No.: HG00734A / HG00734B /
HG00734C / HG00734D
, Version: 02 / 2016,
to
which this declaration refers, complies with the
standards / normative documents of 1999 / 5 / EC.
The complete declaration of conformity can be
viewed at: www.owim.com.
subject to normal wear, thus possibly considered
consumables (e.g. batteries) or for damage to fragile
parts, e.g. switches, rechargeable batteries or glass
parts.
Računalo za bicikl
Uvod
Čestitamo Vam na kupnji novog uređaja. Ovom
kupnjom odlučili ste se za visokokvalitetan proizvod.
Uputa za uporabu je sastavni dio ovog proizvoda.
Ona sadrži važne upute o sigurnosti, uporabi i
uklanjanju otpada. Prije upotrebe proizvoda upo-
znajte se sa svim njegovim uputama za korištenje i
sigurnosnim uputama. Koristite ovaj proizvod u
skladu s navedenim uputama te u navedene svrhe.
Ukoliko proizvod dajete nekoj drugoj osobi, pre-
dajte toj osobi također i sve upute.
Namjenska uporaba
Proizvod se smije upotrebljavati kao računalo za
bicikl. Nije namijenjen za komercijalne svrhe.
Warranty
The device has been manufactured to strict quality
guidelines and meticulously examined before delivery.
In the event of product defects you have legal rights
against the retailer of this product. Your legal rights
are not limited in any way by our warranty detailed
below.
The warranty for this device is 3 years from the date
of purchase. Should this device show any fault in
materials or manufacture within three years from the
date of purchase, we will repair or replace it - at
our choice - free of charge to you.
The warranty period begins on the date of purchase.
Please keep the original sales receipt in a safe location
.
This document is required as your proof of purchase.
This warranty becomes void if the device has been
damaged or improperly used or maintained.
The warranty applies to faults in material or manu-
facture. This warranty does not cover product parts
15
Prikaz uspoređivanja brzine
▲ viša od prosječne brzine
▼ niža od prosječne brzine
16
Prikaz trenda brzine:
Ubrzanje – okretanje suprotno od kazaljke na satu
Usporenje – okretanje u smjeru kazaljke na satu
17
Prikaz napunjenosti baterija
Tehnički podaci
Baterija: 3 V (CR2032 gumbasta)
Opseg isporuke
1 računalo za bicikl
1 držač računala za
bicikl
1 magnet
1 sensor
4 poveznika kabela
2 baterije 3 V
, tip
CR2032 gumbasta
1 upute za uporabu
Opće sigurnosne
napomene
SAČUVAJTE SVE SIGURNOSNE NAPOMENE I
UPUTE ZA BUDUĆNOST!
Ovaj uređaj mogu koristiti djeca od 8godina i
starija djeca, kao i osobe s umenjenom psihič-
kom, senzoričkom i mentalnom ili s umanjenim
iskustvom ako se nadgledaju ili ako su upoz-
nati sa upotrebom uređaja i razumiju opas-
nosti koje proizlaze iz upotrebe. Djeca se ne
smiju igrati uređajem. Čišćenje i održavanje ne
smiju vršiti djeca bez nadzora odraslih.
Molimo vodite računa da jamstvo ne pokriva
štete koje su uzrokovali nepravilno rukovanje,
nepoštivanje uputa za uporabu i sigurnosnih
napomena ili osobe koje ne bi smjele upotre-
bljavati proizvod.
Sigurnosne upute
za baterije
OPASNOST PO
ŽIVOT! Moglo bi se progutati baterije, što je
opasno po život. Ako netko proguta bateriju,
odmah potražite liječničku pomoć.
Izvadite bateriju iz uređaja ako ga nećete
upotrebljavati duže vrijeme.
OPREZ! OPASNOST OD
EKSPLOZIJE! Nikada nemojte
ponovno puniti baterije!
OPREZ! OPASNOST OD
EKSPLOZIJE! Uvijek istovremeno
zamijenite sve baterije i upotrijebite
samo baterije istog tipa.
Istrošenu bateriju odmah izvadite iz uređaja.
Inače prijeti povećana opasnost curenja sadr-
žaja baterije!
Prilikom umetanja pripazite na pravilan polaritet!
Čuvajte bateriju izvan dohvata djece, nemojte
bacati bateriju u vatru, nemojte kratko spajati
bateriju i nemojte je rastavljati.
Ukoliko je sadržaj baterije u vašem uređaju
iscurio, omdah ih izvadite kako biste spriječili
oštećenje uređaja!
Izbjegavajte dodir s kožom, očima i sluznicom.
U slučaju dodira baterijske kiseline, isperite
dotično mjesto sa dostatno vode i / ili obratite
se liječniku!
Prije puštanja u rad
Prije prve uporabe skinite zaštitnu foliju s LCD
zaslona
7
.
Napomena: ovaj proizvod se ne smije koristiti
na e-biciklu. Motor može prouzročiti smetnju funk-
cije proizvoda.
Umetanj baterije
Prilikom umetanja baterije
3
postupite kako
je opisano u sl. A.
Koristite kovanicu za otvaranje pretinca za
baterije. Okrenite s njime u smjeru protivnom
od kretanja kazaljke na satu.
Obratite pozornost na to, da su baterije
ispravno umetnute u pretinac (polaritet). Ispra-
van polaritet prikazan je u pretincu za baterije.
Okrenite poklopac pretinca za baterije s kova-
nicom na pretrinac u smjeru protivnom od kre-
tanja kazaljke na satu, kako bi ga zatvorili.
Jednostavno skenirajte pomoću
Smartphone QR-kod i pogledajte
u videu, kako ćete proizvod mon-
tirati.
Postavljanje računala
za bicikl
Prilikom postavljanja uređaja postupite kako je
prikazano na slikama B do I.
Napomena: Obratite pozornost da je računalo
za bicikl
6b
postavljeno na udaljenost manjoj od
70 cm od senzora
1b
. Pričvrstite računalo za bicikl
unutar kuta od 30° prema senzoru, kao što je pri-
kazano na slici B.
Napomena: Vodite računa da kabel bude pra-
vilno postavljen. On se ne smije zapetljati u žbice
ili po njima strugati.
Puštanje u rad
Provedba osnovnih
namještanja
Napomena: Nakon umetanja baterije
3
LCD
zaslon
7
se automatski uključuje nakon oko 2
sekunde. Ulazite izravno u izbor jezika.
Pritišćite tipku MODE
11
sve dok se ne pojavi
željeni jezik.
Potvrdite Vaš unos pritiskom na tipku SET
12
.
Automatski ulazite u izbor profila uporabe.
Pritišćite tipku MODE sve dok se ne pojavi
željeni profil uporabe ADVANCE (Napredni)
ili EASY (Jednostavan).
Potvrdite Vaš unos pritiskom na tipku SET. Sada
automatski ulazite u izbor profila guma (SET WS).
Na LCD zaslonu pojavljuje se četveroznamen-
kasti broj. Unesite sada opseg guma svog bici-
kla u mm. U tu svrhu pritišćite tipku MODE sve
dok se ne pojavi prva znamenka željenog broja.
Potvrdite Vaš unos pritiskom na tipku SET.
Ponovite postupak za svaku od sljedeće tri
znamenke.
Napomena: Opseg gume možete izračunati
tako da promjer gume pomnožite 3,1416. Na
sljedećem popisu možete pronaći opsege naj-
češćih bicklističkih guma.
Promjer guma Opseg guma
20” 1598 mm
22” 1759 mm
24” 1916 mm
26” (650 A) 2073 mm
26,5” (Tubular) 2117 mm
26,6” (700x25C) 2124 mm
26,8” (700x28C) 2136 mm
27” (700x32C) 2155 mm
28” (700B) 2237 mm
ATB24”x1,75 1888 mm
ATB26 x1,4 1995 mm
ATB26 x1,5 2030 mm
ATB26 x1,75 2045 mm
ATB26x2 (650B) 2099 mm
27”x1 2138 mm
27”x1 1 / 4 2155 mm
Nakon toga odaberite željenu mjernu jedinicu
za duljinu i brzinu. Za to pritisnite tipku MODE
sve dok se ne pojavi SET KM KMH ili SET
MILE MPH u LC-zaslonu.
Potvrdite Vaš unos pritiskom na tipku SET. Sada
ulazite u unos starosne dobi.
Na LCD zaslonu pojavljuje se dvoznamenkasti
broj. Unesite sada svoju dob. U tu svrhu priti-
šćite tipku MODE sve dok se ne pojavi prva
znamenka željenog broja.
Potvrdite Vaš unos pritiskom na tipku SET.
Ponovite postupak za sljedeću znamenku.
Sada ulazite u izbor jedinice za težinu.
Za to pritišćite tipku MODE sve dok se na
LC-displeju ne pojavi SET KG ili SET LB.
Potvrdite Vaš unos pritiskom na tipku SET. Sada
ulazite u unos težine.
Na LC-displeju pojavljuje se troznamenkasti
broj. Unesite sada svoju težinu. U tu svrhu priti-
šćite tipku MODE sve dok se ne pojavi prva
znamenka željenog broja (vidi sliku K).
Potvrdite Vaš unos pritiskom na tipku SET.
BIKE COMPUTER
IAN 275091
BIKE COMPUTER
Operation and Safety Notes
COMPUTER PENTRU BICICLETĂ
Instrucţiuni de utilizare şi de siguranţă
RAČUNALO ZA BICIKL
Upute za posluživanje i za Vašu sigurnost
G
F
4
A
1b 6 b
3 3
1d 6 a
I
2
1b
H
2 1b
J
8
9
10
1112
13
14
15
16
17
7
2 3 54
1a 1b 1c
C
1c
41a
D
1b
4
2
K
L
1a 6 b
E
1b 4
5
B
6 b
1b
2


Alăturați-vă conversației despre acest produs
Aici puteți împărtăși ce părere aveți despre Crivit IAN 275091 Ciclocomputer. Dacă aveți o întrebare, citiți mai întâi cu atenție manualul. Solicitarea unui manual se poate face folosind formularul nostru de contact.
răspuns | A fost util (3) (Tradus de Google)
răspuns | A fost util (0) (Tradus de Google)
răspuns | A fost util (0) Citeşte mai mult (Tradus de Google)
A fost util (0) (Tradus de Google)
răspuns | A fost util (0) (Tradus de Google)