EN
HU
RO
PL
BG
EN
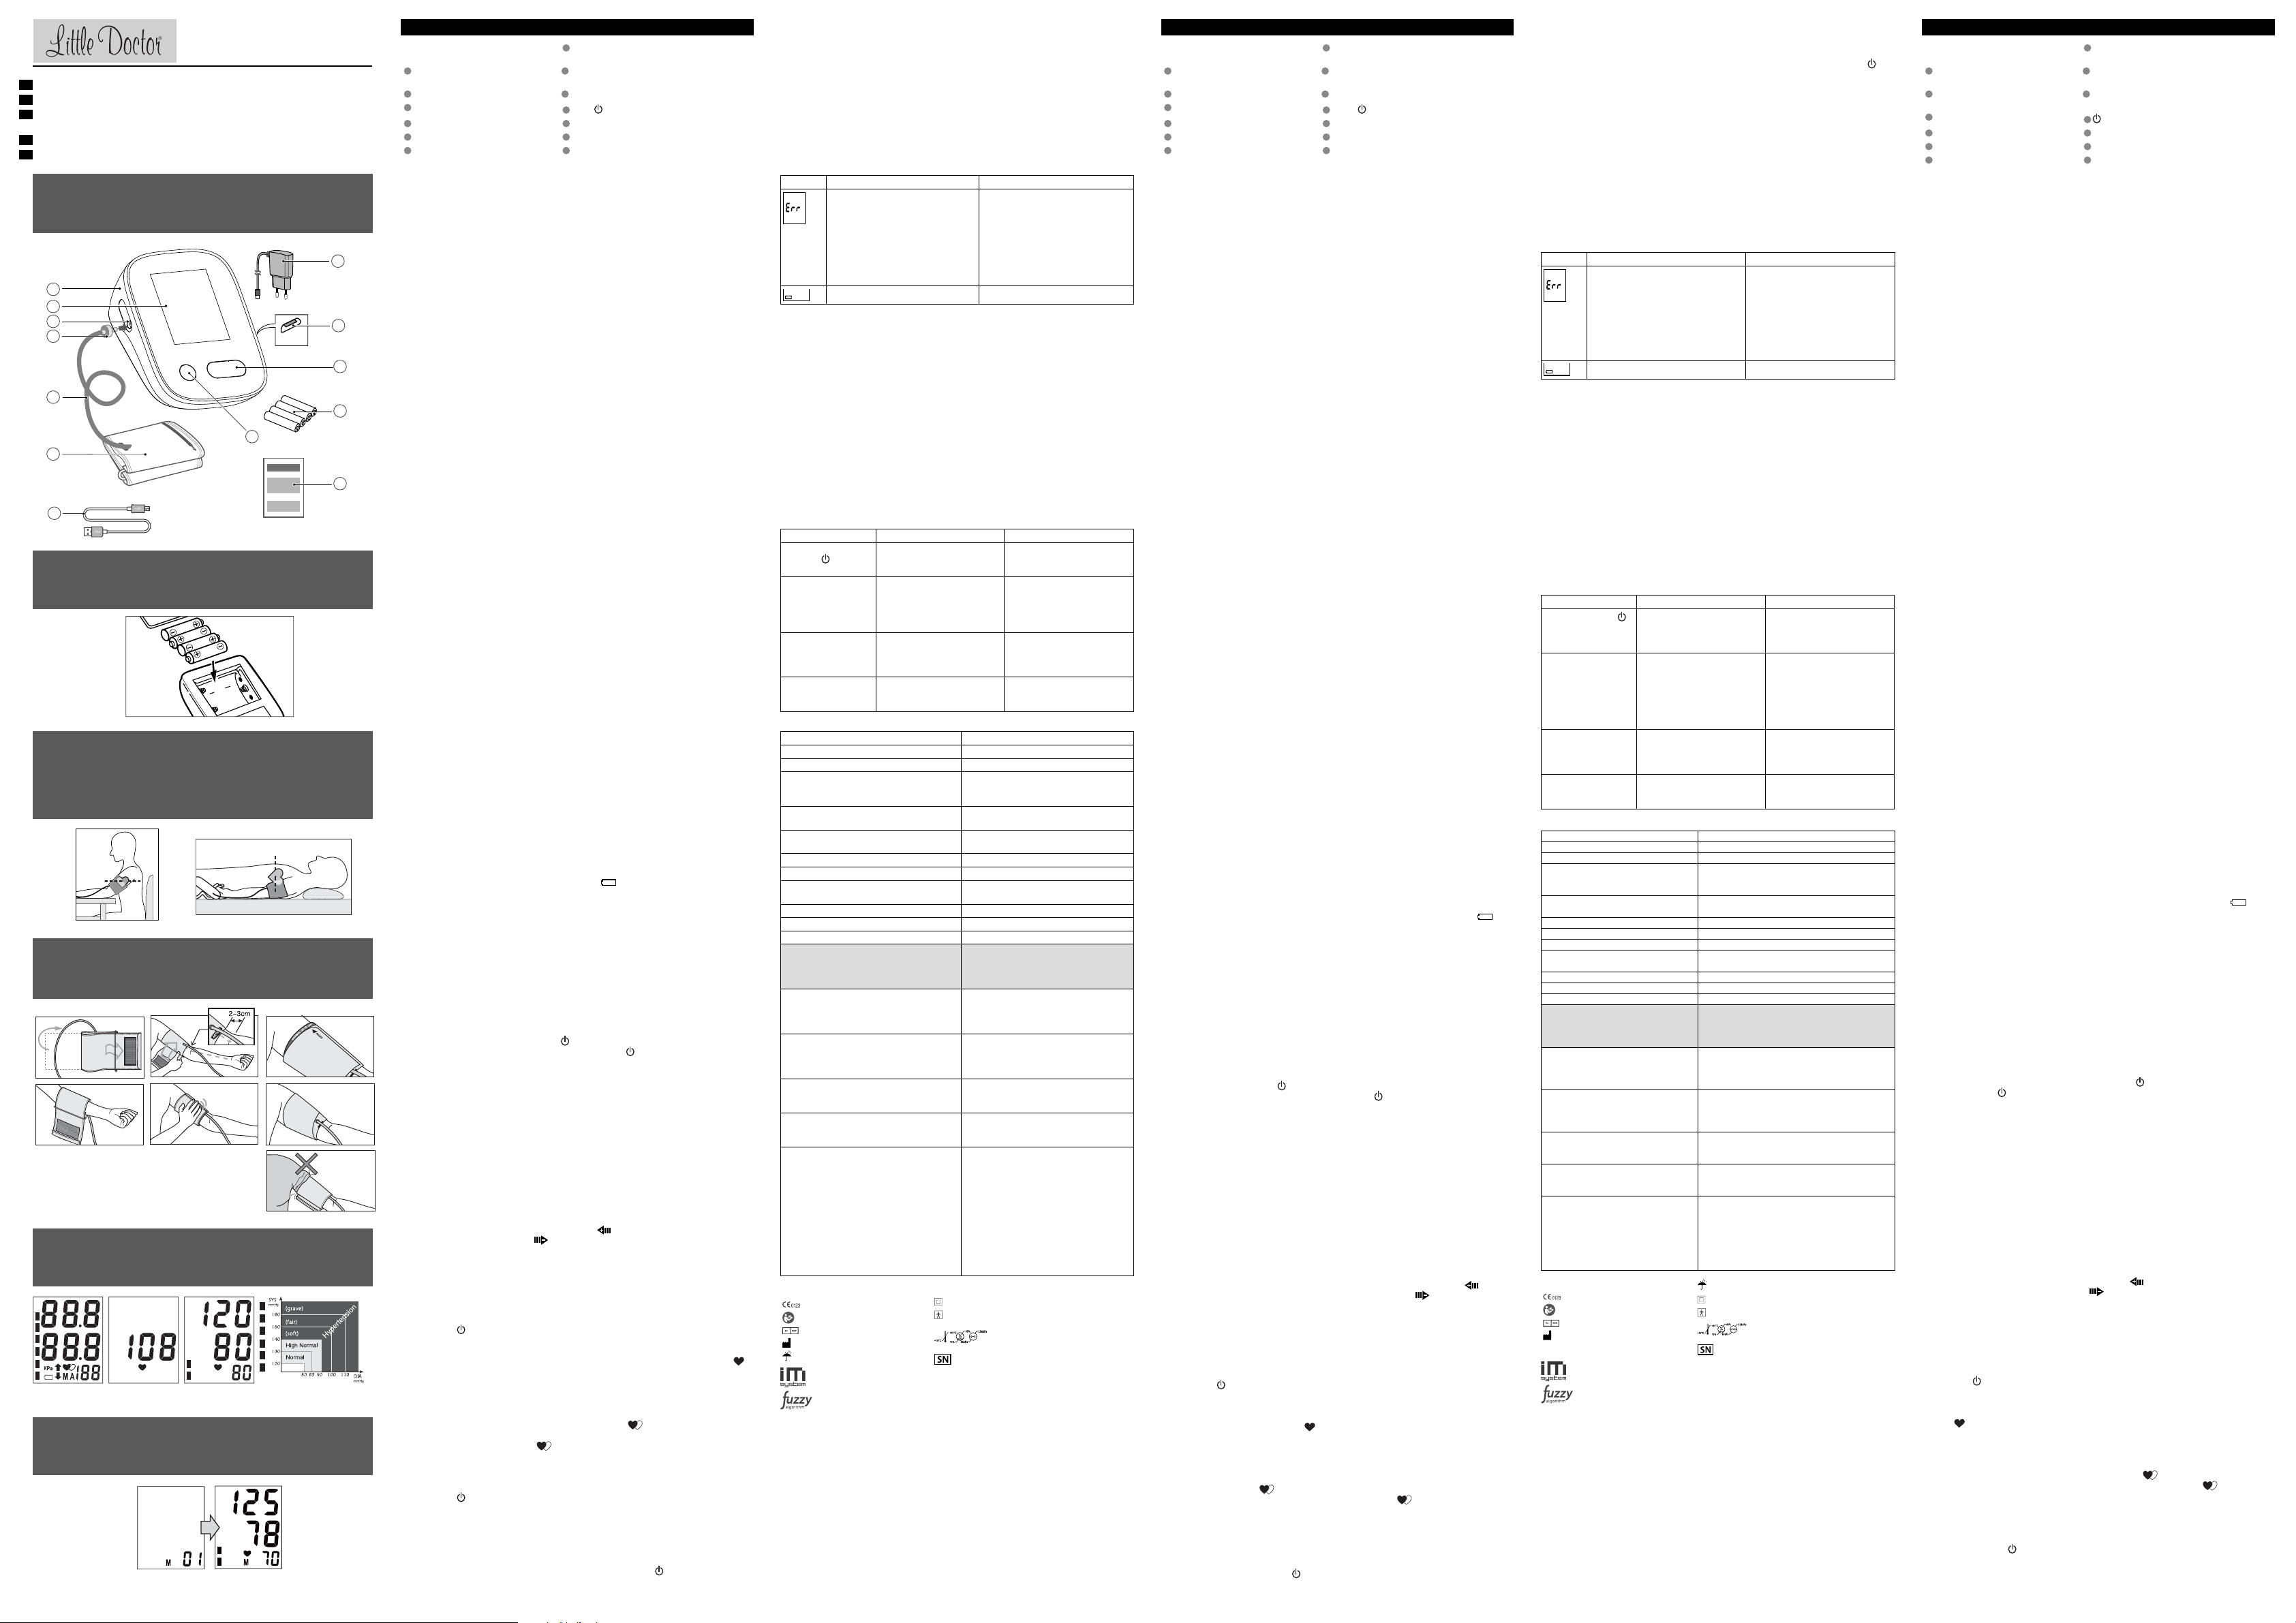
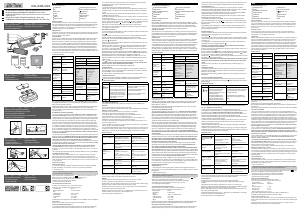
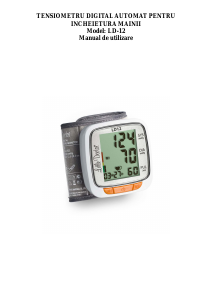
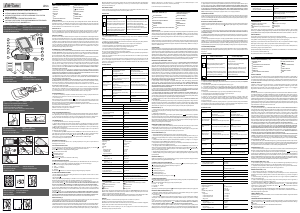
DENOMINATION OF PARTS AND COMPONENTS
(Fig. 1)
7
USB power cord (supplied as part of package for model
LD-521, LD-521U)
1
Electronic block
8
AC adapter LD-N063 (supplied as part of package for model
LD-521A, LD-521U)
2
LCD display
9
Micro-USB socket for power source connection
3
Cuff socket
10
Button
(Start/Stop)
4
Cuff сonnector
11
Button M (Memory)
5
Air hose
12
Batteries
6
Cuff (Applied part)
13
Operation manual with warranty card
GENERAL INFORMATION
This manual is intended to provide assitance to user in terms of safe and eff ective operation of arterial blood pressure
and heart rate measuring device with value display led (versions LD-521, LD-521A, LD-521U) (hereinafter referred to as
the “DEVICE”). The Device should be used in accordance with the rules stated in this manual and should not be used for
the purposes other than those described herein. It is important to read and understand the entire manual, especially the
section “Recommendations for proper use”.
INDICATIONS FOR USE
The device is intended for measurement of systolic and diastolic arterial blood pressure and determining pulse rate in
patients at the age of 15 and up. The device is recommended for use by patients with unstable (inconstant) arterial blood
pressure or with known arterial hypertension at home in addition to medical supervision.
PRINCIPLE OF OPERATION
Oscillometric method of arterial blood pressure and heart rate measurement is used in the device. The cuff is wrapped
around the upper arm and pumped automatically. The sensitive element inside the device detects weak fl uctuations
of pressure in the cuff generated by expansion and contraction of the brachial artery in responce to each heart beat.
Amplitude of the pressure waves is measured, converted into millimeters of mercury column and is displayed in the form
of a digital value. The device has 90 memory cells to store the measurement results. Please note that the device may not
ensure the specifi ed measurement precision, if it is used or stored at temperature or moisture other than those stated in
the section “Technical characteristics” of this manual. We give notice of possible errors in measurement of arterial blood
pressure with this device in people with pronounced arrhythmia. Please consult your physician as to how to measure
arterial blood pressure in children.
The patient is an intended operator. But persons who suff er from arrhythmia, diabetes, cardiovascular problems or who
have had a stroke should consult your doctor before using the device.
IMPORTANT SAFETY INSTRUCTIONS
• Do not service or maintain the cuff while in use with patient.
• Do not use the device with other medical electrical (ME) equipment simultaneously.
• Do not use the device in the area the HF surgical equipment, MRI, or CT scanner exists, or in the oxygen rich environment.
• Do not use a mobile phone or other devices that emit electromagnetic fi elds, near the device. This may result in incor-
rect operation of the device.
• Never use any accessories or parts from other manufacturers. Using such accessories or parts could cause a hazardous
situation for the user or damage to the device.
• Do not modify this equipment without authorization of the manufacturer.
RECOMMENDATIONS ON CORRECT MEASUREMENT
1. For correct measurement you should know that THE BLOOD PRESSURE IS SUBJECT TO SHARP VARIATIONS EVEN WITHIN
THE SHORT TIME INTERVALS. The blood pressure depends on many factors. It is usually lower in summer and higher in
winter. The blood pressure varies together with the atmospheric pressure, depends on physical loads, emotional excite-
ment, stresses and dietary regime. Drugs, drinking alcohol and smoking produce signifi cant
Eff ect on blood pressure. Even the very procedure of blood pressure measurement in a hospital sends the blood pressure
high in many people, thus, the blood pressure measured at home often diff ers from the values received in a hospital.
As the blood pressure tends to rise at low temperatures, make measurements at an indoor temperature (approximately
20 °C). If this Device was stored in the room with low temperature, keep it for at least 1 hour at an indoor temperature
before use, otherwise the measurement result may be incorrect. During the day, the diff erence in readings for healthy
people may be 30-50 mmHg of systolic pressure and to 10 mmHg of diastolic pressure. The dependence of the blood
pressure on various factors is individual for each person. Accordingly, it is recommended to keep a special book with
blood pressure measurement records. ONLY A CERTIFIED DOCTOR IS CAPABLE TO ANALYZE THE TENDENCY OF YOUR BLOOD
PRESSURE VARIATIONS USING YOUR RECORDS.
2. People with cardiovascular and some other diseases requiring blood pressure monitoring should make measurements
in the hours fi xed by attending doctor. REMEMBER THAT THE DIAGNOSTIC AND ANY TREATMENT OF HYPERTENSION MAY
BE CONDUCTED ONLY BY A CERTIFIED DOCTOR ON THE BASIS OF BLOOD PRESSURE VALUES OBTAINED BY THIS DOCTOR.
DRUGS PRESCRIPTION SHOULD BE CARRIED OUT ONLY BY YOUR ATTENDING DOCTOR.
3. At such disorders as deep vascular sclerosis, weak pulse wave and also in patients with the prominent distortions of
cardiac rhythm it may be diffi cult to measure the blood pressure accurately. IN SUCH CASES CONSULT A CERTIFIED DOCTOR
ABOUT APPLICATION OF THE ELECTRONIC DEVICE.
4. KEEP QUIET DURING A MEASUREMENT TO OBTAIN THE ACCURATE VALUES OF YOUR BLOOD PRESSURE WITH THE
ELECTRONIC DEVICE. Measure your blood pressure in the calm and comfortable conditions at the indoor temperature. No
eating an hour before measurement; no smoking, no taking tonic agents or alcohol 1.5-2 hours before measurement.
5. The accuracy of blood pressure measurement depends on whether the cuff matches the size of your arm. THE CUFF
SHOULD NOT BE TOO SMALL OR TOO LARGE.
6. Wait 3 minutes between measurements for the blood to restore its circulation. However, the persons with prominent
atherosclerosis due to considerable loss of vascular elasticity may need to increase the wait time between measurements
(10-15 minutes). This also refers to the patients suff ering from diabetes. For more accurate determination of blood pres-
sure, it is recommended to make a series of 3 consecutive measurements and to use the average value.
POWER SUPPLY OF THE DEVICE
Installation of batteries (fi g. 2)
1. Open the cover of the battery compartment and insert 4 batteries of type AAA as it shown on the fi gure inside the compart-
ment. Make sure the polarity is correct. Do not apply undue exertion when opening the cover of the battery compartment.
2. Close the battery compartment cover.
• Replace all batteries when the indicator of batteries replacement “ ” is being constantly displayed or there is no
indication on the display. The battery replacement indicator does not show the level of discharge.
The batteries that come with the device are intended for check of the device serviceability when purchased, their service life
can be less than that for recommended batteries.
• When replacing the batteries replace all of them simultaneously. Do not use second-hand batteries.
• If the device is not used for long time, remove the batteries from the device.
• Do not leave used batteries in the device.
Use of the device with AC adapter
The AC adapter is specifi ed as a part of the blood pressure monitor. Use the AC adapter (model LD-N063, supplied as part
of package for model LD-521A, LD-521U) with the following technical characteristics.
Output voltage : 5V ± 5%
Load current : at least 500 mA
Type of connector : micro-USB
The socket for the stabilized power supply is located on the right side of the device.
In order to use the device with a power source connect the power sorce connector to the device and insert the power
source plug into the socket outlet and press the button .
Upon completion of measurement switch the device off by pressing the button
, remove the power source plug from the
socket outlet and disconnect the power source connector from the device.
CORRECT POSE DURING MEASUREMENT (fi g. 3)
1. Sit near a table so that your arm rests on its surface during measurement. Make sure that the point of the cuff applica-
tion is approximately at the same height as your heart, and that your forearm lies freely on the table and does not move.
2. You can measure pressure when lying on your back. Look at the ceiling, keep calm and do not move during measure-
ment. Make sure that the measurement point on your upper arm is approximately at the same level as your heart.
CUFF PREPARATION (fi g. 4)
1. Insert the cuff end for about 5 cm into a metal ring as shown in fi gure.
2. Apply the cuff to your left upper arm so that the air tube is directed to your palm. If the measurement on your left arm is
diffi cult, you may use your right arm. In this case remember that the readings may diff er by 5-10 mmHg and even more.
3. Wrap the cuff around your upper arm so that the bottom of the cuff is approximately 2-3 cm above your elbow. The
sign “ARTERY” should be over the arm artery.
4. Fix the cuff so that it fi ts tightly to the arm, but make sure that it is not overtight. Too tight or too loosen placement of
the cuff may give inaccurate readings.
5. On the fi xed cuff the sign «INDEX» should point to the area «NORMAL».It means that the cuff is chosen correctly and fi
ts the size of your upper arm. if the sign points to the area marked «
» the cuff is too small and the readings will be
higher. If the sign points to the area marked « » the cuff is too large and the readings will be lower.
6. If the arm has a conic form, the cuff should be put on with a spiral movement as shown in the fi gure.
7. If the rolled-up sleeve squeezes the arm interfering with free blood fl ow the Device may give inaccurate fi gures not
corresponding to your actual blood pressure.
MEASURING PROCEDURE (Fig. 5)
1. Insert the cuff connector into the cuff socket.
Before measurement take a deep breath 3 to 5 times and relax. Do not move, do not talk and do not strain your arm
during measurement.
2. Press the button .
3. All symbols will appear for a short time on the display (Fig. 5.1), a short signal will sound and the air will start quickly
pumped into the cuff .
4. After reaching 18-20 mmHg the cuff will start pumping additionally, fi rst slowly, then quickly. The pulse symbol
(Fig. 5.2) will start fl ushing during pumping. The algorithm Infl ation Measuring System (IMS) allows determination of
systolic and diastolic blood pressure in the process of infl ation.
SINCE THE ARTERIAL BLOOD PRESSURE AND THE PULSE ARE MEASURED DURING INFLATION OF THE CUFF, TRY TO REMAIN
IMMOBILE AND DO NOT MOVE YOUR ARM DURING MEASUREMENT AS WELL AS NOT TO STRAIN MUSCLES OF YOUR ARM.
5. At the end of measurement a signal will be heard, after which the device will release air from the cuff and the
measurement result will appear on the display (Fig. 5.3). The fl ashing symbol on the display informs about ir-
regular pulse. Display of arrhythmia indicator may be also caused by body movement during measurement. Consult your
physician, if you regularly observe the symbol
.
In addition to the digital value of blood pressure, the result is also displayed on the Hypertension indicator (Fig. 5.4). The
Hypertension indicator serves to classify the obtained value of arterial blood pressure according to recommendations of
World Health Organization. The scale is located on the display’s left side and allows to assess the obtained value accord-
ing to the classifi cation: the pressure value is normal, increased, or it is one of the arterial hypertension degrees.
6. Press the button to switch off the device.
TO OBTAIN THE ACCURATE RESULT IT IS NECESSARY TO MAKE A PAUSE BETWEEN MEASUREMENTS IN ORDER TO RECOVER
BLOOD CIRCULATION.
DATA ARE STORED IN MEMORY EVEN WHEN THE DEVICE IS KEPT WITHOUT BATTERIES. YOU MAY REMOVE DATA STORED IN
THE DEVICE MEMORY BY PERFORMING ACTIONS DESCRIBED IN THE SECTION “MEMORY FUNCTION”.
If no actions were performed after measurement during 3 minutes the device automatically switches off .
Forced depressurization of the cuff
If during infl ation of the cuff you need to quickly depressurize the cuff , press the button
. The device will release air
from the cuff and switch off .
MEMORY FUNCTION (FIG. 6)
LD-521, LD-521A, LD-521U
PL
INSTRUCTION MANUAL FOR DIGITAL BLOOD PRESSURE MONITOR LD
BGINSTRUKCJA OBSŁUGI CIŚNIENIOMIERZA CYFROWEGO
LD
CZHASZNÁLATI ÚTMUTATÓ.
LD
KÉSZÜLÉK A VÉRNYOMÁS ÉS PULZUSSZÁM DIGITÁLIS
MÉRÉSÉRE
HUMANUAL DE UTILIZARE A TENSIOMETRULUI DIGITAL
LD
ROРЪКОВОДСТВО ЗА ЕКСПЛОАТАЦИЯ НА ЦИФРОВ ТОНОМЕТЪР
LD
fi g.1 rys. 1 1 . ábra desenul 1 рис. 1
PARTS AND COMPONENTS DENUMIREA PĂRŢILOR ȘI COMPONENTELOR
PODSTAWOWE CZĘŚCI I KOMPONENTY НАЗВАНИЯ НА ЧАСТИ И КОМПОНЕНТИ
ALKATRÉSZEK MEGNEVEZÉSE
DC5V 0.5A
fi g.2 rys. 2 2 . ábra desenul 2 рис. 2
BATTERY INSTALLATION INSTALAREA BATERIILOR
WYMIANA BATERII
ПОСТАВЯНЕ НА ЕЛЕМЕНТИТЕ НА ЗАХРАНВАНЕ
AZ ELEMEK BEHELYEZÉSE
fi g.3 rys. 3 3. ábra desenul 3 рис. 3
CORRECT POSITION DURING MEASUREMENT
PRZYJĘCIE POZYCJI UMOŻLIWIAJĄCEJ POMIAR
A HELYES TESTHELYZET A MÉRÉSNÉL
POZIŢIA CORECTĂ ÎN TIMPUL PROCESULUI DE MĂSURARE
ПРАВИЛНА ПОЗА ПРИ ИЗМЕРВАНЕ
fi g.4 rys. 4 4 . ábra desenul 4 рис. 4
CUFF PREPARATION PREGĂTIREA MANȘETEI
ZAKŁADANIE MANKIETU ПОДГОТОВКА НА МАНШЕТА
A MANDZSETTA ELŐKÉSZÍTÉSE
fi g.5 rys. 5 5 . ábra desenul 5 рис. 5
MEASUREMENT PROCEDURE ORDINEA MĂSURĂRII
PROCEDURA POMIARU ПОСЛЕДОВАТЕЛНОСТ НА ИЗМЕРВАНЕТО
A MÉRÉS MÓDSZERE
5.1 5.2 5.3 5.4
fi g.6 rys. 6 6 . ábra desenul 6 рис. 6
MEMORY FUNCTION FUNCŢIA MEMORIEI
FUNKCJA PAMIĘCI ФУНКЦИЯТА „ПАМЕТ“
MEMÓRIA FUNKCIÓJA
1. The results of each measurement (blood pressure and pulse) are automatically stored in the device’s memory.
THE RESULT WILL NOT BE STORED, IF THERE APPEARED ERROR NOTIFICATION.
2. The device memory can store up to 90 measurement results and the average value of the last 3 measurements. When
the number of measurements exceeds 90 the oldest data are automatically replaced with data of the next measurements.
3. You can see content of the device memory by pressing the button M. Upon the fi rst pressing of the button M, the
average value of the last three measurements stored in the memory with index “MA” will be displayed. Upon the second
pressing of the button M, the index “1” (number of a memory cell) will shortly appear on the display and after that the
last measurement result will appear.
Upon each subsequent pressing of the button M, the memory cell index will increment by one with consequent display of
this memory cell content.
Clearing the device’s memory
In order to remove all stored results from the device’s memory press and hold the button M 5 seconds. The symbols “Clr”
will apear on the display and the device memory will be cleared.
ERROR MESSAGES
INDICATION POSSIBLE CAUSE SOLUTION
REMEDY
The cuff is put on incorrectly or the air tube tee
connector is inserted loosely.
Measurements could not be done because of the
arm movement or talking during measurement.
In case of apparent heart rhythm disorders, deep
vascular sclerosis, weak pulse wave, correct mea-
surement of blood pressure may be hindered.
Make sure the cuff is put on correctly, and the tee
is inserted tightly, and repeat the measurement
procedure.
Repeat the measurement with full observation of
the recommendations of this operation manual.
In these cases, you should consult a certifi ed
physician about the use of the electronic Device.
Batteries are discharged Replace all batteries with new ones
CARE, STORAGE, REPAIR AND DISPOSAL
1. This Device should be protected from increased humidity, direct sunrays, impact, vibration. THE DEVICE IS NOT WATERPROOF!
2. Do not store and do not use the Device in close proximity to heating Devices and open fi re.
3. If the Device is not used for a long time, remove the batteries from the Device. Battery leakage may damage the Device.
KEEP THE BATTERIES AWAY FROM CHILDREN!
4. Do not contaminate the Device and protect it from dust. You can use soft dry cloth to clean the Device.
5. Avoid contact of the Device or its parts with water, solvents, alcohol. Do not use petroleum.
6. Protect the cuff from sharp object, and do not try stretching or twisting the cuff .
7. Do not expose the Device to strong impacts and do not drop it.
8. The Device does not have any measurement accuracy controls. Individual disclosure of the electronic unit is prohibited.
If necessary, the repair shall be performed only in specialized organizations.
9. After the end of the established service life you should periodically contact experts (specialized repair organizations) to
check the technical condition of the Device.
10. Disposal is governed by the rules in eff ect in your region. The manufacturer does not establish any special disposal
conditions for this Device.
11. The cuff is resistant to repeated sanitary treatment. It is allowed to treat the inner side of the cloth surface of the cuff
(the one contacting with the patient’s arm) with a cotton wool pad damped in 3 % hydrogen peroxide solution. In case
of continuous use, partial decoloring of the cloth surface of the cuff is admissible. Wet wash of the cuff , as well as its
treatment with a hot iron, is not allowed.
POSSIBLE PROBLEMS
PROBLEM POSSIBLE CAUSE SOLUTION REMEDY
No image on display after
pressing the
button
Batteries are discharged.
Polarity of batteries is not observed.
Battery contacts are contaminated.
Replace all batteries with new ones.
Install the batteries correctly.
Wipe the contacts with a dry cloth.
Blood pressure is diff erent
every time.
Measurement values are too
low (too high).
Is the cuff located at the heart level?
Was the cuff put on correctly?
Is your hand relaxed?
Maybe you were talking or moving your
hand during measurement.
Take the correct pose for measurement.
Put the cuff on correctly.
Relax before measurement.
Keep quiet and calm during measure-
ment.
Pulse rate value is too high
(too low).
Maybe you were talking or moving your
hand during measurement.
Were the measurements done after a
physical load?
Keep quiet and calm during measure-
ment.
Repeat measurement after at least 5
minutes.
Independent switching off . Automatic switch off system activates. This is not a failure. The Device switches
off automatically 3 minutes after the last
measurement.
TECHNICAL SPECIFICATIONS
Method of measurement
oscillometric
Indicator liquid crystal
Range of pressure indication in the cuff , mmHg 0 to 300
Measurement range:
pressure in the cuff , mmHg
pulse rate, 1/min
40 to 260
40 to 160
Limits of allowable absolute error when measuring air
pressure in the compression cuff , mmHg ±3
Limits of allowable relative error when measuring pulse
rate, % ±5
Infl ation automatic (air pump)
Depressurization automatic
Memory 90 measurements + average value of the last 3
measurements for each memory block
Cuff range universal for adults (22-42 cm)
Type of power socket USB micro-USB
Power supply, V 4x1.5V(AАА) or DC 5V 500mA
Power source LD-N063 (comes with model LD-521A, LD-521U)
Output voltage, V
Maximum load current
Input voltage
5 ± 5%
at least 500 mA
~100-240 V, 50/60 Hz
Operational conditions:
temperature, °C
relative humidity, % Rh
atmospheric pressure, kPa
10 to 40
15 - 85
86 - 106
Storage and transportation conditions:
temperature, °C
relative humidity, % Rh
atmospheric pressure, kPa
from minus 20 to 50
15 - 85
50 - 106
Overall dimensions:
Size (electronic block), mm
Weight (without packing, batteries and power source), g
87 x 116 x 49
195
Year of manufacture Year and month of manufacture are indicated in the
serial number after the symbol “A”. Serial number is
located on the device bottom.
USB Data Interface (LD-521U) USB interface is designed for:
1) transmission of measurement results (systolic /
diastolic pressure, pulse, ambient temperature, time
stamps, symptom of arrhythmia, WHO classifi cation,
standard measurement errors, sign of discharge of AA
batteries) to a personal computer
2) transfer of the START / STOP measurement command
to the device from the personal computer
3) device powering
Attention: This interface is not intended and cannot be
used to make changes to the measurement algorithm
and process measurement data inside the device.
SYMBOL EXPLANATION:
Compliance with the Directive 93/42/EEC
Important: Read the instruction
Representative in the EU
Manufacturer
Keep from moisture
Protection class II
BF type product
Storage/operation temperature, humidity and
atmospheric pressure limitation
Serial number
Infl ation Measuring System (IMS) allows determination of systolic and diastolic blood pressure in the process
of infl ation.
Fuzzy Algorithm is the algorithm for processing the measurement values with regard to peculiarities of the
man’s heartbeat, thus, ensuring high measurement accuracy.
The revision date of this Operation manual is indicated at the last page in the EXXX/YYMM/NN format, where YY is the
year, ММ is the month, and NN is the revision number. Technical specifi cations are subject to change without prior notice
in order to improve operational properties and quality of the product.
Production is certifi ed according to the international standard ISO 13485. The Device complies with the European Directive
MDD 93/42/ЕЕС, international standards ISO 15223-1, EN1041, IEС 60601-1, IEС 60601-1-2, ISO 14971.
WARRANTY
The warranty liabilities are contained in the warranty card given at the sale of this Device to a purchaser. Warranty period for the
parts of device with service life depending on intensity of its operation (cuff s, tubes for cuff s, bulbs etc.) is established within 12
months from the date of sale.
Manufactured under control and for Little Doctor International (S) Pte. Ltd. (7500A BEACH ROAD #11-313 THE PLAZA SINGAPORE
199591, postal address: Yishun Central P.O. Box 9293 Singapore 917699).
Manufacturer: Little Doctor Electronic (Nantong) Co. Ltd. (No. 8, Tongxing Road Economic & Technical Development Area,
226010 Nantong, Jiangsu, People’s Republic of China).
Distributor in European Union: Little Doctor Europe Sp. z o. o. (57G Zawila Street, 30-390 Kraków, Poland, phone: +48 12
2684746, 12 2684747, fax: +48 12 268 47 53, e-mail: biuro@littledoctor.pl)
For more information please visit www.littledoctor.sg
PL
CZĘŚCI I KOMPONENTY URZĄDZENIA (rys.1)
7
Kabel zasilający USB (wchodzi w skład zestawu do modeli
LD-521, LD-521U)
1
Blok elektroniczny
8
Zasilacz LD-N063 (wchodzi w skład zestawu do modeli
LD-521A, LD-521U)
2
Wyświetlacz LCD
9
Gniazdo Micro-USB do podłączenia zasilania
3
Gniazdo do podłączenia mankietu
10
Przycisk
(Start/stop)
4
Złącze mankietu
11
Przycisk M (Pamięć)
5
Przewód powietrza
12
Baterie
6
Mankiet (część robocza)
13
Instrukcja obsługi z kartą gwarancyjną
INFORMACJE OGÓLNE
Niniejsza instrukcja ma służyć użytkownikom jako pomoc w bezpiecznym i efektywnym posługiwaniu się urządzeniem
do pomiaru ciśnienia tętniczego krwi i pulsu LD (wersja LD-521, LD-521A, LD-521U) (dalej w tekście: URZĄDZENIE).
Urządzenie powinno być stosowane zgodnie z zasadami przedstawionymi w niniejszej instrukcji i nie wykorzystywane
do celów innych, niż tu opisane. Należy przeczytać i zrozumieć całą instrukcję obsługi, zwłaszcza rozdział “Zalecenia
dotyczące prawidłowego pomiaru”.
WSKAZANIA DO STOSOWANIA
Urządzenie przeznaczone jest do pomiaru skurczowego i rozkurczowego ciśnienia tętniczego krwi oraz pulsu u pacjentów
w wieku od 15 lat. Zaleca się korzystanie z danego ciśnieniomierza w warunkach domowych przez pacjentów z niestabil-
nym ciśnieniem tętniczym krwi lub nadciśnieniem tętniczym w ramach uzupełnienia nadzoru lekarskiego
ZASADA DZIAŁANIA
Urządzenie wykorzystuje oscylometryczną metodę pomiaru ciśnienia tętniczego krwi i pulsu. Mankiet jest owijany
wokół ramienia i automatycznie pompowany. Czujnik wychwytuje delikatne wahania zmiany ciśnienia w mankiecie,
powodowane rozszerzaniem się i kurczeniem tętnicy ramiennej w odpowiedzi na każde uderzenie serca. Mierzona
amplituda fal ciśnienia przekładana jest na wartość wysokości słupa rtęci i pojawia się na wyświetlaczu w postaci
wartości cyfrowej. Urządzenie posiada 90 komórek pamięci do przechowywania wyników pomiarów. Należy pamiętać,
że aby urządzenie wyświetlało poprawne wyniki, musi ono być przechowywane i wykorzystywane w temperaturze i przy
wilgotności, nie odbiegających od opisanych w dziale ”Dane techniczne” niniejszej instrukcji. Uprzedzamy o możliwości
wystąpienia błędów w pomiarze ciśnienia krwi u osób z ciężką arytmią. W sprawie pomiaru ciśnienia krwi u dzieci, należy
skonsultować się z lekarzem.
Urządzenie skierowane jest głównie do użytkowania przez pacjentów. Osoby, które cierpią na arytmię, cukrzycę, choroby
sercowo-naczyniowe lub doznały udaru mózgu, przed użyciem danego urządzenia powinny skonsultować się z lekarzem.
WAŻNE WSKAZÓWKI DOTYCZĄCE BEZPIECZEŃSTWA
• Nie należy przeprowadzać konserwacji mankietu podczas użytkowania przez pacjenta.
• Nie używać jednocześnie danego urządzenia i innych elektrycznych sprzętów medycznych.
• Nie należy korzystać z urządzenia w miejscach, w których znajduje się sprzęt chirurgiczny o wysokiej częstotliwości,
skaner MRI lub CT oraz w środowisku bogatym w tlen.
• Nie używać w pobliżu urządzenia telefonu komórkowego ani innych sprzętów emitujących pola elektromagnetyczne.
Może to spowodować jego nieprawidłowe działanie.
• Nie należy stosować żadnych akcesoriów ani części innych producentów. Użytkowanie tego rodzaju akcesoriów lub części
może się okazać niebezpieczne dla użytkownika lub doprowadzić do uszkodzenie sprzętu.
• Nie modyfi kować urządzenia bez zgody producenta.
ZALECENIA DOTYCZĄCE PRAWIDŁOWEGO POMIARU
1. Dla przeprowadzenia prawidłowego pomiaru należy pamiętać, że CIŚNIENIE TĘTNICZE PODLEGA SILNYM WAHANIOM
NAWET W KRÓTKIM OKRESIE CZASU. Poziom ciśnienia krwi zależy od wielu czynników. Zwykle jest ono niższe latem i
wyższe zimą. Ciśnienie krwi zmienia się wraz z ciśnieniem atmosferycznym, zależy od wysiłku fi zycznego, emocjonalnej
pobudliwości, stresu, diety. Duży wpływ mają używki, narkotyki, alkohol i palenie tytoniu. U wielu osόb nawet procedura
pomiaru ciśnienia w przychodni powoduje wzrost wskaźników. Dlatego ciśnienie tętnicze zmierzone w warunkach
domowych może różnić się od ciśnienia mierzonego w klinice. W związku z tym, że ciśnienie krwi wzrasta w niskich
temperaturach, przeprowadzać jego pomiar trzeba w temperaturze pokojowej (około 20 °C). Jeżeli urządzenie było prze-
chowywane w niskiej temperaturze, zaleca się pozostawić go w temperaturze pokojowej przez co najmniej 1 godzinę.
Po tym czasie można korzystać z tego urządzenia. W przeciwnym wypadku wynik pomiaru ciśnienia może być błędny. W
ciągu doby różnica we wskazaniach zdrowych ludzi może wynosić 30-50 mmHg. ciśnienia skurczowego (górnego) i do 10
mmHg. ciśnienia rozkurczowego (dolnego). U każdego człowieka ciśnienie zależy od różnych czynników. Dlatego zaleca
się prowadzenie dziennika pomiarów ciśnienia tętniczego krwi. TYLKO DYPLOMOWANY LEKARZ NA PODSTAWIE TAKICH
DANYCH MOŻE ANALIZOWAĆ TENDENCJE ZMIAN CIŚNIENIA TĘTNICZEGO.
2. Przy chorobach sercowo-naczyniowych i w przypadku wielu innych chorób, które wymagają monitorowania ciśnienia
tętniczego, pomiary należy wykonywać w porach, wskazanych przez lekarza. PAMIĘTAJ, ŻE DIAGNOSTYKA I JAKIEKOLWIEK
LECZENIE NADCIŚNIENIA TĘTNICZEGO MOŻE BYĆ WYKONYWANE TYLKO PRZEZ LEKARZA NA PODSTAWIE JEGO WŁASNO-
RĘCZNĘGO ODCZYTU POMIARÓW CIŚNIENIA KRWI. PRZYJMOWANIE LUB ZMIANĘ DAWEK LEKÓW NALEŻY PRZEPROWADZAĆ
TYLKO WEDŁUG ZALECEŃ LEKARZA.
3. Pomiar ciśnienia tętniczego może być utrudniony przy takich zaburzeniach jak: miażdżyca naczyń krwionośnych, słaba
fala pulsu, a także u pacjentów z poważnymi zaburzeniami rytmu serca,. W TYCH PRZYPADKACH NALEŻY SKONSULTOWAĆ
SIĘ Z DYPLOMOWANYM LEKARZEM ODNOŚNIE STOSOWANIA URZĄDZENIA ELEKTRONICZNEGO.
4. W TRAKCIE POMIARU PRZY KORZYSTANIU Z ELEKTRONICZNEGO URZĄDZENIA DLA UZYSKANIA PRAWIDŁOWEGO ODCZYTU
CIŚNIENIA TĘTNICZEGO NALEŻY ZACHOWAĆ CISZĘ . Pomiar ciśnienia tętniczego powinien być przeprowadzony w spokojnej
atmosferze przy temperaturze pokojowej. Godzinę przed wykonaniem pomiaru ciśnienia należy unikać jedzenia, picia
1,5-2 godziny palenia papierosów, spożywania napojów tonizujących lub alkoholu.
5. Dokładność pomiaru zależy od dopasowania mankietu urządzenia do wielkości ręki. MANKIET NIE POWINIEN BYĆ ZBYT
MAŁY LUB ZBYT DUŻY.
6. W celu przywrócenia prawidłowego ciśnienia krwi, ponowne pomiary winny być wykonywane w odstępach 3 minut.
Jednak dla osόb cierpiących na miażdżycę, z powodu dużej utraty elastyczności naczyń krwionośnych, między pomiarami
wymagany jest większy odstęp czasu (10-15 minut). Dotyczy to również pacjentów z cukrzycą. Aby dokładniej określić
ciśnienie krwi, zaleca się wykonać serię 3 kolejnych pomiarów i wykorzystać średnią wartość wyników pomiaru.
ZASILANIE URZĄDZENIA
Instalacja baterii (rys. 2)
1. Otwórz pokrywę komory i włóż 4 baterie typu AAA zgodnie ze schematem, zamieszczonym w wewnętrznej części
komory. Upewnij się, że została zachowana właściwa biegunowość. Nie stosuj nadmiernej siły podczas otwierania
pokrywy komory.
2. Zamknij pokrywę komory baterii.
• Wymień wszystkie baterie, w przypadku gdy na wyświetlaczu ciągle pojawia się symbol wymiany baterii “ ”, lub
gdy nie wyświetla się nic. Wskaźnik wymiany baterii nie pokazuje poziomu ich rozładowania.
Baterie załączone do urządzenia służą do testowania poprawności jego działania przy sprzedaży, a okres ich żywotności może
być o wiele krótszy, aniżeli baterii zalecanych do stosowania.
• Dokonując wymiany baterii, należy wymienić je wszystkie równocześnie. Nie wskazane jest stosowanie baterii
używanych.
• Jeżeli urządzenie nie jest używane przez dłuższy czas, należy wyjąć z niego baterie.
• Nie zostawiaj zużytych baterii w urządzeniu.
Eksploatacja urządzenia zasilanego zasilaczem
Zasilacz sieciowy w komplecie z ciśnieniomierzem. Należy stosować zasilacz (model LD-N063, dla LD-521A, LD-521U w
zestawie) o następujących danych technicznych.
Napięcie wyjściowe : 5В ± 5%
Prąd obciążenia : nie mniej niż 500 mA
Rodzaj złącza : mikro-USB
Gniazdko dla zasilacza stabilizowanego znajduje się po prawej stronie urządzenia.
W celu korzystania z ciśnieniomierza zasilanego zasilaczem należy podłączyć złącze zasilacza do urządzenia, włożyć
wtyczkę do gniazdka i nacisnąć przycisk .
Po zakończeniu pomiaru, urządzenie należy wyłączyć naciskając przycisk
, wyjąć wtyczkę z gniazdka i odłączyć zasilacz
od urządzenia.
PRAWIDŁOWA POSTAWA PODCZAS POMIARU (rys. 3)
1. Usiądź tak, aby podczas pomiaru ciśnienia krwi Twoja ręka leżała na powierzchni stołu. Upewnij się, że miejsce założenia
mankietu znajduje się na tej samej wysokości co serce, że przedramię swobodnie leży na stole i nie rusza się.
2. Można mierzyć ciśnienie i w pozycji leżącej na plecach. Patrząc na sufi t, zachowaj spokój i nie ruszaj się w trakcie
pomiaru. Upewnij się, że miejsce pomiaru na ramieniu znajduje się na poziomie serca.
PRZYGOTOWANIE MANKIETU (rys. 4)
1. Wsuń krawędź mankietu w metalowy pierścień na około 5 cm, jak pokazano na rysunku.
2. Załóż mankiet na lewą rękę, rurka powinna być skierowana w stronę dłoni. W przypadku gdy pomiar na lewej ręce jest
utrudniony, można przeprowadzić pomiar na prawej ręce. W tym przypadku należy pamiętać, że wyniki mogą się różnić
o 5-10 mmHg.
3. Owinąć mankiet wokół ramienia tak, aby dolna krawędź mankietu znajdowała się w odległości 2-3 cm od zgięcia
łokciowego. Etykieta z napisem “ARTERY” powinny znajdować się nad tętnicą.
4. Zapiąć mankiet tak, aby ciasno przylegał do ramienia, ale go nie ściskał. Zbyt ciasne lub odwrotnie, zbyt luźne umiesz-
czenie mankietu może prowadzić do niedokładnych odczytów.
5. Na zapiętym mankiecie znaczek “INDEX” powinien wskazywać na obszar “NORMAL”. Oznacza to, że mankiet jest
dopasowany prawidłowo i odpowiada rozmiarowi obwodu ramienia. Jeżeli strzałka wskazuje na obszar “
”, oznacza
to, że mankiet jest za mały i wyniki będą zawyżone. Jeżeli strzałka wskazuje na obszar “
” oznacza to, że mankiet jest
za duży i wyniki będą zaniżone.
6. W przypadku, gdy ręka ma wyrażoną stożkowatość, zaleca się spiralne zakładanie mankietu, jak pokazano na rysunku.
7. Podwinięte rękawy nie mogą uciskać ramienia, gdyż może to zmniejszyć przepływ krwi, a odczyty urządzenia mogą
być nieprawidłowe.
PROCEDURA POMIARU (rys.5)
1. Podłącz złącze mankietu do właściwego gniazda ciśnieniomierza.
Przed pomiarem rozluźnij się i weź 3-5 głębokich oddechów. Nie poruszaj się, nie naprężaj ręki i nic nie mów w czasie pomiaru.
2. Naciśnij przycisk .
3. Przez moment na wyświetlaczu zostaną wyświetlone wszystkie symbole (rys. 5.1), usłyszysz krótki sygnał, a urządze-
nie automatycznie zacznie pompować mankiet.
4. Po osiągnięciu wartości18-20 mmHg mankiet zacznie pompować powietrze, najpierw powoli, a następnie szybko.
Podczas pompowania zacznie migać znak pulsu “ ” (rys. 5.2). Algorytm Infl ation Measuring System (IMS) umożliwia
określenie ciśnienia skurczowego i rozkurczowego podczas pompowania.
ZE WZGLĘDU NA TO, ŻE CIŚNIENIE TĘTNICZE I PULS MIERZONE SĄ PODCZAS POMPOWANIA POWIETRZA DO MANKIETU,
STARAJ SIĘ NIE PORUSZAĆ RĘKĄ I NIE NAPINAĆ MIĘŚNI RĘKI.
5. Na końcu pomiaru pojawi się sygnał dźwiękowy, po czym urządzenie wypuści z mankietu całe powietrze, a na wyświe-
tlaczu pojawi się wynik pomiaru (rys. 5.3).
Migający na wyświetlaczu znak “ ”, informuje o nieregularnym rytmie serca. Pojawienie się wskaźnika arytmii
może być również spowodowane ruchem ciała w trakcie pomiaru. Jeżeli symbol “
” pojawia się okresowo, należy
skonsultować się z lekarzem.
Oprócz wartości ciśnienia w postaci liczbowej, wynik pomiaru wyświetla się również na wskaźniku nadciśnienia tętnicze-
go (rys.5.4). Wskaźnik nadciśnienia tętniczego - skala klasyfi kacji uzyskanej wartości ciśnienia krwi, która pozwala ocenić,
czy wyniki są zgodne z zaleceniami Światowej Organizacji Zdrowia. Skala, znajdująca się z lewej strony wyświetlacza,
umożliwia ocenę otrzymanych wartości zgodnie z następującą klasyfi kacją: ciśnienie normalne, podwyższone lub jeden
ze stopni nadciśnienia tętniczego.
6. Aby wyłączyć urządzenie, naciśnij przycisk
.
W CELU OTRZYMANIA DOKŁADNYCH WYNIKÓW NALEŻY ROBIĆ PRZERWY MIĘDZY POMIARAMI, ŻEBY PRZYWRÓCIĆ
KRĄŻENIE KRWI.
DANE W PAMIĘCI BĘDĄ ZACHOWANE NAWET PO WYJĘCIU BATERII Z URZĄDZENIA. ZACHOWANE W PAMIĘCI URZĄDZENIA
WYNIKI MOŻNA USUNĄĆ PO WYKONANIU CZYNNOŚCI OPISANYCH W ROZDZIALE «FUNKCJA PAMIĘCI».
Jeśli źródło zasilania nie zostało odłączone, a w ciągu 3 minut nie korzystano z urządzenia, wyłączy się ono automatycznie.
Wymuszone spuszczanie powietrza z mankietu
Jeżeli podczas pompowania mankietu zajdzie potrzeba szybkiego spuszczenia powietrza, należy wcisnąć przycisk .
Urządzenie szybko wypuści całe powietrze z mankietu i wyłączy się.
FUNKCJA PAMIĘCI (RYS.6)
1. Wyniki każdego pomiaru (ciśnienie, puls) automatycznie są zapisywane w pamięci urządzenia.
WYNIK POMIARU NIE ZOSTANIE ZAPISANY W PRZYPADKU POJAWIENIA SIĘ POWIADOMIENIA O BŁĘDZIE.
2. W pamięci urządzenia można zapisać maksymalnie 90 wyników pomiarów oraz średnią wartość ostatnich 3 wyników.
Kiedy liczba pomiarów przewyższa 90, najstarsze dane są automatycznie zamieniane na wyniki kolejnych pomiarów.
3. Zawartość pamięci urządzenia można wyświetlić, naciskając przycisk M. Po pierwszym naciśnięciu przycisku M na
ekranie pojawi się średnia wartość 3 ostatnich pomiarów zapisanych w pamięci urządzenia oznaczonych jako “MA”. Po
powtórnym naciśnięciu przycisku M na wyświetlaczu pojawi się wskaźnik «1» (numer komórki pamięci), po czym pojawi
się wynik ostatniego pomiaru.
Po każdym kolejnym naciśnięciu przycisku M, wskaźnik numeru komórki pamięci wzrośnie o jeden i na ekranie zostanie
wyświetlona zawartość danej komórki pamięci.
Czyszczenie pamięci urządzenia
W celu usunięcia z pamięci urządzenia wszystkich zapisanych w niej wyników pomiarów, należy nacisnąć przycisk M i
przytrzymać go przez ponad 5 sekund. Na wyświetlaczu pojawi się znak “Clr” i pamięć urządzenia zostanie wyczyszczona.
KOMUNIKATY O BŁĘDACH
SYMBOL PRAWDOPODOBNA PRZYCZYNA
SPOSOBY ROZWIĄZYWANIA
Źle założony mankiet lub trójnik węża powietrza
jest luźno wstawiony.
Pomiary nie mogły być wykonane ze względu na
ruchy ręką lub rozmowy w trakcie pomiaru.
Przy wyraźnych zaburzeniach rytmu serca, za-
awansowanej miażdżycy naczyń, słabej fali pulsu
pomiar ciśnienia tętniczego może być utrudniony.
Upewnij się, że mankiet został prawidłowo za-
łożony, a trójnik jest ciasno włożony i powtórz
całą procedurę pomiarów.
Powtórz pomiar, stosując się do wskazówek
zawartych w instrukcji obsługi.
W tych przypadkach należy skonsultować się z
dyplomowanym lekarzem odnośnie stosowania
urządzenia elektronicznego.
Rozładowane baterie Wymień wszystkie baterie na nowe
KONSERWACJA, PRZECHOWYWANIE, NAPRAWA I UTYLIZACJA
1. Urządzenie należy chronić przed wilgocią, bezpośrednim światłem słonecznym, wstrząsami i wibracjami. URZĄDZENIE
NIE JEST WODOODPORNE!
2. Nie przechowuj i nie używaj urządzenia w pobliżu grzejników i otwartego ognia.
3. Jeśli urządzenie przez dłuższy czas nie jest używane, należy wyjąć z niego baterie. Wyciek elektrolitu z baterii może
spowodować uszkodzenie urządzenia. BATERIE NALEŻY PRZECHOWYWAĆ W MIEJSCU NIEDOSTĘPNYM DLA DZIECI!
4. Nie zanieczyszczać urządzenia i chronic go przed kurzem. Do czyszczenia urządzenia można używać wyłącznie suchej,
miękkiej szmatki.
5. Nie dopuszczać do kontaktu urządzenia i jego części z wodą, rozpuszczalnikami, alkoholem, benzyną.
6. Chroń mankiet przed ostrymi przedmiotami i nie próbuj go ciągnąć ani przekręcać.
7. Nie narażaj urządzenia na silne wstrząsy i nie rzucaj nim.
8. Urządzenie nie zawiera elementów ustawienia dokładności pomiaru. Zabrania się samoczynie otwierać blok elektro-
niczny. W razie potrzeby należy wykonać naprawę tylko w wyspecjalizowanych punktach serwisowych.
9. Utylizacji należy dokonywać zgodnie z lokalnie obowiązującymi przepisami. Specjalne warunki utylizacji nie zostały
ustalone przez producenta.
10. Mankiet jest odporny na wielokrotną sanityzację. Dopuszcza się czyszczenie wewnętrznej strony powłoki mankietu
(która ma kontakt z ręką pacjenta) wacikiem nasączonym 3 % roztworem nadtlenku wodoru. Długotrwałe stosowanie
może spowodować częściowe odbarwienia mankietu. Nie wolno go prać oraz prasować.
MOŻLIWE PROBLEMY
PROBLEM MOŻLIWA PRZYCZYNA ROZWIĄZANIE
Po naciśnięciu przycisku
brak obrazu na wyświetlaczu
Rozładowane baterie.
Nie została zachowana prawidłowa
polaryzacja baterii.
Styki baterii są zabrudzone.
Wymień wszystkie baterie na nowe.
Włóż baterie prawidłowo.
Przetrzyj styki suchą ściereczką.
Ciśnienie krwi za każdym
razem jest inne.
Wartości pomiarów są za
niskie (wysokie).
Czy mankiet znajduje się na poziomie
serca?
Czy mankiet został prawidłowo
założony?
Czy ręka nie jest napięta?
Być może rozmawiałeś lub ruszałeś ręką
podczas pomiaru.
Przyjmij odpowiednią pozycję do
pomiaru.
Poprawnie załóż mankiet.
Zrelaksuj się przed pomiarem.
Podczas pomiaru należy zachować ciszę
i spokój.
Tętno jest zbyt wysokie (lub
zbyt niskie).
Być może rozmawiałeś lub ruszałeś ręką
podczas pomiaru.
Pomiar wykonano bezpośrednio po
wysiłku fi zycznym?
Podczas pomiaru należy zachować ciszę
i spokój.
Powtórz pomiar po 5 minutach.
Samodzielne wyłączanie
zasilania.
Działa system automatycznego wyłącza-
nia zasilania.
To nie jest usterka. Urządzenie wyłącza
się automatycznie po 3 minutach od
ostatniego pomiaru.
DANE TECHNICZNE
Metoda pomiaru
oscylometryczna
Wyświetlacz ciekłokrystaliczny
Zakres pomiaru ciśnienia w mankiecie, mmHg od 0 do 300
Zakres pomiaru:
ciśnienie w mankiecie, mmHg
częstotliwości pulsu, 1/min
od 40 do 260
od 40 do 160
Granica błędu pomiaru ciśnienia powietrza w
mankiecie kompresyjnym, mmHg ±3
Granica błędu pomiaru częstotliwości pulsu, % ±5
Pompowanie automatyczne (pompa powietrzna)
Spuszczanie powietrza automatyczne
Pamięć 90 pomiarów + wartość średnia z ostatnich 3 pomiarów dla
każdego bloku pamięci
Rozmiar mankietu
Mankiet w uniwersalnym rozmiarze (obwód ramienia 22-42 cm)
Typ gniazda zasilania USB micro-USB
Zasilanie elektryczne, B 4x1.5V (AАА) lub DC 5В/500mA
Zasilacz LD-N063 (dla LD -521A, LD-521U w zestawie)
Napięcie wyjściowe, В
Maksymalny prąd obciążenia
Napięcie wejściowe
5 ± 5%
nie mniej niż 500 mA
~100-240 V, 50/60 Hz
Warunki eksploatacji:
temperatura, °C
wilgotność względna, % Rh
ciśnienie atmosferyczne, kPa
Od 10 do 40
15 - 85
86 - 106
Warunki przechowywania i transportu:
temperatura, °C
wilgotność względna, % Rh
ciśnienie atmosferyczne, kPa
od 20 do 50
85 i mniej
50 - 106
Wymiary gabarytowe:
Wymiary (blok elektroniczny), mm
waga (bez opakowania, baterii i zasilacza), g
87 x 116 x 49
195
Rok produkcji Rok i miesiąc produkcji oznaczono w numerze seryjnym po
symbolu «А». Numer seryjny podano na obudowie w dolnej
części korpusu urządzenia.
Interfejs danych USB (LD-521U) Interfejs USB jest przeznaczony do:
1) transferu wyników pomiaru do komputera osobistego
2) przesyłania do urządzenia komendy START / STOP z poziomu
komputera osobistego
3) zasilania urządzenia
Uwaga: Tego interfejsu nie można używać do wprowadzania
zmian w algorytmie pomiarowym
OBJAŚNIENIA ZNAKÓW:
Zgodność z Dyrektywą 93/42/EEC
Uwaga: Przeczytaj instrukcję
Przedstawicielstwo w UE
Producent
Przechowywać z dala od wilgoci
Klasa ochrony II
Produkt typu BF
Warunki przechowywania, transportu i
użytkowania
Numer seryjny
Algorytm Infl ation Measuring System (IMS) umożliwia określenie ciśnienia skurczowego i rozkurczowego
podczas pompowania.
Fuzzy Algorithm – algorytm przetwarzania danych pomiarowych, który pozwala dokładniej odzwierciedlić
specyfi kę pracy ludzkiego serca, co zapewnia wyższą dokładność danych.
Dane techniczne mogą ulec zmianie bez powiadomienia w celu poprawy właściwości użytkowych i jakości produktu.
Produkcja jest certyfi kowana według międzynarodowego standardu ISO 13485. Urządzenie jest zgodne z Europejską dyrek-
tywą MDD 93/42/EEC, z międzynarodowymi standardami EISO 15223-1, EN1041, IEС 60601-1, IEС 60601-1-2, ISO 14971.
WARUNKI GWARANCJI
Na sprzęt LD jest ustalony okres gwarancji, który określono w karcie gwarancyjnej produktu.
Zobowiązania gwarancyjne
potwierdzone są kartą gwarancyjną, otrzymywaną przez nabywcę przy zakupie urządzenia. Na akcesoria, wchodzące w skład
zestawu, których żywotność zależy od intensywności użytkowania (materiały eksploatacyjne typu mankiety, przewody do
mankietów, gruszki pompujące itp.), udziela się 12-miesięcznej gwarancji od daty zakupu.
Wykonywane jest pod nadzorem i dla Little Doctor International (S) Pte. Ltd. (7500A BEACH ROAD #11-313 THE PLAZA
SINGAPORE 199591, Singapore. Adres pocztowy: Yishun Central P.O. Box 9293 Singapore 917699).
Producent: Little Doctor Electronic (Nantong) Co. Ltd. (No.8, Tongxing Road Economic & Technical Development Area, 226010
Nantong, Jiangsu, People’s Republic of China).
Dystrybutor w Unii Europejskiej: Little Doctor Europe Sp. z o. o. (ul. Zawiła 57G, 30-390 Kraków Polska, tel.: +48 12 2684746,
12 2684747, fax: +48 12 268 47 53, e-mail: biuro@littledoctor.pl).
Więcej informacji można znaleźć na stronie www.littledoctor.pl
HU
ELEMEK ÉS ÖSSZETEVŐK MEGNEVEZÉSEI
(1. ábra)
7
USB tápkábel (az LD-521 és LD-521U modellek
készleteinek tartozékaként szállítandó)
1
Elektronikus egység
8
LD-N063 elektromos tápegység (az LD-521A és LD-521U
modellek készleteinek tartozékaként szállítandó)
2
Folyadékkristályos (LCD) kijelző
9
Micro-USB csatlakozó az elektromos tápegység
csatlakozásához
3
Mandzsetta csatlakozója
10
gomb (Start/stop)
4
Mandzsetta dugója
11
M gomb (Memória)
5
Légtömlő
12
Alkáli elemek
6
Mandzsetta (üzemelő rész)
13
Használati útmutató garancia kártyával
ÁLTALÁNOS TUDNIVALÓK
Az útmutató célja az, hogy segítse a felhasználót az LD digitális vérnyomás- és pulzusmérő biztonságos és hatékony hasz-
nálatában (LD-521, LD-521A, LD-521U kivitelben) (továbbiakban: készülék). A készüléket a jelen használati útmutatóban
meghatározott szabályoknak megfelelően kell használni, semmilyen más, az itt leírtaktól eltérő célokra a készülék nem
használható. A használati útmutatót fontos teljes egészében elolvasni és megérteni, különösen pedig az “Ajánlatok a
helyes méréshez” című részt.
HASZNÁLATI JAVALLATOK
A készülék a szisztolés és a diasztolés vérnyomás mérésére és a pulzusszám meghatározására van tervezve a 15 éves vagy
annál idősebb pácienseknél. A készülék használata ajánlatos otthoni körülmények között a labilis (időszakos) vérnyomás-
sal rendelkező vagy ismert artériás hipertóniában szenvedő betegek esetében mint az orvosi felügyelet kiegészítője.
MŰKÖDÉSI ELV
A készülék oszcillometriás vérnyomásmérési módszert alkalmaz a vérnyomás és a pulzusszám méréséhez.
A mandzsetta körbe tekeri a felkart és automatikusan felpumpálódik. A készülék érzékelő eleme észleli a mandzsettában
lévő gyenge hullámokat, amelyek a kar artériájának tágulása és összehúzódása által minden egyes szívverés hatására
keletkeznek. A keletkezett nyomáshullám amplitúdója meg lesz mérve, higanymilliméterbe lesz átszámolva, és az
értéke szám formájában megjelenik a kijelzőn. A mérési eredmények tárolásához a készülék memóriája 90 tárhellyel
rendelkezik. Felhívjuk a fi gyelmét arra, hogy a készülék nem fogja biztosítani a meghatározott mérési pontosságot, ha
a használati útmutató Műszaki jellemzők című részében megadott hőmérséklet vagy páratartalom eltérő értékei mellet
használják vagy tárolják. Figyelmeztetjük azokra az esetleges hibákra, amelyek a jelen készülék általi súlyos aritmiában
szenvedő embereknél való vérnyomásmérésnél keletkezhetnek. Konzultáljon orvosával a gyermek vérnyomásának
mérésével kapcsolatban.
A feltételezett felhasználó a beteg. Azoknak a betegeknek, akik szívritmuszavarban, cukorbetegségben, szív- és érrend-
szeri betegségekben szenvednek, illetve szélütést kaptak, konzultálniuk kell az orvossal a készülék használata előtt.
FONTOSABB HASZNÁLATI UTASÍTÁSOK
• A beteg általi használatnál ne végezze a mandzsetta műszaki karbantartását.
• Ne használja a készüléket más orvosi elektromos felszerelésekkel egyidejűleg.
Ne használja a készüléket olyan helyen, ahol nagyfrekvenciás sebészeti berendezés, MRI vagy CT készülék található,
valamint ne használja oxigéndús környezetben.
• Ne használjon mobiltelefont vagy más olyan eszközt, amely elektromágneses mezőt hoz létre a készülék közelében. Ez a
készülék meghibásodásához vezethet.
• Soha ne használjon más gyártók bármilyen tartozékait vagy alkatrészeit. Az ilyen tartozékok vagy alkatrészek használa-
ta veszélyes helyzetet okozhat a felhasználó számára, valamint a készülék károsodásához vezethet.
• A gyártó engedélye nélkül ne végezzen módosítást a berendezésben.
JAVASLATOK A HELYES MÉRÉSHEZ
1. A helyes méréshez tudni kell, hogy a VÉRNYOMÁS RÖVID IDŐN BELÜL IS JELENTŐS INGADOZÁSOKAT MUTATHAT. A vérnyo-
másszint számos tényezőtől függ. Nyáron rendszerint alacsonyabb és télen magasabb. A vérnyomás a légköri nyomás függ-
vényében változik, függ a fi zikai megterheléstől, az érzelmi izgatottságtól, a stressztól és az étrendtől. Nagyon befolyásolják
a szedett gyógyszerek, az alkoholtartalmú italok fogyasztása és a dohányzás. Számos esetben a klinikai nyomás mérésére
szolgáló eljárás is növeli a vényomást. Ezért az otthon mért vérnyomás gyakran eltér a klinikán mért vérnyomástól. Mivel a
vérnyomás alacsony hőmérsékleten emelkedik, ezért a mérést szobahőmérsékleten (kb. 20 °C) kell végezni. Ha a készüléket
alacsony hőmérsékleten tárolták, használat előtt, szobahőmérsékleten legalább 1 órát kell tartani, különben a mérési
eredmény hibás lesz. A nap folyamán az egészséges emberek szisztolés (felső) nyomásingadozása lehet 30-50 mmHg és
diasztolés (alacsonyabb) nyomásingadozása legfeljebb 10 mmHg. A vérnyomás függése különböző tényezőkön alapul és
minden ember számára egyedi. Ezért ajánlatos egy speciális naplót tartani a vérnyomásmérésről. A NAPLÓ ALAPJÁN CSAK A
SZAKKÉPZETT ORVOS TUDJA ELEMEZNI A VÉRNYOMÁS VÁLTOZÁSÁNAK TENDENCIÁJÁT.
2. Kardiovaszkuláris betegségekben és számos egyéb betegségekben, ahol az artériás nyomás monitorozására van szükség,
a kezelőorvosa által meghatározott időben végezze a méréseket. NE FELEDJE, HOGY A DIAGNOSZTIKA ÉS HYPERTENZIÓS BE-
TEGSÉGEK KEZELÉSE CSAK A SZAKKÉPZETT ORVOS ÁLTAL VÉGZETT VÉRNYOMÁSMÉRÉSEK ALAPJÁN TÖRTÉNIK. A GYÓGYSZEREK
ADAGJÁNAK BEVÉTELÉT VAGY MÓDOSíTÁSÁT CSAK A KEZELŐORVOS ÁLTAL ELŐÍRT MÓDON SZABAD ELVÉGEZNI.
3. Az olyan rendellenességek, mint a mély vaszkuláris szklérózis (érelmeszedés), a gyenge pulzushullám, valamint a
súlyos szívritmuszavarban szenvedő betegeknél, nehéz lehet a vérnyomás pontos mérése. EZEKBEN AZ ESETEKBEN KÉRJE A
SZAKKÉPZETT ORVOS TANÁCSÁT, AKI AZ ELEKTRONIKUS KÉSZÜLÉK ALKALMAZÁSÁHOZ ÉRT.
4. HOGY AZ ELEKTRONIKUS KÉSZÜLÉK A VÉRNYOMÁST HELYESEN LEOLVASHASSA, A MÉRÉS KÖZBEN SZÜKSÉGES BETARTANI
A CSENDET. A vérnyomásmérést szobahőmérsékleten nyugodt, kényelmes környezetben kell elvégezni. Egy órával a mérés
előtt szükséges mellőzni az étel bevitelét, 1,5-2 órával előtte a dohányzást, az üdítő- és az alkoholos italok fogyasztását.
5. A vérnyomásmérés pontossága attól függ, hogy a készülék mandzsettája megfelel-e a karja méretének. A MANDZSETTA
NEM LEHET KICSI, VAGY NAGY.
6. Az ismételt méréseket 3 perces szünetekkel kell elvégezni, hogy a vérkeringés helyreálljon. Azonban a súlyos
ateroszklerózisban szenvedő személyek a vascularis rugalmasság jelentős csökkenése miatt hosszabb időintervallumot igé-
nyelnek a mérések között (10-15 perc). Ez a cukorbetegek esetében is érvényes. A vérnyomás pontosabb meghatározásához
ajánlott 3 egymást követő méréssorozatot készíteni és a mérési eredmények átlagértékét használni.
A KÉSZÜLÉK TÁPELLÁTÁSA
Az elemek behelyezése (2. Ábra)
1. Nyissa meg az elemtartó rekesz fedelét és helyezze be a négy AAA alkáli elemet a rekesz belsejében található sémának
megfelelően. Győződjön meg arról, hogy a polaritás megfelelő. Az elemtartó rekesz fedelének levételekor ne használjon
túlzott erőt.
2. Zárja be az elemtartó rekesz fedelét.
• Abban az esetben, ha a kijelzőn folyamatosan megjelenik az elemek cseréjének szükségességére utaló “
” jelzés,
vagy ha a kijelzőn nincs semmilyen jelzés, cserélje ki az összes elemet. Az elemcsere szükségességére utaló jelzés nem
mutatja az elemek lemerülésének mértékét.
A készlethez tartozó elemek rendeltetése – a készülék működőképességének ellenőrzése az eladás pillanatában, élettartamuk
rövidebb lehet, mint a használathoz ajánlott elemeké.
• Az elemek cseréjénél cserélje ki az összes elemet egyidejűleg. Ne használjon régebben már használt elemeket.
• Ha a készüléket hosszabb ideig nem használja, a készülékből vegye ki az összes elemet.
• Ne hagyjon lejárt élettartamú elemeket a készülékben.
A készülék hálózati tápegységgel való használata
A váltakozó feszültségű adapter a vérnyomásmérő részeként szerepel. A lent meghatározott műszaki jellemzőkkel ren-
delkező tápegység használata szükséges (LD-N063 modell, az LD-521A és LD-521U modellek készleteinek tartozékaként
szállítandó)
Kimeneti feszültség : 5V ± 5%
Terhelési áram : legalább 500 mА
Dugó típusa : Micro-USB
A stabilizált tápegység csatlakozási helye a készülék jobb oldalán található.
Az elektromos hálózat energiájának felhasználásához csatlakoztassa a hálózati tápegység dugóját a készülékhez, dugja
be a tápegység dugóját egy hálózati csatlakozóaljzatba, és nyomja meg a
gombot.
A mérés befejezése után a
gomb megnyomásával kapcsolja ki a készüléket, húzza ki a tápegység dugóját a hálózati
csatlakozóaljzatból és csatlakoztassa szét a tápegységet és a készüléket
.
HELYES TESTTARTÁS A MÉRÉS ALATT (3. ábra)
1. Üljön az astalhoz úgy, hogy a vérnyomásmérés során a karja az asztal felületén legyen. Győződjön meg arról, hogy a
mandzsetta körülbelül a szíve magasságában van, és az alkar szabadon fekszik az asztalon, és nem mozog.
2. Vérnyomást mérhet hanyatt fekve is. Nézzen a plafon felé, nyugodjon meg és ne mozogjon a mérés időtartama alatt.
Győződjön meg arról, hogy a felkaron levő mérési hely kb. a szívével egyvonalban van.
MANDZSETTA ELŐKÉSZÍTÉSE (4. ábra)
1. Húzza a mandzsetta szélét kb. 5 cm-re a fémgyűrűbe, ahogy az ábra is mutatja.
2. Helyezze a mandzsettát a bal karjára, a csövet ilyenkor a tenyér felé kell iranyítani. Ha a mérés a bal karján nehezen
megoldható, akkor használja a jobb karját. Ebben az esetben nem szabad elfelejteni, hogy a mérések 5-10 Hgmm-rel
eltérhetnek.
3. A mandzsettát tekerje a karja körül, hogy a mandzsetta alsó széle 2-3 cm-re legyen a könyökétől. Az „ARTERY“ feliratú
címke a kar arteriája fölött legyen.
4. Rögzítse a mandzsettát úgy, hogy az szorosan álljon a karján, de ne szorítsa meg túlságosan. Túl szoros vagy fordítva, a
túl laza mandzsetta elhelyezése pontatlan mérésekhez vezethet.
55. A rögzített mendzsettán az „INDEX“ jelzés a „NORMAL“ területet jelöli. Ez azt jelenti, hogy a mandzsetta megfelelően
van megválasztva, és megfelel a felkarl kerülete méretének. Ha a jel a « » jelzésű területet jelöli, akkor a mandzsetta
kicsi, és a mérés eredmény magasabb lesz. Ha a címke a «
» jelzésű területet jelöli, akkor a mandzsetta nagy, és a
mérési eredmény kisebb lesz.
6. Ha a kar kifejezetten kúpos alakú, akkor a mandzsettát ajánlatos spirális alakban felhelyezni , ahogy az ábra is mutatja.
7. Ha feltűri a ruha ujját és így szorítja a karját, akadályozva a vér szabad áramlását, a készülék mérés értéke nem
feltétlenül fog megfelelni a vérnyomásának.
MÉRÉSI ELJÁRÁS (5. ábra)
1. Dugja be a mandzsetta dugóját a készüléken található mandzsetta csatlakozásának helyébe. Mérés előtt 3-5 mélyen
lélegezzen be és ki, lazítsa el magát. A mérés során ne mozogjon, ne beszéljen, és ne feszítse meg a kezét.
2. Nyomja meg a gombot.
3. A kijelző képernyőjén rövid időre megjelenik az összes szimbólum (5.1. ábra), egy rövid hangjelzés lesz halható, és
megkezdődik a levegő gyors felpumpálása a mandzsettába.
4. A 18-20 mmHg mérési szint elérése után a mandzsetta először lassan, majd gyorsan kezd felpumpálódni. A felpumpá-
lás során a pulzus piktogramja elkezd villogni. (5.2. ábra). Az Infl ation Measuring System (IMS) algoritmus lehetővé
teszi a szisztolés és a diasztolés vérnyomás megállapítását felpumpálás közben.
MIVEL AZ ARTÉRIÁS VÉRNYOMÁS ÉS A PULZUSSZÁM MÉRÉSE A LEVEGŐ PUMPÁLÁSA KÖZBEN TÖRTÉNIK, PRÓBÁLJON
MOZDULATLAN ÁLLAPOTBAN MARADNI, MÉRÉS KÖZBEN NE MOZGASSA A KEZÉT ÉS NE FESZÍTSE MEG A KÉZ IZMAIT.
5. A mérés végén egy hangjelzés hallható, amely után a készülék kiereszti az összes levegőt a mandzsettából, és a kijelzőn
megjelenik a mérési eredmény (5.3 ábra). A kijelző képernyőjén megjelenő villogó piktogram a szabálytalan
szívverést jelzi. Az aritmia jelzésének megjelenése a test mérés közbeni mozgása is okozhatja. A
jelzés időszakos
megjelenésénél forduljon az orvosához.
A nyomás numerikus értékén kívül az eredmény a hipertónia indikátor is megjelenik (5.4. ábra). A hipertónia indikátor
a vérnyomás kapott értékének osztályozási skálája az Egészségügyi Világszervezet ajánlása szerint. A kijelző bal oldalán
található skála lehetővé teszi a kapott számok következő osztályozás szerinti értékelését: normális vérnyomás, magas
vérnyomás, vagy azt, hogy az artériás hipertónia egyik fokozatával állunk szemben.
6. Leállításhoz nyomja meg a
gombot.
A PONTOS EREDMÉNY ELÉRÉSE CÉLJÁBÓL A VÉRKERINGÉS HELYREÁLLÍTÁSÁHOZ SZÜKSÉGES A MÉRÉSEK KÖZÖTTI SZÜNET.
A MEMÓRIA ADATAINAK MENTÉSE MÉG A KÉSZÜLÉK ELEMEK NÉLKÜLI TÁROLÁSÁNÁL IS MEGTÖRTÉNIK. A KÉSZÜLÉKEN TÁ-
ROLT ADATOK TÖRLÉSE A “MEMÓRIA FUNKCIÓJA” CÍMŰ RÉSZBEN MEGHATÁROZOTT MŰVELETEK TELJESÍTÉSÉVEL LEHETSÉGES.
Ha az áramellátást nincs kikapcsolva, és a készüléket 3 percig nem használja, az automatikusan kikapcsolódik.


Alăturați-vă conversației despre acest produs
Aici puteți împărtăși ce părere aveți despre Little Doctor LD-521 Tensiometru. Dacă aveți o întrebare, citiți mai întâi cu atenție manualul. Solicitarea unui manual se poate face folosind formularul nostru de contact.
răspuns | A fost util (1) (Tradus de Google)