4 5
a
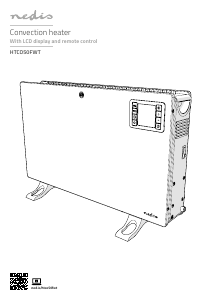
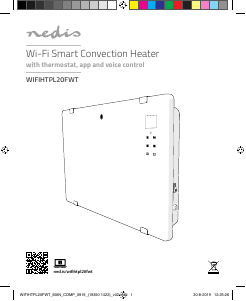
Quick start guide
Convection heater HTCO50FWT
For more information see the extended manual
online: ned.is/htco50fwt
Intended use
The Nedis HTCO50FWT is a heater that allows the user to control the
surrounding temperature.
This product is only suitable for well insulated spaces or occasional
use.
The product is intended for indoor use only.
Any modification of the product may have consequences for safety,
warranty and proper functioning.
Specications
Product Convection heater
Article number HTCO50FWT
Dimensions (l x w x h) 590 x 410 x 210 mm
Weight 3.1 kg
Input power 220 – 240 VAC ; 50 – 60 Hz
Power 1800 – 2000 W
Battery type CR2032
Heat output
Nominal heat output 2.0 kW
Minimum heat output 0.75 kW
Maximum continuous heat
output
2.0 kW
Auxiliary electricity consumption
At nominal heat output 2.0 kW
At minimum heat output 0.75 kW
In standby mode 0.001 kW
Type of heat output Electronic room temperature
control with:
day timer
working time limitation
black bulb sensor
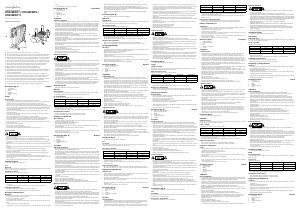
Main parts (image A)
Handle
Display
Mode button
Fan button
Measurement unit button
Temperature up button
Receiver
Temperature down button
On/off button
Timer button
Transmitter
Battery compartment
Convection heater
On/off switch
Power cable
Screw
Foot
Safety instructions
To avoid overheating, do not cover the product.
• Allow the product to cool down.
• If the power cable is damaged, it must be replaced by a special
cable or assembly available from the manufacturer or its service
agent.
• Unplug the product when not in use and before cleaning.
• Only handle the product with dry hands. Handling with wet
hands might cause an electric shock.
• Close supervision is necessary when the product is used by or
near children, animals or infirm persons.
• Do not use the product near explosive or flammable materials.
• Always unwind the power cable before using the product.
• Do not let the power cable touch hot surfaces.
• Only use the product in the upright position.
• Keep the air inlet grill clean.
• Do not use the product without the feet attached.
• Cleaning and user maintenance shall not be done by children
under the age of 8 and without supervision.
• Children of less than 3 years should be kept away unless
continuously supervised.
• Children aged from 3 years and less than 8 years shall only switch
on/off the product provided that it has been placed or installed
in its intended normal operating position and they have been
given supervision or instruction concerning use of the product in
a safe way and understand the hazards involved.
Installing the feet (image B)
1. Place the product upside down.
2. Place the feet A
i
on the product.
3. Align the holes in the feet with the holes in the bottom of the
product.
4. Attach the feet to the product with the screws A
u
using a
screwdriver.
5. Place the product upright.
Insert or change battery (image C)
1. Open the battery compartment A
e
.
2. Place the battery
3. Close A
e
.
Switching on the product
-
Do not use the product without the feet attached.
4
See “Installation” for instructions on how to attach the feet.
1. Plug the power cable A
y
into the power outlet.
2. Press the on/off switch A
t
to switch on the product.
The product is now in standby mode.
4
You hear a click when you switch on the product.
4
When the product is switched on (after a long period of time),
the product may emit some smell and fumes.
3. Press the on/off button A
9
to switch between standby and on.
4
You can control the product with the remote control and the
buttons on the side of the display.
4
The display A
2
switches on.
Display (image D)
The display shows the following:
Power setting
Fan mode
Anti-frost mode
Current room temperature
Measurement unit
Countdown timer
Set room temperature
4
The display shows the current room temperature when the
product is in standby mode.
Switching between power settings
1. Press mode button A
3
to switch between power settings.
Hot surfaces! Contact may result in severe burns.
-
WARNING
• Ensure you have fully read and understood the instructions in
this document before you install or use the product. Keep this
document for future reference.
• Only use the product as described in this document.
• Do not use the product if a part is damaged or defective. Replace
a damaged or defective product immediately.
• Do not drop the product and avoid bumping.
• This product may only be serviced by a qualified technician for
maintenance to reduce the risk of electric shock.
• Do not use the product where splashing of water might occur,
e.g. bathroom, swimming pool or close to a washbowl.
• Do not expose the product to water or moisture.
• Do not locate the product immediately below a power outlet.
• Unplug the product from the power source and other equipment
if problems occur.
• Do not unplug the product by pulling on the cable. Always grasp
the plug and pull.
• Do not dismantle, open or shred secondary cells or batteries.
• Do not expose cells or batteries to heat or fire. Avoid storage in
direct sunlight.
• Do not short-circuit a cell or a battery.
• Do not store cells or batteries haphazardly in a box or drawer
where they may short-circuit each other or be short-circuited by
other metal objects.
• Do not subject cells or batteries to mechanical shock.
• In the event of a cell leaking, do not allow the liquid to come in
contact with the skin or eyes. If contact has been made, wash the
affected area with copious amounts of water and seek medical
advice.
• Always purchase the battery recommended by the product
manufacturer for the product.
• Do not remove a cell or battery from its original packaging until
required for use.
• Do not use any cell or battery which is not designed for use with
the equipment.
• Use only the cell or battery in the application for which it was
intended.
• Do not mix cells of different manufacture, capacity, size or type
within a product.
• Wipe the cell or battery terminals with a clean dry cloth if they
become dirty.
• Battery usage by children should be supervised.
• Observe the plus (+) and minus (–) marks on the cell, battery and
equipment and ensure correct use.
• When possible, remove the battery from the product when not in
use.
• Properly dispose of the empty battery.
• Seek medical advice immediately if a cell or a battery has been
swallowed.
• Always keep button cell batteries, both full and empty, out of
reach of children to avoid the chance of swallowing. Dispose of
used batteries immediately and safely. Button cell batteries can
cause serious internal chemical burns in as little as two hours
when swallowed. Keep in mind that the first symptoms may look
like child diseases like coughing or drooling. Seek immediate
medical attention when you suspect that batteries have been
swallowed.
• Always use the voltage (A.C. Only) marked on the rating label.
• Before cleaning and maintenance, switch off the product and
disconnect the product from the power source.
2. Choose between:
• 750 W
• 1250 W
• 2000 W
• Anti-frost mode
4
D
1
shows the current heating level.
Anti-frost mode
• When the product is set to anti-frost mode, the product switches
on when the room temperature reaches below 5°C to avoid
freezing temperatures.
• If the room temperature reaches 9°C, the product switches back
to standby.
4
When anti-frost mode is activated, D
3
is visible on the display.
Setting the timer
1. Press the timer button A
q
to set a countdown timer.
2. Press A
q
to increase the timer with 1 hour.
4
The maximum countdown time is 24 hours.
3. Switch off the timer by pressing A
q
once more when the time
is set to maximum.
4
The timer is cancelled when the product is switched off.
4
The time starts counting down 5 seconds after you set the timer.
4
The product switches back to standby mode when the selected
time has expired.
4
D
6
shows the remaining time.
Setting the temperature
Press the temperature up and down buttons A68 to adjust the
set room temperature.
4
D
4
shows the current room temperature.
4
D
7
shows the set room temperature.
Setting the measurement unit
Press the measurement unit button A5 to switch between units.
4
Choose between °C or °F.
4
D
5
shows the current measurement unit.
Switching on/o the fan
1. Press the fan button A
4
to switch on the fan.
The fan mode indicator D2 on the display shows to indicate the
fan mode is activated.
2. Press A
4
to switch off the fan.
Switching o the product
1. Press A
9
to switch the product to standby mode.
2. Press A
t
to switch off the product.
3. Unplug A
y
from the power outlet.
c
Kurzanleitung
Konvektionsheizung HTCO50FWT
Weitere Informationen finden Sie in der
erweiterten Anleitung online: ned.is/htco50fwt
Bestimmungsgemäße Verwendung
Die Nedis HTCO50FWT ist eine Heizung, die dem Benutzer die
Kontrolle der Umgebungstemperatur ermöglicht.
Dieses Produkt ist nur für gut isolierte Räume oder für den
gelegentlichen Gebrauch geeignet.
Das Produkt ist nur zur Verwendung innerhalb von Gebäuden
gedacht.
Jegliche Modifikation des Produkts kann Folgen für die Sicherheit,
Garantie und ordnungsgemäße Funktionalität haben.


Alăturați-vă conversației despre acest produs
Aici puteți împărtăși ce părere aveți despre Nedis HTCO50FWT Radiator. Dacă aveți o întrebare, citiți mai întâi cu atenție manualul. Solicitarea unui manual se poate face folosind formularul nostru de contact.