0519
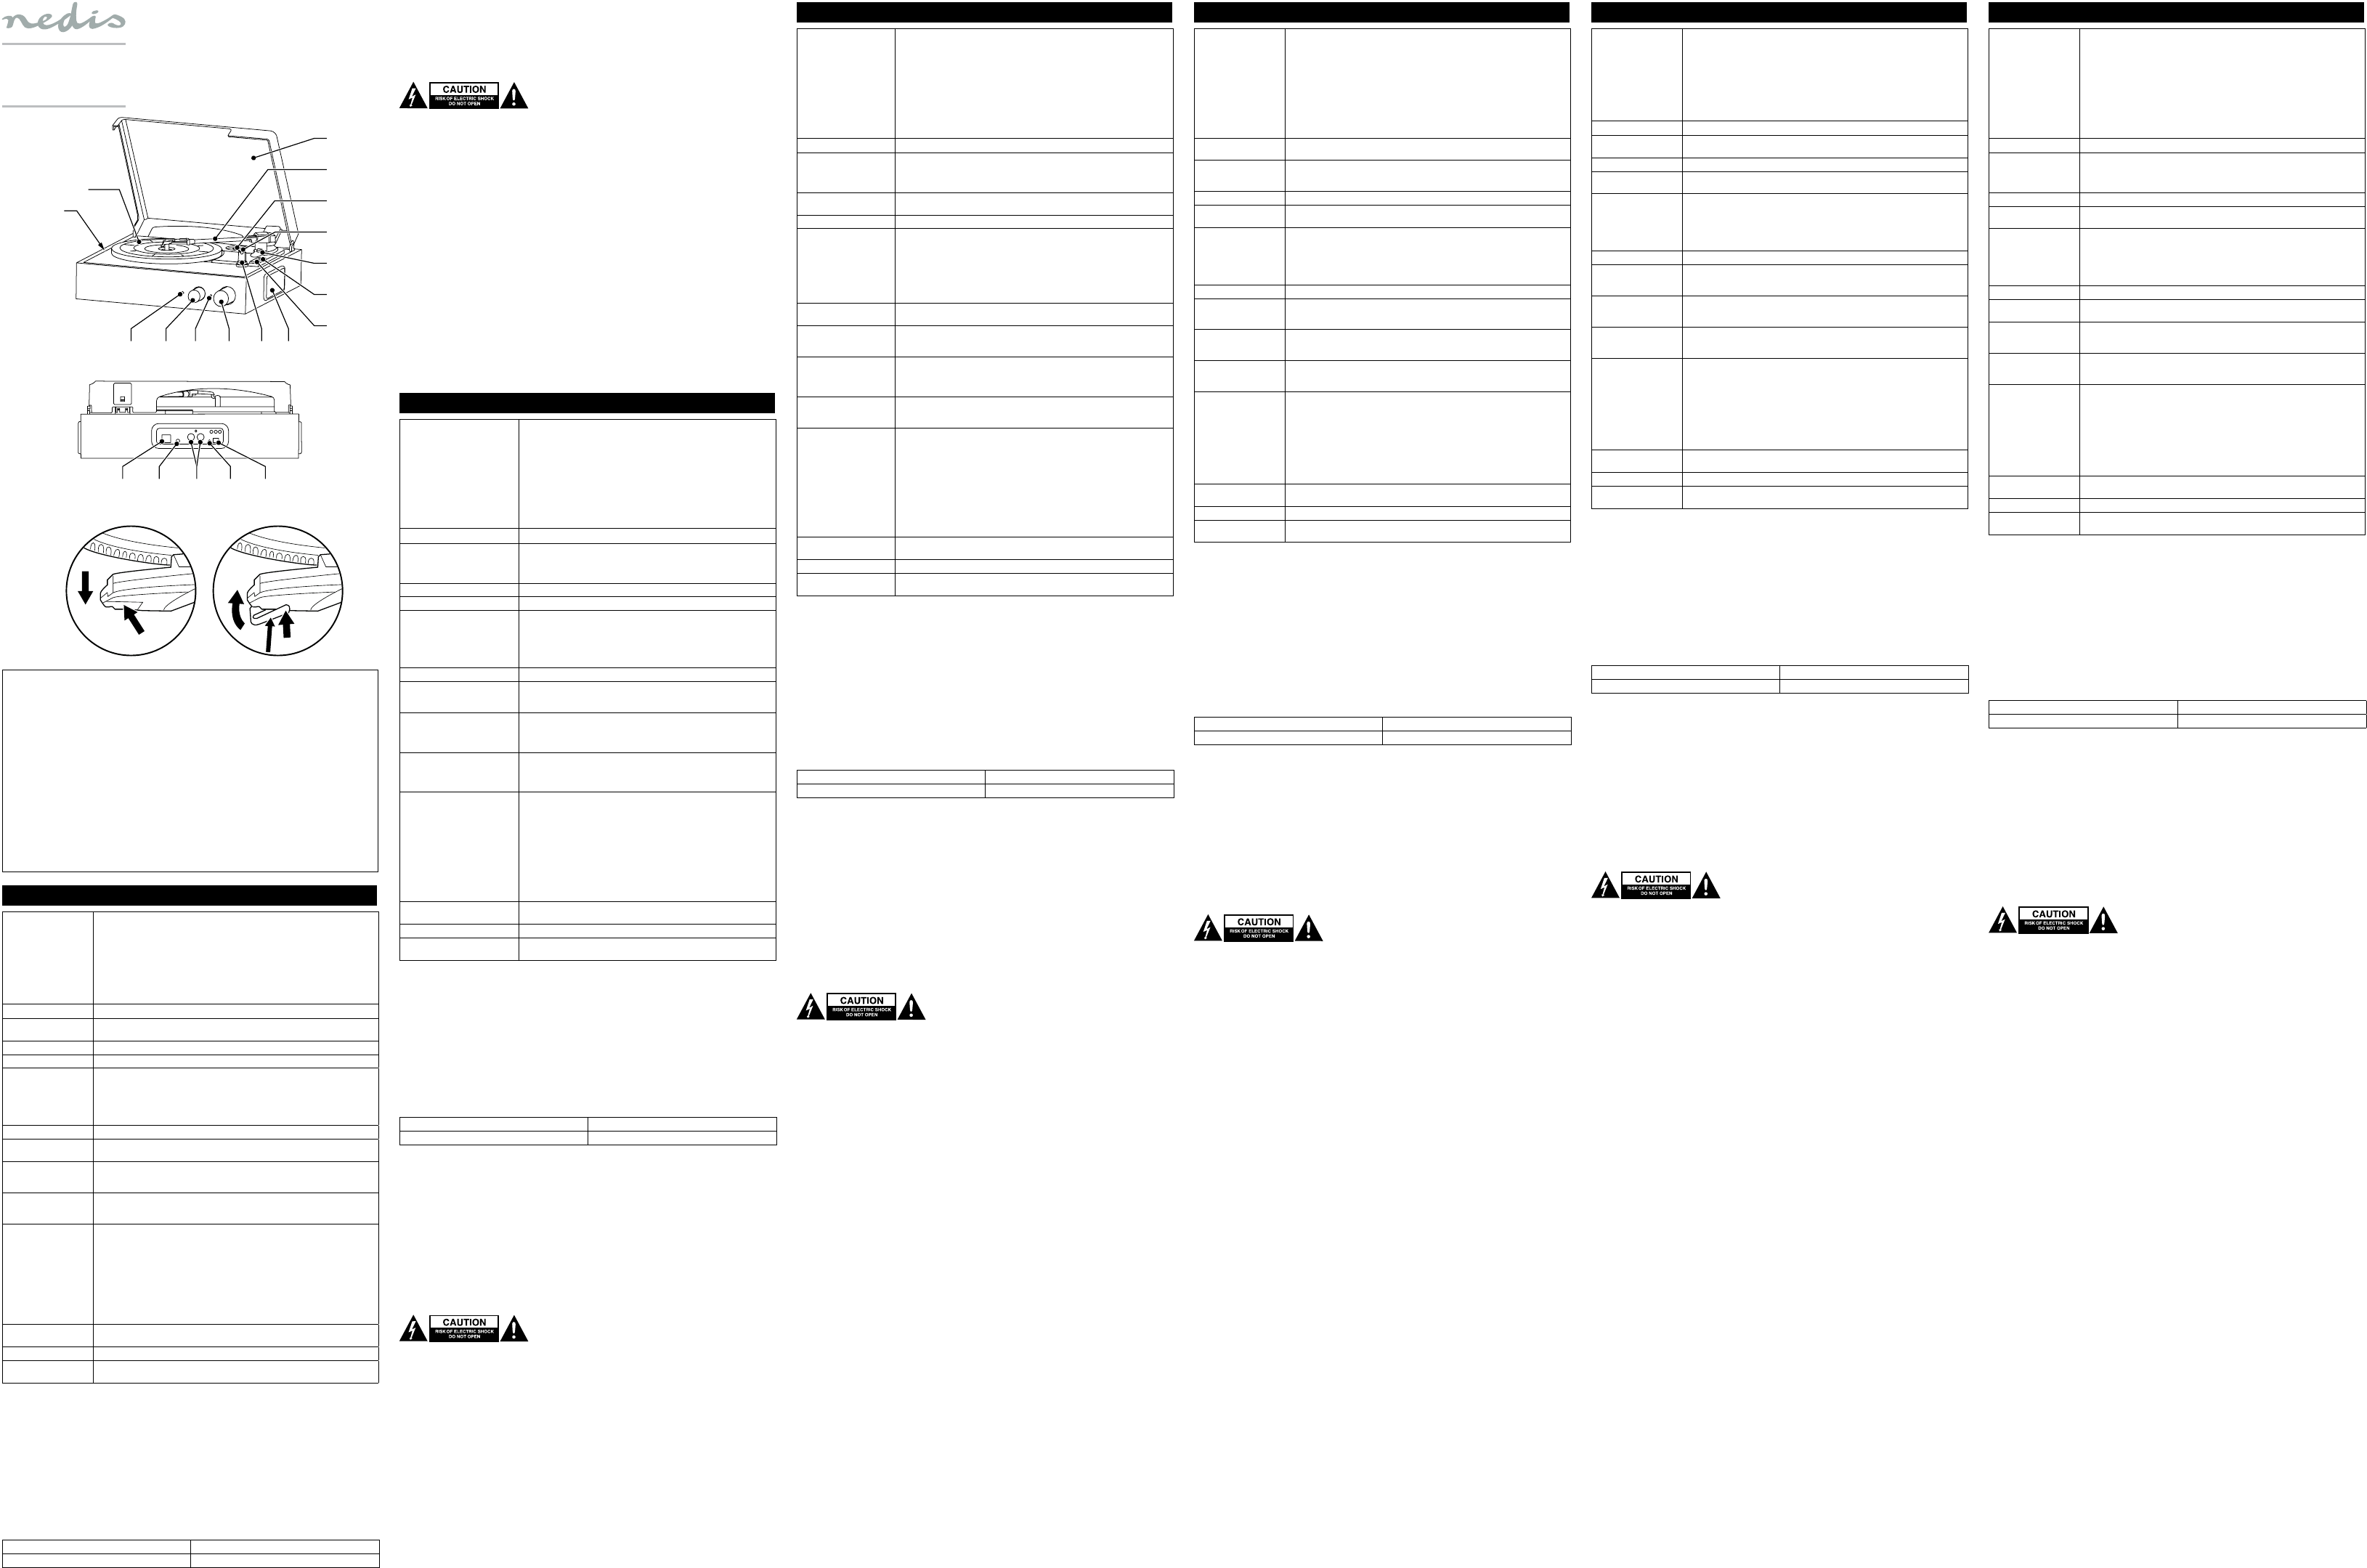
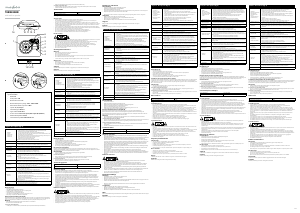
English - Description (g. A)
1. Turntable
2. Tonearm
3. Tonearm lifter
4. Tonearm rest
5. Tonearm lock
• Place the vinyl record onto the turntable.
• Remove the stylus cover by gently sliding the cover away from the tonearm.
• Push the tonearm lock aside to unlock the tonearm.
• Use the tonearm lifter to lift the tonearm or manually lift the tonearm.
• Place the tonearm onto the outer edge of the vinyl record. The turntable starts to rotate
and play the vinyl record automatically.
• Lift the tonearm. Place the tonearm into the tonearm rest.
• Engage the tonearm lock to lock the tonearm.
• Remove the vinyl record from the turntable.
Note: Before transport, make sure that the tonearm is locked.
6. 45rpm adapter • Use the 45rpm adapter to listen to the 45rpm vinyl records.
7. Automatic switch-o
• Set the switch to the "ON" position to enable the automatic switch-o function.
• Set the switch to the "OFF" position to disable the automatic switch-o function.
8. Speed selector • Use the speed selector to select the speed (33/45/78rpm).
9. Power indicator • The indicator lights red when the device is switched on.
10. On/o dial
Volume dial
On/o dial
• Turn the dial clockwise to the "ON" position to switch on the device.
• Turn the dial counterclockwise to the "OFF" position to switch o the device.
Volume dial
• Turn the dial clockwise to increase the volume.
• Turn the dial counterclockwise to decrease the volume.
11. Tone dial • Turn the dial clockwise or counterclockwise to adjust the tone.
12. Headphone jack
• Connect the headphones to the headphone jack.
Warning: Do not use headphones at high volume levels to prevent hearing damage.
13. RCA output
(red/white)
• To use an external amplier, connect the RCA cable to the RCA output of the device
and to the external amplier. Make sure that each plug of the RCA cable is connected
according to the corresponding colour (red/white).
14. AUX input
• To play audio les from an audio device, connect an AUX cable to the AUX input of the
device and to the audio device.
• Use the controls on the audio device to control the sound.
15. PC output (USB-B)
16. PC indicator
PC encoding function
• Install the PC recording software on the PC using the supplied CD-ROM.
• Connect an USB-B-to-USB cable to the PC output of the device and to the PC.
• To start recording, start the PC recording software. The PC indicator lights continously
during the recording process.
• To stop recording:
- Click the "Reserve" button in the PC recording software.
- Take one of the following actions:
(a) Stop the PC recording software
(b) Disconnect the USB-B-to-USB cable to the PC output of the device and the
PC.
17. DC input (5V)
• To power the device, connect the power adapter to the DC input of the device and to
the wall socket.
18. Speaker
19. Dust cover
• If you play vinyl records, open the dust cover.
• If you do not play vinyl records, close the dust cover.
Use
Replacing the turntable stylus (g. B)
The turntable stylus lasts for approximately 50hours under normal operation. It is recommended to replace the turntable
stylus as soon as you notice a change in the sound quality. The use of a worn-out turntable stylus can cause damage to the
vinyl records. 78rpm vinyl records will wear out the turntable stylus more quickly than 33/45rpm vinyl records.
Warning!
• Before replacing the turntable stylus, make sure that the device is switched o.
• Do not bend or touch the turntable stylus.
To remove the old turntable stylus:
• Carefully place a screwdriver at the tip of the turntable stylus and push the turntable stylus downward (A).
• Remove the old turntable stylus by pulling it down and forward simultaneously.
To install the new turntable stylus:
• Hold the turntable stylus at the front edge and insert the rear edge of the turntable stylus into the tonearm (B).
• Push the turntable stylus upward to lock it into position (C).
Technical data
Frequency range 2400-2483.5 MHz
Maximum transmission power 4 dBm
Safety
General safety
• Read the manual carefully before use. Keep the manual for future reference.
• The manufacturer is not liable for consequential damages or for damages to property or persons caused by non-
observance of the safety instructions and improper use of the device.
• The device can be used by children from 8 years and above and by persons with a physical, sensory, mental or motor
disability, or lack of experience and knowledge if they are supervised or instructed on how to use the device in a safe way
and understand the hazards involved. Children shall not play with the device. Cleaning and user maintenance shall not
be made by children without supervision.
• Only use the device for its intended purposes. Do not use the device for other purposes than described in the manual.
• Do not use the device if any part is damaged or defective. If the device is damaged or defective, replace the device immediately.
• The device is suitable for indoor use only. Do not use the device outdoors.
• The device is suitable for domestic use only. Do not use the device for commercial purposes.
• Do not use the device in locations with high humidity, such as bathrooms and swimming pools.
• Do not use the device near bathtubs, showers, basins or other vessels containing water.
Electrical safety
• To reduce risk of electric shock, this product should only be opened by an authorized technician when service is required.
• Disconnect the product from the mains and other equipment if a problem should occur.
• Do not use the device if the mains cable or mains plug is damaged or defective. If the mains cable or mains plug is
damaged or defective, it must be replaced by the manufacturer or an authorised repair agent.
• Before use, always check that the mains voltage is the same as the voltage on the rating plate of the device.
• Do not move the device by pulling the mains cable. Make sure that the mains cable cannot become entangled.
• Do not immerse the device, the mains cable or the mains plug in water or other liquids.
• Do not leave the device unattended while the mains plug is connected to the mains supply.
• Do not use an extension cable.
Cleaning and maintenance
Warning!
• Before cleaning or maintenance, always switch o the device.
• Do not use cleaning solvents or abrasives.
• Do not clean the inside of the device.
• Do not attempt to repair the device. If the device does not operate correctly, replace it with a new device.
• Do not immerse the device in water or other liquids.
• Clean the device using a soft, damp cloth. Thoroughly dry the device with a clean, dry cloth.
Vinyl records
• Hold vinyl records at the edges with clean hands.
• Do not touch the surface of vinyl records in order to maintain the sound quality.
• Do not touch the grooves of vinyl records.
• Store vinyl records upright and in their protective sleeve when not in use.
Support
If you need further help or have comments or suggestions please visit www.nedis.com/support
Contact
NEDIS B.V., De Tweeling 28, 5215 MC ‘s-Hertogenbosch, The Netherlands
Nederlands - Beschrijving (g. A)
1. Draaitafel
2. Toonarm
3. Toonarmhendel
4. Toonarmsteun
5. Toonarmvergrendeling
• Plaats de vinylplaat op de draaitafel.
• Verwijder het naaldkapje door de kap voorzichtig van de toonarm weg te
schuiven.
• Duw de toonarmvergrendeling opzij om de toonarm te ontgrendelen.
• Gebruik de toonarmhendel om de toonarm omhoog te brengen of breng de
toonarm handmatig omhoog.
• Plaats de toonarm op de buitenrand van de vinylplaat. De draaitafel begint te
draaien en de vinylplaat automatisch af te spelen.
• Breng de toonarm omhoog. Plaats de toonarm in de toonarmsteun.
• Gebruik de toonarmvergrendeling om de toonarm te vergrendelen.
• Verwijder de vinylplaat van de draaitafel.
Let op: Zorg er voor transport voor dat de toonarm is vergrendeld.
6. 45-toerenadapter • Gebruik de 45-toerenadapter om naar 45-toerenplaten te luisteren.
7. Automatisch uitschakelen
• Zet de schakelaar in de stand "ON" om de automatische uitschakelfunctie te
activeren.
• Zet de schakelaar in de stand "OFF" om de automatische uitschakelfunctie
te deactiveren.
8. Snelheidsregelaar • Gebruik de snelheidsregelaar om de snelheid te selecteren (33/45/78toeren).
9. Voedingsindicator • De indicator brandt rood wanneer het apparaat is ingeschakeld.
10. Aan/uit-knop
Volumeknop
Aan/uit-knop
• Draai de knop rechtsom naar de stand "ON" om het apparaat in te schakelen.
• Draai de knop linksom naar de stand "OFF" om het apparaat uit te schakelen.
Volumeknop
• Draai de knop rechtsom om het volume te verhogen.
• Draai de knop linksom om het volume te verlagen.
11. Toonknop • Draai de knop rechtsom of linksom om de toon af te stellen.
12. Hoofdtelefoon-
aansluiting
• Sluit de hoofdtelefoon aan op de hoofdtelefoonaansluiting.
Waarschuwing: Gebruik geen hoofdtelefoons bij een hoog volumeniveau om
gehoorbeschadiging te voorkomen.
13. RCA-uitgang
(rood/wit)
• Sluit voor het gebruik van een externe versterker de RCA-kabel aan op de
RCA-uitgang van het apparaat en op de externe versterker. Zorg ervoor dat
iedere plug van de RCA-kabel is aangesloten conform de overeenkomstige
kleur (rood/wit).
14. AUX-ingang
• Sluit een AUX-kabel aan op de AUX-ingang van het apparaat en op het audio-
apparaat om audiobestanden vanaf een audio-apparaat af te spelen.
• Gebruik de bedieningselementen op het audio-apparaat om het geluid te
regelen.
15. PC-uitgang (USB-B)
16. PC-indicator
PC-coderingsfunctie
• Installeer de PC-opnamesoftware op de PC met behulp van de meegeleverde
CD-ROM.
• Sluit een USB-B>USB-kabel aan op de PC-uitgang van het apparaat en op de PC.
• Start de PC-opnamesoftware om te starten met opnemen. De PC-indicator brandt
continu tijdens het opnemen.
• Om te stoppen met opnemen:
- Klik op "Reserve"-knop in de PC-opnamesoftware.
- Verricht een van de volgende stappen:
(a) Stop de PC-opnamesoftware.
(b) Koppel de USB-B>USB-kabe los van de PC-uitgang van het apparaat
en de PC.
17. DC-ingang (5V)
• Sluit voor het voeden van het apparaat de stroomadapter aan op de DC-
ingang van het apparaat en op het stopcontact.
18. Speaker
19. Stofkap
• Open de stofkap als u vinylplaten afspeelt.
• Sluit de stofkap als u geen vinylplaten afspeelt.
Gebruik
De naald vervangen (g. B)
De naald gaat bij normaal gebruik ongeveer 50uur mee. Het wordt aanbevolen om de naald te vervangen zodra u een
wijziging in de geluidskwaliteit constateert. Het gebruik van een versleten naald kan schade aan de vinylplaten veroorzaken.
78-toerenplaten doen de naald sneller slijten dan 33/45-toerenplaten.
Waarschuwing!
• Zorg er voor het vervangen van de naald voor dat het apparaat is uitgeschakeld.
• Buig de naald niet en raak de naald niet aan.
De oude naald verwijderen:
• Plaats voorzichtig een schroevendraaier op de punt van de naald en duw de naald naar beneden (A).
• Verwijder de oude naald door hem gelijktijdig naar beneden en naar voren te trekken.
De nieuwe naald installeren:
• Houd de naald aan de voorzijde vast en steek de achterzijde van de naald in de toonarm (B).
• Duw de naald naar boven om hem op zijn plaats vast te zetten (C).
Technische gegevens
Frequentiebereik 2400-2483,5 MHz
Maximaal zendvermogen 4 dBm
Veiligheid
Algemene veiligheid
• Lees voor gebruik de handleiding zorgvuldig door. Bewaar de handleiding voor latere raadpleging.
• De fabrikant is niet aansprakelijk voor gevolgschade of voor schade aan eigendommen of personen veroorzaakt door
het niet naleven van de veiligheidsinstructies en door verkeerd gebruik van het apparaat.
• Het apparaat kan worden gebruikt door kinderen vanaf 8 jaar en door personen met een lichamelijke, zintuiglijke,
geestelijke of motorische beperking of zonder de benodigde ervaring en kennis indien ze onder toezicht staan of
instructies krijgen over hoe het apparaat op een veilige manier kan worden gebruikt alsook de gevaren begrijpen die
met het gebruik samenhangen. Kinderen mogen niet met het apparaat spelen. Reiniging en onderhoud mogen niet
worden uitgevoerd door kinderen, tenzij zij onder toezicht staan.
• Gebruik het apparaat uitsluitend voor de beoogde doeleinden. Gebruik het apparaat niet voor andere doeleinden dan
beschreven in de handleiding.
• Gebruik het apparaat niet als een onderdeel beschadigd of defect is. Vervang een beschadigd of defect apparaat onmiddellijk.
• Het apparaat is uitsluitend geschikt voor gebruik binnenshuis. Gebruik het apparaat niet buitenshuis.
• Het apparaat is uitsluitend geschikt voor huishoudelijk gebruik. Gebruik het apparaat niet voor commerciële doeleinden.
• Gebruik het apparaat niet op plaatsen met een hoge luchtvochtigheid, zoals badkamers en zwembaden.
• Gebruik het apparaat niet in de buurt van badkuipen, douches, wastafels of andere voorzieningen die water bevatten.
Elektrische veiligheid
• Dit product mag voor onderhoud uitsluitend door een erkende technicus worden geopend om het risico op elektrische
schokken te verkleinen.
• Koppel het product los van het stopcontact en van andere apparatuur als zich problemen voordoen.
• Gebruik het apparaat niet als het netsnoer of de netstekker beschadigd of defect is. Indien het netsnoer of de netstekker
beschadigd of defect is, moet het onderdeel door de fabrikant of een erkend servicecentrum worden vervangen.
• Controleer voor gebruik altijd of de netspanning overeenkomt met de spanning op het typeplaatje van het apparaat.
• Verplaats het apparaat niet door aan het netsnoer te trekken. Zorg dat het netsnoer niet in de war kan raken.
• Dompel het apparaat, het netsnoer of de netstekker niet onder in water of andere vloeistoen.
• Laat het apparaat niet onbeheerd achter terwijl de netstekker op de netvoeding is aangesloten.
• Gebruik geen verlengsnoer.
Reiniging en onderhoud
Waarschuwing!
• Schakel voor reiniging en onderhoud altijd het apparaat uit.
• Gebruik geen reinigingsmiddelen of schuurmiddelen.
• Reinig niet de binnenzijde van het apparaat.
• Probeer het apparaat niet te repareren. Indien het apparaat niet juist werkt, vervang het dan door een nieuw apparaat.
• Dompel het apparaat niet onder in water of andere vloeistoen.
• Reinig het apparaat met een zachte, vochtige doek. Droog het apparaat grondig af met een schone, droge doek.
Vinylplaten
• Houd vinylplaten aan de randen vast met schone handen.
• Raak het oppervlak van vinylplaten niet aan om de geluidskwaliteit te behouden.
• Raak de groeven van vinylplaten niet aan.
• Bewaar vinylplaten rechtop en in hun beschermhoes wanneer ze niet worden gebruikt.
Support
Breng voor hulp of als u een opmerking of suggestie heeft een bezoek aan www.nedis.com/support
Contact
NEDIS B.V., De Tweeling 28, 5215 MC ’s-Hertogenbosch, Nederland
Deutsch - Beschreibung (Abb. A)
1. Plattenspieler
2. Tonarm
3. Tonarmheber
4. Tonarmstütze
5. Tonarmverriegelung
• Legen Sie die Schallplatte auf den Plattenspieler.
• Entfernen Sie die Nadelabdeckung, indem Sie die Abdeckung vorsichtig vom Tonarm
wegschieben.
• Schieben Sie die Verriegelung des Tonarms zur Seite, um den Tonarm zu entriegeln.
• Verwenden Sie den Tonarmheber, um den Tonarm anzuheben. Heben Sie den
Tonarm alternativ manuell an.
• Setzen Sie den Tonarm auf die äußere Kante der Schallplatte auf. Der Plattenspieler
beginnt automatisch, sich zu drehen und die Schallplatte abzuspielen.
• Heben Sie den Tonarm an. Setzen Sie den Tonarm auf der Tonarmstütze ab.
• Lassen Sie die Verriegelung des Tonarms einrasten, um den Tonarm zu verriegeln.
• Nehmen Sie die Schallplatte vom Plattenspieler.
Hinweis: Stellen Sie vor dem Transport sicher, dass der Tonarm verriegelt ist.
6. 45U/Min. Adapter • Verwenden Sie den 45U/Min. Adapter, um Schallplatten mit 45U/Min. abzuspielen.
7. Automatische
Abschaltung
• Stellen Sie den Schalter auf die Position „ON“, um die automatische Abschaltfunktion
zu aktivieren.
• Stellen Sie den Schalter auf die Position „OFF“, um die automatische Abschaltfunktion
zu deaktivieren.
8. Geschwindigkeitswähler
• Verwenden Sie den Geschwindigkeitswähler, um die Geschwindigkeit (33/45/78U/
Min.) zu wählen.
9. Betriebsanzeige • Die Anzeige leuchtet rot, wenn das Gerät eingeschaltet wird.
10. Ein-/Aus-Knopf
Lautstärkeknopf
Ein-Aus-Drehknopf
• Drehen Sie den Knopf im Uhrzeigersinn in die Position „ON“, um das Gerät
einzuschalten.
• Drehen Sie den Knopf gegen den Uhrzeigersinn in die Position „OFF“, um das Gerät
auszuschalten.
Lautstärkeregler
• Drehen Sie den Regler im Uhrzeigersinn, um die Lautstärke zu erhöhen.
• Drehen Sie den Regler gegen den Uhrzeigersinn, um die Lautstärke zu verringern.
11. Tonregler
• Drehen Sie den Regler im oder entgegen dem Uhrzeigersinn, um den Ton
einzustellen.
12. Kopfhörerbuchse
• Verbinden Sie den Kopfhörer mit der Kopfhörerbuchse.
Warnung: Verwenden Sie keine Kopfhörer mit hoher Lautstärke, um Hörschäden zu
vermeiden.
13. RCA-Ausgang
(rot/weiß)
• Um einen externen Verstärker zu benutzen, verbinden Sie das RCA-Kabel mit dem
RCA-Ausgang des Geräts und dem externen Verstärker. Stellen Sie sicher, dass jeder
Stecker des RCA-Kabels entsprechend der richtigen Farbe (rot/weiß) angeschlossen
ist.
14. AUX-Eingang
• Um Audiodateien von einem Audiogerät abzuspielen, verbinden Sie ein AUX-Kabel
mit dem AUX-Eingang des Geräts und dem Audiogerät.
• Verwenden Sie die Regler auf dem Audiogerät, um den Klang zu steuern.
15. PC-Ausgang (USB-B)
16. PC-Anzeige
PC-Codierfunktion
• Installieren Sie die PC-Aufzeichnungssoftware mithilfe der mitgelieferten CD-ROM auf
dem PC.
• Verbinden Sie ein USB-B-zu-USB-Kabel mit dem PC-Ausgang des Geräts und dem PC.
• Starten Sie die PC-Aufzeichnungssoftware, um mit der Aufzeichnung zu beginnen. Die
PC-Anzeige leuchtet während des Aufzeichnungsprozesses durchgehend.
• Um die Aufzeichnung zu beenden:
- Klicken Sie auf die Schaltäche „Reserve“ in der PC-Aufzeichnungssoftware.
- Führen Sie Folgendes durch:
(a) Stoppen Sie die PC-Aufzeichnungssoftware
(b) Trennen Sie das USB-B-zu-USB-Kabel vom PC-Ausgang des Geräts und dem
PC.
17. DC-Eingang (5V)
• Um das Gerät zu betreiben, verbinden Sie den Netzadapter mit dem DC-Eingang des
Geräts und mit der Wandsteckdose.
18. Lautsprecher
19. Staubabdeckung
• Önen Sie die Staubabdeckung, wenn Sie Schallplatten abspielen möchten.
• Falls Sie keine Schallplatten abspielen möchten, schließen Sie die Abdeckung.
Gebrauch
Ersetzen der Plattenspielernadel (Abb. B)
Die Plattenspielernadel hält unter normalen Betriebsbedingungen ca. 50Stunden. Es wird empfohlen, die
Plattenspielernadel zu ersetzen, sobald Sie eine Veränderung der Klangqualität bemerken. Die Verwendung einer
abgenutzten Plattenspielernadel kann Schäden an den Schallplatten verursachen. Schallplatten mit 78U/Min. nutzen die
Plattenspielernadel schneller ab als Schallplatten mit 33/45U/Min.
Warnung!
• Achten Sie darauf, dass das Gerät beim Laden ausgeschaltet ist, bevor Sie die Plattenspielernadel auswechseln.
• Biegen oder berühren Sie die Plattenspielernadel nicht.
Um die alte Plattenspielernadel zu entfernen:
• Setzen Sie vorsichtig einen Schraubendreher an die Spitze der Plattenspielernadel und schieben Sie diese nach unten (A).
• Entfernen Sie die alte Plattenspielernadel, indem Sie sie gleichzeitig nach unten und nach vorne ziehen.
Um die neue Plattenspielernadel einzusetzen:
• Halten Sie die Plattenspielernadel an der Vorderkante fest und setzen Sie die Hinterkante der Plattenspielernadel in den
Tonarm ein (B).
• Schieben Sie die Plattenspielernadel nach oben, um sie einrasten zu lassen (C).
Technische Daten
Frequenzbereich 2400-2483,5 MHz
Maximale Übertragungsleistung 4 dBm
Sicherheit
Allgemeine Sicherheit
• Lesen Sie die Bedienungsanleitung vor dem Gebrauch genau durch. Bitte bewahren Sie die Bedienungsanleitung zur
späteren Bezugnahme auf.
• Der Hersteller ist nicht schadensersatzpichtig für Folgeschäden, Sachschäden oder Personenverletzungen, die durch die
Nichtbeachtung der Sicherheitshinweise und durch unsachgemäße Handhabung des Gerätes entstanden sind.
• Das Gerät darf von Kindern ab 8 Jahren sowie von Personen mit eingeschränkten physischen, sensorischen, geistigen
oder motorischen Fähigkeiten oder einem Mangel an Erfahrung und Kenntnis verwendet werden, sofern diese Personen
beaufsichtigt oder in den sicheren Gebrauch des Geräts eingewiesen wurden und die damit verbundenen Gefahren
verstehen. Kinder dürfen nicht mit dem Gerät spielen. Die Reinigung und Pege seitens des Benutzers darf nur von
Kindern durchgeführt werden, wenn diese beaufsichtigt werden.
• Verwenden Sie das Gerät nur bestimmungsgemäß. Verwenden Sie das Gerät nur für den in dieser Bedienungsanleitung
beschriebenen Zweck.
• Verwenden Sie das Gerät nicht, falls ein Teil beschädigt oder defekt ist. Ist das Gerät beschädigt oder defekt, erneuern
Sie es unverzüglich.
• Das Gerät eignet sich nur zur Verwendung in Innenräumen. Verwenden Sie das Gerät nicht im Freien.
• Das Gerät eignet sich nur für den Hausgebrauch. Verwenden Sie das Gerät nicht für den gewerblichen Gebrauch.
• Verwenden Sie das Gerät nicht an Orten mit hoher Feuchtigkeit wie beispielsweise Badezimmern oder Schwimmbädern.
• Verwenden Sie das Gerät nicht in der Nähe von Badewannen, Duschen, Becken oder anderen Behältnissen, die Wasser
enthalten.
Elektrische Sicherheit
• Um die Gefahr eines elektrischen Schlags zu verringern, sollte dieses Produkt bei erforderlichen Servicearbeiten
ausschließlich von einem autorisierten Techniker geönet werden.
• Bei Problemen trennen Sie das Gerät bitte von der Spannungsversorgung und von anderen Geräten.
• Verwenden Sie das Gerät nicht, falls das Netzkabel oder der Netzstecker beschädigt oder defekt ist. Ist das Netzkabel
oder der Netzstecker beschädigt oder defekt, muss das Netzkabel oder der Netzstecker vom Hersteller oder einem
autorisierten Service-Partner erneuert werden.
• Vergewissern Sie sich stets vor dem Gebrauch, dass die Netzspannung mit der Spannung auf dem Typenschild des
Geräts übereinstimmt.
• Bewegen Sie das Gerät nicht durch Ziehen am Netzkabel. Achten Sie darauf, dass sich das Netzkabel nicht verwickeln kann.
• Tauchen Sie das Gerät, das Netzkabel oder den Netzstecker nicht in Wasser oder andere Flüssigkeiten ein.
• Lassen Sie das Gerät nicht unbeaufsichtigt, während der Netzstecker mit dem Stromnetz verbunden ist.
• Verwenden Sie kein Verlängerungskabel.
Reinigung und Pege
Warnung!
• Schalten Sie das Gerät vor dem Reinigen oder Warten stets ab.
• Verwenden Sie keine Lösungs- oder Scheuermittel.
• Reinigen Sie das Gerät nicht von innen.
• Versuchen Sie nicht, das Gerät zu reparieren. Falls das Gerät nicht einwandfrei arbeitet, tauschen Sie es gegen ein neues aus.
• Tauchen Sie das Gerät nicht in Wasser oder andere Flüssigkeiten ein.
• Reinigen Sie das Gerät mit einem weichen feuchten Tuch. Trocknen Sie das Gerät gründlich mit einem sauberen
trockenen Tuch ab.
Schallplatten
• Halten Sie Schallplatten mit sauberen Händen an den Kanten fest.
• Berühren Sie die Oberäche der Schallplatten nicht, um die Klangqualität zu wahren.
• Berühren Sie keinesfalls die Rillen der Schallplatten.
• Bewahren Sie Schallplatten aufrecht und in ihrer Schutzhülle auf, wenn sie nicht in Gebrauch sind.
Hilfe
Wenn Sie weitere Hilfe benötigen oder Kommentare oder Vorschläge für uns haben, gehen Sie bitte auf www.nedis.com/support
Kontakt
NEDIS B.V., De Tweeling 28, 5215 MC ’s-Hertogenbosch, Niederlande
Español - Descripción (g. A)
1. Tocadiscos
2. Brazo fonocaptor
3. Elevador del brazo
fonocaptor
4. Soporte del brazo
fonocaptor
5. Bloqueo del brazo
fonocaptor
• Coloque el disco de vinilo sobre el tocadiscos.
• Retire la cubierta de la aguja deslizándola suavemente para alejarla del brazo
fonocaptor.
• Empuje el bloqueo del brazo fonocaptor a un lado para desbloquearlo.
• Utilice el elevador del brazo fonocaptor para levantar el brazo o levante manualmente
el brazo fonocaptor.
• Coloque el brazo fonocaptor en el borde exterior del disco de vinilo. El tocadiscos
empieza a girar y reproduce el disco de vinilo automáticamente.
• Levante el brazo fonocaptor. Coloque el brazo fonocaptor en su soporte.
• Enganche el bloqueo del brazo fonocaptor para bloquearlo.
• Retire el disco de vinilo del tocadiscos.
Nota: Antes del transporte, asegúrese de que el brazo fonocaptor esté bloqueado.
6. Adaptador para
45rpm
• Utilice el adaptador de 45 rpm para escuchar los discos de vinilo de 45 rpm.
7. Apagado automático
• Sitúe el interruptor en la posición "ON" para habilitar la función de apagado automático.
• Sitúe el interruptor en la posición "OFF" para deshabilitar la función de apagado
automático.
8. Selector de velocidad • Utilice el selector de velocidad para seleccionar la velocidad (33/45/78 rpm).
9. Indicador de
encendido
• El indicador se enciende en rojo cuando el dispositivo está encendido.
10. Mando de encendido/
apagado
Mando de volumen
Mando de encendido/apagado
• Gire el mando en sentido horario a la posición "ON" para encender el dispositivo.
• Gire el mando en sentido antihorario a la posición "OFF" para apagar el dispositivo.
Mando de volumen
• Gire el mando en el sentido de las agujas del reloj para aumentar el volumen.
• Gire el mando en el sentido contrario a las agujas del reloj para disminuir el volumen.
11. Mando de tono • Gire el mando en sentido horario o en sentido antihorario para ajustar el tono.
12. Toma de auriculares
• Conecte los auriculares a la toma de auriculares.
Advertencia: No utilice auriculares a niveles elevados de volumen para evitar daños
auditivos.
13. Salida RCA
(rojo/blanco)
• Para utilizar un amplicador externo, conecte el cable RCA a la salida RCA del
dispositivo y al amplicador externo. Asegúrese de que cada enchufe del cable RCA
esté conectado de acuerdo con el color correspondiente (rojo/blanco).
14. Entrada AUX
• Para reproducir archivos de audio desde un dispositivo de audio, conecte un cable AUX a
la entrada AUX del dispositivo y al dispositivo de audio.
• Utilice los controles del dispositivo de audio para controlar el sonido.
15. Salida de PC (USB-B)
16. Indicador de PC
Función de codicación de PC
• Instale el software de grabación para PC en el PC utilizando el CD-ROM suministrado.
• Conecte un cable USB B a USB a la salida de PC del dispositivo y al PC.
• Para iniciar la grabación, inicie el software de grabación para PC. El indicador de PC se
enciende de forma continua durante el proceso de grabación.
• Para detener la grabación:
- Haga clic en el botón "Reserve" del software de grabación para PC.
- Realice una de las siguientes acciones:
(a) Detenga el software de grabación para PC
(b) Desconecte el cable USB B a USB a la salida de PC del dispositivo y el PC.
17. Entrada CC (5V)
• Para alimentar el dispositivo, conecte el adaptador de alimentación a la entrada CC del
dispositivo y a la toma de pared.
18. Altavoz
19. Cubierta antipolvo
• Si reproduce discos de vinilo, abra la cubierta antipolvo.
• Si no reproduce discos de vinilo, cierre la cubierta antipolvo.
Uso
Sustitución de la aguja del tocadiscos (g. B)
La aguja del tocadiscos dura aproximadamente 50 horas en condiciones de funcionamiento normal. Se recomienda sustituir
la aguja del tocadiscos tan pronto como note un cambio en la calidad del sonido. La utilización de una aguja desgastada
puede dañar los discos de vinilo. Los discos de vinilo de 78 rpm desgastarán la aguja del tocadiscos más rápidamente que los
discos de vinilo de 33/45 rpm.
¡Advertencia!
• Antes de sustituir la aguja del tocadiscos, asegúrese de que el dispositivo esté apagado.
• No doble ni toque la aguja del tocadiscos.
Para retirar la aguja usada del tocadiscos:
• Coloque con cuidado un destornillador en la punta de la aguja del tocadiscos y empuje la aguja hacia abajo (A).
• Retire la aguja usada tirando hacia abajo y hacia delante al mismo tiempo.
Para instalar la nueva aguja del tocadiscos:
• Sujete la aguja del tocadiscos en el extremo delantero e inserte el extremo trasero de la aguja del tocadiscos en el brazo
fonocaptor (B).
• Empuje la aguja del tocadiscos hacia arriba para bloquearla en su posición (C).
Datos técnicos
Gama de frecuencia 2400-2483.5 MHz
Potencia de transmisión máxima 4 dBm
Seguridad
Seguridad general
• Lea el manual detenidamente antes del uso. Conserve el manual en caso de futura necesidad.
• El fabricante no es responsable de daños consecuentes o de daños en la propiedad o en las personas causados por no
seguir estas instrucciones de seguridad y por un uso inadecuado de este dispositivo.
• El dispositivo puede ser utilizado por niños a partir de los 8 años y por personas con una discapacidad física, sensorial,
mental o motora, o que no tengan experiencia ni conocimientos, sin son supervisados o instruidos en el uso del
dispositivo de forma segura y entienden los riesgos implicados. Los niños no pueden jugar con el dispositivo. Los niños
no podrán realizar la limpieza ni el mantenimiento reservado al usuario a menos que cuenten con supervisión.
• Utilice el dispositivo únicamente para su uso previsto. No utilice el dispositivo con una nalidad distinta a la descrita en
el manual.
• No utilice el dispositivo si alguna pieza ha sufrido daños o tiene un defecto. Si el dispositivo ha sufrido daños o tiene un
defecto, sustitúyalo inmediatamente.
• El dispositivo sólo es apto para uso en interiores. No utilice el dispositivo en exteriores.
• El dispositivo sólo es apto para uso doméstico. No utilice el dispositivo con nes comerciales.
• No utilice el dispositivo en lugares con un nivel alto de humedad, como baños y piscinas.
• No utilice el dispositivo cerca de bañeras, duchas, lavabos u otros recipientes que contengan agua.
Seguridad eléctrica
• Para reducir el peligro de descarga eléctrica, este producto sólo debería abrirlo un técnico autorizado cuando necesite
reparación.
• Desconecte el producto de la toma de corriente y de los otros equipos si ocurriera algún problema.
• No utilice el dispositivo si el cable de red o el enchufe de red está dañado o es defectuoso. Si el cable de red o el enchufe
de red está dañado o es defectuoso, éste debe ser sustituido por el fabricante o un servicio técnico autorizado.
• Antes del uso, compruebe siempre que la tensión de red sea la misma que se indica en la placa de características del
dispositivo.
• No mueva el dispositivo tirando del cable de red. Asegúrese de que el cable de red no se enrede.
• No sumerja el dispositivo, el cable de red o el enchufe de red en agua ni otros líquidos.
• No deje el dispositivo desatendido cuando el enchufe de red esté conectado al suministro de red.
• No utilice un cable alargador.
Limpieza y mantenimiento
¡Advertencia!
• Antes de la limpieza o el mantenimiento, apague siempre el dispositivo.
• No utilice disolventes de limpieza ni productos abrasivos.
• No limpie el interior del dispositivo.
• No intente reparar el dispositivo. Si el dispositivo no funciona correctamente, sustitúyalo por uno nuevo.
• No sumerja el dispositivo en agua ni otros líquidos.
• Limpie el dispositivo con un paño suave humedecido. Seque bien el dispositivo con un paño limpio y seco.
Discos de vinilo
• Sujete los discos de vinilo por los bordes con las manos limpias.
• No toque la supercie de los discos de vinilo para mantener la calidad del sonido.
• No toque los surcos de los discos de vinilo.
• Guarde los discos de vinilo en posición vertical y en su funda protectora cuando no los utilice.
Apoyo
Si necesita ayuda adicional o si tiene comentarios o sugerencias, visite www.nedis.com/support
Contacto
NEDIS B.V., De Tweeling 28, 5215 MC ‘s-Hertogenbosch, Países Bajos
Français - Description (g. A)
1. Platine
2. Bras de lecture
3. Lève-bras de lecture
4. Repose-bras de lecture
5. Sécurité de bras de
lecture
• Placez le disque vinyle sur la platine.
• Retirez le cache de stylet en le faisant glisser doucement hors du bras de lecture.
• Poussez la sécurité de bras de lecture pour l'écarter an de libérer le bras de lecture.
• Utilisez le lève-bras de lecture pour lever le bras de lecture ou levez-le manuellement.
• Placez le bras de lecture sur le bord extérieur du disque vinyle. La platine commence à
tourner et lit automatiquement le disque vinyle.
• Levez le bras de lecture. Placez le bras de lecture sur le repose-bras de lecture.
• Engagez la sécurité de bras de lecture an de bloquer le bras de lecture.
• Retirez le disque vinyle de la platine.
Note : Avant le transport, assurez-vous que le bras de lecture est bloqué.
6. Adaptateur 45 tours • Utilisez l'adaptateur 45 tours pour écouter des disques vinyle 45 tours.
7. Arrêt automatique
• Positionnez l'interrupteur sur "ON" pour activer la fonction d'arrêt automatique.
• Positionnez l'interrupteur sur "OFF" pour désactiver la fonction d'arrêt automatique.
8. Sélecteur de vitesse • Utilisez le sélecteur de vitesse pour sélectionner la vitesse (33/45/78tr/mn).
9. Indicateur
d'alimentation
• L'indicateur s'allume en rouge lorsque l'appareil est sous tension.
10. Molette marche/arrêt
Molette de volume
Molette marche/arrêt
• Tournez la molette dans le sens horaire sur la position "ON" pour allumer l'appareil.
• Tournez la molette dans le sens antihoraire sur la position "OFF" pour éteindre l'appareil.
Molette de volume
• Tournez la molette dans le sens horaire pour augmenter le volume.
• Tournez la molette dans le sens antihoraire pour réduire le volume.
11. Molette de tonalité • Tournez la molette dans le sens horaire ou antihoraire pour régler la tonalité.
12. Prise casque
• Connectez le casque à la prise casque.
Avertissement: N'utilisez pas les écouteurs à des niveaux de volume élevés pour éviter tout
dommage auditif.
13. Sortie RCA
(rouge/blanc)
• Pour utiliser un amplicateur externe, connectez le câble RCA à la sortie RCA de
l'appareil et à l'amplicateur externe. Assurez-vous que chaque che du câble RCA est
connectée selon la couleur correspondante (rouge/blanc).
14. Entrée AUX
• Pour lire des chiers audio d'un appareil audio, connectez un câble AUX à l'entrée AUX
de l'appareil et de l'appareil audio.
• Utilisez les commandes de l'appareil audio pour gérer le son.
15. Sortie PC (USB-B)
16. Indicateur PC
Fonction de codage PC
• Installez le logiciel d'enregistrement PC sur le PC avec le CD-ROM fourni.
• Connectez un câble USB-B-à-USB à la sortie PC de l'appareil et au PC.
• Pour lancer l'enregistrement, démarrez le logiciel d'enregistrement PC. L'indicateur PC
s'allume en continu durant le processus d'enregistrement.
• Arrêt d'enregistrement :
- Cliquez sur le bouton "Reserve" du logiciel d'enregistrement PC.
- Eectuez l'une des actions suivantes:
(a) Arrêtez le logiciel d'enregistrement PC
(b) Déconnectez le câble USB-B-à-USB de la sortie PC de l'appareil et du PC.
17. Entrée CC (5V)
• Pour mettre l'appareil sous tension, connectez l'adaptateur électrique à l'entrée CC de
l'appareil et à la prise murale.
18. Haut-parleur
19. Cache-poussière
• Pour lire des disques vinyle, ouvrez le cache-poussière.
• Si vous ne lisez pas de disques vinyle, fermez le cache-poussière.
Usage
Remplacement de stylet de platine (g. B)
Le stylet de la platine dure environ 50 heures en fonctionnement normal. Il est recommandé de remplacer le stylet de la
platine dès que vous notez un changement de la qualité sonore. L'emploi d'un stylet de platine usé risque d'endommager les
disques vinyle. Les disques vinyle 78 tours usent le stylet de platine plus vite que les disques vinyle 33 et 45 tours.
Avertissement!
• Avant le remplacement du stylet de platine, assurez-vous que l'appareil est éteint.
• Ne courbez et ne touchez pas le stylet de platine.
Retrait de l'ancien stylet de platine :
• Placez prudemment un tournevis sur la pointe du stylet de platine et poussez le stylet vers le bas (A).
• Retirez le stylet de platine usagé en le tirant vers le bas et en avant simultanément.
Installation de nouveau stylet de platine :
• Tenez le stylet de platine par le bord avant et insérez le bord arrière du stylet de platine dans le bras de lecture (B).
• Poussez le stylet de platine vers le haut pour le verrouiller en position (C).
Caractéristiques techniques
Plage de fréquence 2400-2483,5 MHz
Puissance de transmission maximum 4 dBm
Sécurité
Sécurité générale
• Lisez attentivement le manuel avant usage. Conservez le manuel pour toute référence ultérieure.
• Le fabricant décline toute responsabilité pour les dommages ou blessures consécutifs causés par le non-respect des
consignes de sécurité et d'une utilisation inappropriée de l'appareil.
• Cet appareil peut être utilisé par des enfants 8 ans ou plus et des personnes présentant un handicap physique,
sensoriel, mental ou moteur, voire dépourvus des connaissances et de l'expérience nécessaires, en cas de surveillance
ou d'instructions sur l'usage de cet appareil en toute sécurité et de compréhension des risques impliqués. Les enfants
ne doivent pas jouer avec l'appareil. Le nettoyage et l'entretien ne doivent pas être eectués par des enfants sans
supervision.
• Utilisez l'appareil uniquement pour son usage prévu. N'utilisez pas l'appareil à d'autres ns que celles décrites dans le
manuel.
• N'utilisez pas l'appareil si une pièce quelconque est endommagée ou défectueuse. Si l'appareil est endommagé ou
défectueux, remplacez-le immédiatement.
• L'appareil est conçu exclusivement pour une utilisation en intérieur. N'utilisez pas l'appareil à l'extérieur.
• L'appareil est conçu exclusivement pour un usage domestique. N'utilisez pas l'appareil à des ns commerciales.
• N'utilisez pas l'appareil dans des endroits très humides, ainsi les salles de bains et piscines.
• N'utilisez pas l'appareil à proximité d'une baignoire, d'une douche, d'un lavabo ou d'autres récipients contenant de l'eau.
Sécurité électrique
• Pour réduire le risque de choc électrique, ce produit doit être ouvert uniquement par un technicien qualié si une
réparation s'impose.
• Débranchez l'appareil et les autres équipements du secteur s'il y a un problème.
• N'utilisez pas l'appareil si le cordon d'alimentation ou la che secteur est endommagé ou défectueux. Si le cordon
d'alimentation ou la che secteur est endommagé ou défectueux, il doit être remplacé par le fabricant ou par un
réparateur agréé.
• Avant toute utilisation, vériez que la tension du secteur correspond à celle indiquée sur la plaque signalétique de
l'appareil.
• Ne déplacez pas l'appareil en le tirant par le cordon d'alimentation. Assurez-vous que le cordon d'alimentation ne
s'enchevêtre pas.
• N'immergez pas l'appareil, le cordon d'alimentation ou la che secteur dans l'eau ou d'autres liquides.
• Ne laissez pas l'appareil sans surveillance si la che secteur est branchée.
• N'utilisez aucune rallonge.
Nettoyage et entretien
Avertissement!
• Avant le nettoyage ou l'entretien, éteignez systématiquement l'appareil.
• N'utilisez pas de solvants ni de produits abrasifs.
• Ne nettoyez pas l'intérieur de l'appareil.
• Ne tentez pas de réparer l'appareil. Si l'appareil fonctionne mal, remplacez-le par un neuf.
• Ne plongez pas l'appareil dans l'eau ou autres liquides.
• Nettoyez l'appareil avec un chion doux et humide. Séchez soigneusement l'appareil avec un chion propre et sec.
Disques vinyle
• Tenez les disques vinyle par les bords avec les mains propres.
• Ne touchez pas la surface des disques vinyle an de préserver la qualité sonore.
• Ne touchez pas les sillons des disques vinyle.
• Rangez les disques vinyle à la verticale et dans leur housse de protection si vous ne les utilisez pas.
Support
Si vous avez des commentaires, des suggestions ou besoin d'aide, veuillez visiter www.nedis.com/support
Contact
NEDIS B.V., De Tweeling 28, 5215 MC ‘s-Hertogenbosch, Pays-Bas
Italiano - Descrizione (g. A)
1. Giradischi
2. Braccio di riproduzione
3. Meccanismo di
sollevamento del
braccio
4. Supporto del braccio
5. Fermo del braccio
• Collocare un disco in vinile sul piatto del giradischi.
• Rimuovere la copertura della puntina slandola dal braccio di riproduzione.
• Premere il fermo del braccio lateralmente per sbloccare il braccio.
• Utilizzare il meccanismo di sollevamento apposito per sollevare il braccio oppure
sollevare manualmente il braccio.
• Collocare il braccio di riproduzione sul bordo esterno del disco in vinile. Il giradischi
inizia automaticamente a ruotare e riprodurre il disco in vinile.
• Sollevare il braccio di riproduzione. Collocare il braccio di riproduzione sull’apposito
supporto.
• Innestare il fermo per bloccare il braccio.
• Rimuovere il disco in vinile dal piatto del giradischi.
Nota: Prima del trasporto, assicurarsi che il braccio di riproduzione sia bloccato.
6. Adattatore per 45giri • Utilizzare l’adattatore per 45giri per ascoltare dischi in vinile a 45giri.
7. Spegnimento
automatico
• Impostare l’interruttore in posizione “ON” per attivare la funzione di spegnimento
automatico.
• Impostare l’interruttore in posizione “OFF” per disattivare la funzione di spegnimento
automatico.
8. Selettore di velocità • Utilizzare il selettore di velocità per selezionare la velocità (33/45/78giri).
9. Indicatore di
alimentazione
• L'indicatore si illumina di rosso all'accensione del dispositivo.
10. Selettore di
accensione/
spegnimento
Selettore del volume
Selettore di accensione/spegnimento
• Ruotare il selettore in senso orario sulla posizione “ON” per accendere il dispositivo.
• Ruotare il selettore in senso antiorario sulla posizione “OFF” per spegnere il dispositivo.
Selettore di volume
• Ruotare il selettore in senso orario per aumentare il volume.
• Ruotare il selettore in senso antiorario per diminuire il volume.
11. Selettore dei toni • Ruotare il selettore in senso orario o antiorario per regolare i toni.
12. Jack per cue
• Collegare le cue all'apposito jack.
Attenzione: Per evitare danni all'udito, non utilizzare le cue a volume elevato.
13. Uscita RCA
(rosso/bianco)
• Per utilizzare un amplicatore esterno, collegare il cavo RCA fra l’uscita RCA del
dispositivo e l’amplicatore esterno. Vericare che ciascun connettore del cavo RCA sia
connesso conformemente al colore corrispondente (rosso/bianco).
14. Ingresso AUX
• Per riprodurre le audio da un dispositivo audio, collegare un cavo AUX fra l'ingresso
AUX del giradischi e il dispositivo audio.
• Utilizzare i comandi sul dispositivo audio per controllare il suono.
15. Uscita PC (USB-B)
16. Indicatore PC
Funzione di codica PC
• Installare sul proprio PC il software di registrazione su PC utilizzando il CD-ROM allegato.
• Collegare un cavo da-USB-B-a-USB dall’uscita PC del dispositivo al PC.
• Per iniziare la registrazione, avviare il software di registrazione su PC. L’indicatore del PC si
illumina in modo continuo durante il processo di registrazione.
• Per arrestare la registrazione:
- Fare clic sul pulsante "Reserve" nel software di registrazione su PC.
- Eseguire una delle seguenti azioni:
(a) Arrestare il software di registrazione su PC
(b) Disconnettere il cavo da-USB-B-a-USB dall’uscita PC del dispositivo e dal PC.
17. Ingresso CC (5V)
• Collegare l'adattatore di alimentazione all'ingresso CC del dispositivo e alla presa a
parete per alimentare il dispositivo.
18. Altoparlante
19. Coperchio parapolvere
• Per riprodurre dischi in vinile, aprire il coperchio parapolvere.
• Se non si riproducono dischi in vinile, chiudere il coperchio parapolvere.
Uso
Sostituzione della puntina del giradischi (g. B)
La puntina del giradischi ha una durata di circa 50ore in condizioni normali. Si consiglia di sostituire la puntina del giradischi
non appena si nota un degrado nella qualità del suono. L’uso di una puntina usurata può causare danni ai dischi in vinile. I
dischi in vinile a 78giri usurano la puntina del giradischi più rapidamente dei dischi in vinile a 33/45giri.
Attenzione!
• Prima di sostituire la puntina del giradischi, vericare che il dispositivo sia spento.
• Non piegare né toccare la puntina del giradischi.
Per rimuovere la vecchia puntina usurata:
• Inserire con cautela un cacciavite sull’estremità della puntina del giradischi, quindi spingere la puntina (A) verso il basso.
• Rimuovere la vecchia puntina tirandola simultaneamente in basso e in avanti.
Per installare la nuova puntina:
• Sostenere la puntina del giradischi per l'estremità anteriore, quindi inserire l’estremità posteriore della puntina sul
braccio di riproduzione (B).
• Premere la puntina verso l’alto per bloccarla in posizione (C).
Dati tecnici
Gamma di frequenze 2400-2483,5 MHz
Massima potenza di trasmissione 4 dBm
Sicurezza
Sicurezza generale
• Leggere il manuale con attenzione prima dell'uso. Conservare il manuale per riferimenti futuri.
• Il fabbricante non è responsabile per eventuali danni consequenziali o per danni a cose o persone derivanti
dall'inosservanza delle istruzioni sulla sicurezza o dall'uso improprio del dispositivo.
• Il dispositivo può essere utilizzato da bambini di almeno 8 anni e da persone con ridotte capacità siche, sensoriali,
mentali o motorie, o con mancanza di esperienza o conoscenza, sotto supervisione o dopo avere ricevuto adeguate
istruzioni riguardo all'uso in sicurezza del dispositivo e avere compreso i pericoli intrinseci nell'uso. I bambini non devono
giocare con il dispositivo. Le operazioni di pulizia e manutenzione non devono essere eettuate da bambini senza
supervisione.
• Utilizzare il dispositivo solo per gli scopi previsti. Non utilizzare il dispositivo per scopi diversi da quelli descritti nel
manuale.
• Non utilizzare il dispositivo se presenta parti difettose. Se il dispositivo è danneggiato o difettoso, sostituirlo
immediatamente.
• Questo dispositivo è adatto solo per uso in ambienti interni. Non utilizzare il dispositivo all'aperto.
• Questo dispositivo è adatto solo per uso in ambienti domestici. Non utilizzare il dispositivo per scopi commerciali.
• Non utilizzare il dispositivo in posizioni con un elevato tasso di umidità come bagni o piscine.
• Non utilizzare il dispositivo in prossimità di vasche da bagno, docce, lavandini o altri recipienti contenenti acqua.
Sicurezza elettrica
• Per ridurre il rischio di scosse elettriche, il presente prodotto deve essere aperto solo da un tecnico autorizzato, nel caso
sia necessario ripararlo.
• Scollegare il prodotto dall’alimentazione e da altri apparecchi se dovesse esserci un problema.
• Non utilizzare il dispositivo in presenza di danni o difetti al cavo o alla spina di alimentazione. Se il cavo o la spina di
alimentazione è danneggiato o difettoso, deve essere sostituito dal fabbricante o da un centro riparazioni autorizzato.
• Prima dell'uso vericare sempre che la tensione di alimentazione corrisponda a quella indicata sulla targhetta nominale
del dispositivo.
• Non spostare il dispositivo tirandolo per il cavo di alimentazione. Vericare che il cavo non possa aggrovigliarsi.
• Non immergere il dispositivo, il cavo o la spina di alimentazione in acqua o altri liquidi.
• Non lasciare il dispositivo incustodito con la spina collegata alla rete di alimentazione.
• Non utilizzare cavi di prolunga.
Pulizia e manutenzione
Attenzione!
• Prima di eettuare operazioni di pulizia o manutenzione, spegnere sempre il dispositivo.
• Non utilizzare solventi detergenti o abrasivi.
• Non pulire l'interno del dispositivo.
• Non cercare di riparare il dispositivo. Se il dispositivo non funziona correttamente, sostituirlo con uno nuovo.
• Non immergere il dispositivo in acqua o in altri liquidi.
• Pulire il dispositivo con un panno morbido e umido. Asciugare a fondo il dispositivo con un panno pulito e asciutto.
Dischi in vinile
• Sostenere i dischi in vinile per i bordi con le mani pulite.
• Non toccare la supercie dei dischi in vinile per non alterare la qualità del suono.
• Non toccare i solchi dei dischi in vinile.
• Riporre i dischi in vinile in posizione verticale nelle rispettive fodere protettive, quando non sono utilizzati.
Assistenza
Per ulteriore assistenza o per fornire commenti o suggerimenti visitare il sito www.nedis.com/support
Contatti
NEDIS B.V., De Tweeling 28, 5215 MC ‘s-Hertogenbosch, Paesi Bassi
TURN220BN
Turntable
19
2
6
5
3
7
8
4 181091112
1
18
15 14 13 16 17
A
A
B
C
B
Specifications:
• RMS: 2x3 W
• Peak power: 2x9 W
• Speed: 33, 45, 78 rpm
• Turntable type: Manual
• Type of drive: Belt-drive
• Automatic turn o: Yes
• PC Conversion: MP3 Conversion via software
• Connections: 3.5mm aux input, 3.5mm aux output,
RCA output (Red, White), USB-B


Alăturați-vă conversației despre acest produs
Aici puteți împărtăși ce părere aveți despre Nedis TURN220BN Platan. Dacă aveți o întrebare, citiți mai întâi cu atenție manualul. Solicitarea unui manual se poate face folosind formularul nostru de contact.