EN
HU
RO
PL
BG
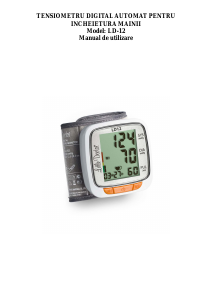
2. You can measure the blood pressure lying on the back. Look at the ceiling, keep quiet and do not move during measure-
ment. Be sure that the cuff is placed approximately at the level of your heart.
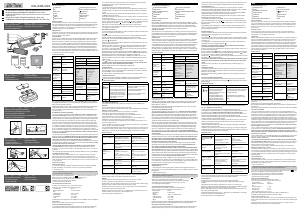
CUFF PREPARATION (fi g.4)
Press
1. Insert the cuff end for about 5 cm into a metal ring as shown in the fi gure.
2.
Apply the cuff to your left upper arm so that the air tube is directed to your palm. If the measurement on your left arm is
diffi cult, you may use your right arm. In this case remember that the readings may diff er by 5-10 mmHg and even more.
3. Wrap the cuff around your upper arm so that the bottom of the cuff is approximately 2-3 cm above your elbow. The sign
“ARTERY” should be over the arm artery.
4. Fix the cuff so that it fi ts tightly to the arm, but see that it is not overtight. Too tight or too free placement of the cuff may give
inaccurate readings..
5. On the fi xed cuff the sign «INDEX» should point to the area «NORMAL (25-36 cm)».It means that the cuff is chosen correctly
and fi ts the size of your upper arm. if the sign points to the area marked
« »
the cuff is too small and the readings will be
higher. If the sign points to the area marked
« »
the cuff is too large and the readings will be lower.x
6. If the arm has a conic form, the cuff should be put on with a spiral movement as shown in the fi gure.
7. If the rolled-up sleeve squeezes the arm interfering with free blood fl ow the Device may give inaccurate fi gures not cor-
responding to your actual blood pressure.
MEASUREMENT PROCEDURE (fi g.5)
1. Insert the Air Tube Plug into the Cuff Jack. Make 3-5 deep inhales and exhales before taking a measurement and relax. Do not
move, do not speak and do not toughen your arm.
2.
Press
.
3. All symbols will appear on the display screen for a short time, two short sound signals will be given and the Device will infl a t e
automatically the air into the cuff . At fi rst the infl ation will stop at the level of 190 mmHg.
4. After reaching the level of 190 mmHg the cuff will gradually defl ate. The fi gures on the screen will count back. The pulse
symbol “
” will start fl ickering.
As the blood pressure and pulse are measured during air defl ation from the arm cuff keep quiet and do not move your arm and
do not toughen your arm muscles.
5. When the measurement is complete the sound signal is given, the arm cuff completely defl ates and your measurement
results fl ash on the screen and Indicator «
» will blink, reminding that to retain results, it is necessary to choose memory 1
or 2, having depressed M1 or M2, respectively. The result may be saved before the beginning of the next measurement or before
turning the device OFF.
If irregular pulse rhythm is detected during measurement, symbol of arrhythmia
“ ” , will appear upon measurement end.
Appearance of arrhythmia indicator may also be caused by body movement during measurement. During periodical appearance of
this indication apply to You attending doctor.
Apart from numerical value of pressure, result is also displayed on scale WHO (Fig. 14). Scale WHO – three-color scale of classifi cation
of received value of arterial pressure, according to recommendation of World Health Organization. The scale is available from the left.
6. Press – to switch off . TO OBTAIN THE ACCURATE RESULT MAKE INTERVAL BETWEEN MEASUREMENTS TO RESTORE THE
BLOOD CIRCULATION. WAIT FOR AT LEAST 3 MINUTES BEFORE MAKING A NEW MEASUREMENT.
THE DATA WILL BE KEPT IN THE MEMORY EVEN IF THE DEVICE IS STORED WITHOUT BATTERIES. TO DELETE ALL VALUES
STORED IN THE MEMORY YOU SHOULD MAKE ACTIONS DESCRIBED IN “MEMORY FUNCTION”.
If no actions are done in mode of date and time setting for more than 3 minute, the Device is independently changed
over to mode of date and time indication.
AUTOMATIC RE-INFLATION
When during the fi rst blood pressure measurement the cuff infl ation to a level of 190 mmHg is not suffi cient or you move your
arm the Device stops measurement and re-infl ates the cuff to the higher level. The Device has 4 fi xed levels of the arm cuff infl a -
tion: 190, 230, 270 and 300 mmHg.
The automatic re-infl ation is repeated until the measurement is completed successfully. This is not a defect.
FORCED DEFLATION FROM A CUFF
For rapid air release from of the arm cuff during arm cuff infl ation or during a measurement (slow defl ation) press the
button. The device will quickly release all air from cuff and will switch off .
MEMORY FUNCTION (fi g.6)
1. Result of each measurement (pressure, pulse, time and date of measurement) may be kept in the device memory. For
this purpose, after measurement, within not more than 3 minutes, memory M1 or M2 shall be selected for memory stor-
age. IF THE NOTICE ON ERROR APPEARS THE MEASUREMENT RESULT WILL NOT BE STORED
.
2. Press the M1 (or M2) Button to see the fi gures stored in the memory.At the fi rst depression of button M1
« »
(or M2
« »
)
mean value of 3 last measurements, kept in memory M1 (or M2), will appear on the screen, marked by symbol«А» (fi g. 17).
At repeated depression of button M1 (or M2) indicator of selected memory М1
« »
(or M2
« »
) and number of memory cell
will appear on the screen, and in 1 second its content is displayed (fi g. 18). When content of memory cell is displayed, date
and time of measurement are displayed alternately in the display lower line. Each depression of button M1 (or M2) causes
shifting to the next memory cell.
MEMORY CLEARING
To delete all values stored in the memory, press the M1 (or M2) Button and hold it down for more than 5 seconds. Symbols “Clr”
will appear on the screen and all values will be deleted from the memory.
INFORMATION ABOUT ERRORS
Indication Likely cause Methods of correction
The arm cuff is applied incorrectly or the air
tube plus is inserted not tightly enough.
Measurements cannot be made due
to hand movement or talking during
measurements.
.
Be sure that the arm cuff is applied correctly and
the plug is inserted tightly. Repeat the whole
measurement procedure.
Repeat the measurement following strictly the
recommendations of this Manual.
Batteries are discharged.
Replace the batteries for new ones.
CARE, STORAGE, REPAIR AND DISPOSAL
1. Keep this Device from exposure to higher humidity, direct sunlight, shocks, vibration. THIS DEVICE IS NOT WATERTIGHT!
2. Do not keep and use this Device near heating installations and open fi re.
3. If the Device was stored at a temperature below the freezing point, keep it at least for 1 hour in some warm place before use.
4. Remove the batteries if the Device will be unused for a long time. Battery leaking may damage the Device. KEEP BATTER-
IES OUT OF REACH OF CHILDREN!
5. Keep the Device clean and protect it from dust. Use the dry soft cloth to clean the Device.
6. Keep the Device and its components away from water, solvents, spirit and petrol.
7. Protect the arm cuff from contacting on sharp things; do not stretch or fold tightly the arm cuff .
8. Do not subject the Device to strong shocks, such as dropping on the fl oor.
9. This Device does not contain special controls to adjust the measurement accuracy. It is prohibited to open individually
the electronic block. Repair the Device only in authorized organizations.
10. On expiration of the warranted service life apply from time to time to authorized repair organizations to check the
technical condition of the Device.
11. Dispose of the Device and its components according to the application local regulations. No special requirements to
disposal of this Device are defi ned by the manufacturer.
12. The arm cuff may withstand multiple sanitary treatments. The internal tissue surface of the arm cuff (contacting on
arm) may be cleaned with cotton ball soaked in 3%-solution of hydrogen peroxide. At long use the partial color fading of
the tissue coating of the arm cuff is possible. Washing and ironing of the arm cuff are not allowed.
TROUBLESHOOTING TIPS
PROBLEM LIKELY CAUSE METHOD OF CORRECTION
After pressing the
Button no indication
on the display.
Discharge of batteries.
Polarity of batteries is not observed.
Battery terminals are contaminated
Power source not plugged in an electrical outlet.
Replace all batteries for new ones.
Install batteries correctly.
Clean the terminals with dry cloth.
Plug the power source into an electrical outlet.
Infl ation is stopped
and resumed.
Automatic re-infl ation to obtain correct
measurements.
Perhaps you talk or move your arm during the
measurement?
See MEASUREMENT PROCEDURE
Calm down and repeat the measurement.
Every time the blood
pressure is diff erent.
Measurements are
too low/high
Check that the arm cuff is level with your heart?
Check that the arm cuff is applied correctly?
Perhaps your arm muscles are tough?
Perhaps you talk or move your arm during the
measurement?
Take the correct position for measurement.
Take the correct position for measurement.
Calm down, apply the arm cuff correctly.
Keep silence and quiet during measurement.
Measurements of
the pulse rate are too
high/low..
Perhaps you talk or move your arm during the
measurement?
Perhaps you make measurement directly after
physical load?
Keep silence and quiet during measurement.
Repeat the measurement at least in 5 min.
Impossibility to make
a large of number of
measurements.
Application of poor batteries. Use only alkali batteries of well-known
manufacturers.
If regardless of the above recommendation you are unable to get correct measurement results, stop the use of this Device
and apply to a maintenance organization (addresses and telephones of authorized organizations may be found in the
warranty card). Do not try to adjust the internal mechanism by yourself.
WARRANTY
The warranty liabilities are contained in the warranty card given at the sale of this Device to a purchaser.
The addresses of organizations for warranty maintenance are given in the warranty card.
Manufactured under control and for Little Doctor International (S) Pte. Ltd. (35 Selegie Road #09-02 Parklane Shopping Mall,
Singapore 188307, postal address: Yishun Central P.O. Box 9293 Singapore 917699).
Manufacturer: Little Doctor Electronic (Nantong) Co. Ltd. (No. 8, Tongxing Road Economic & Technical Development Area,
226010 Nantong, Jiangsu, People’s Republic of China).
Distributor in European Union: Little Doctor Europe Sp. z o. o. (57G Zawila Street, 30-390 Kraków, Poland, phone: +48 12
2684746, 12 2684747, fax: +48 12 268 47 53, e-mail: biuro@littledoctor.pl)
For more information please visit www.littledoctor.sg
PL
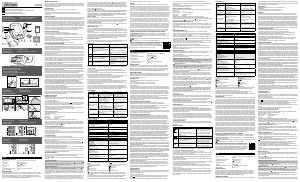
PODSTAWOWE CZĘŚCI I KOMPONENTY (rys.1)
1
BLOK ELEKTRONICZNY URZĄDZENIA.
9
PRZYCISK M2 (PAMIĘĆ 2).
2
WYŚWIETLACZ LCD.
3
GNIAZDO DO PODŁĄCZENIA MANKIETU
10
PRZYCISK (WŁĄCZNIK/WYŁĄCZNIK
ZASILANIA).
4
ZŁĄCZE DO MANKIETU.
11
PRZYCISK M1 (PAMIĘĆ 1).
5
WĄŻ MANKIETU.
12
BATERIE
6
MANKIET.
13
KARTA GWARANCYJNA.
7
GNIAZDO DO PODŁĄCZENIA ZASILACZA.
14
INSTRUKCJA OBSŁUGI.
8
ZASILACZ LD-N057(W ZAWARTOŚCI KOMPLETU MODELU LD51A, LD51U).
15
TORBA.
EN
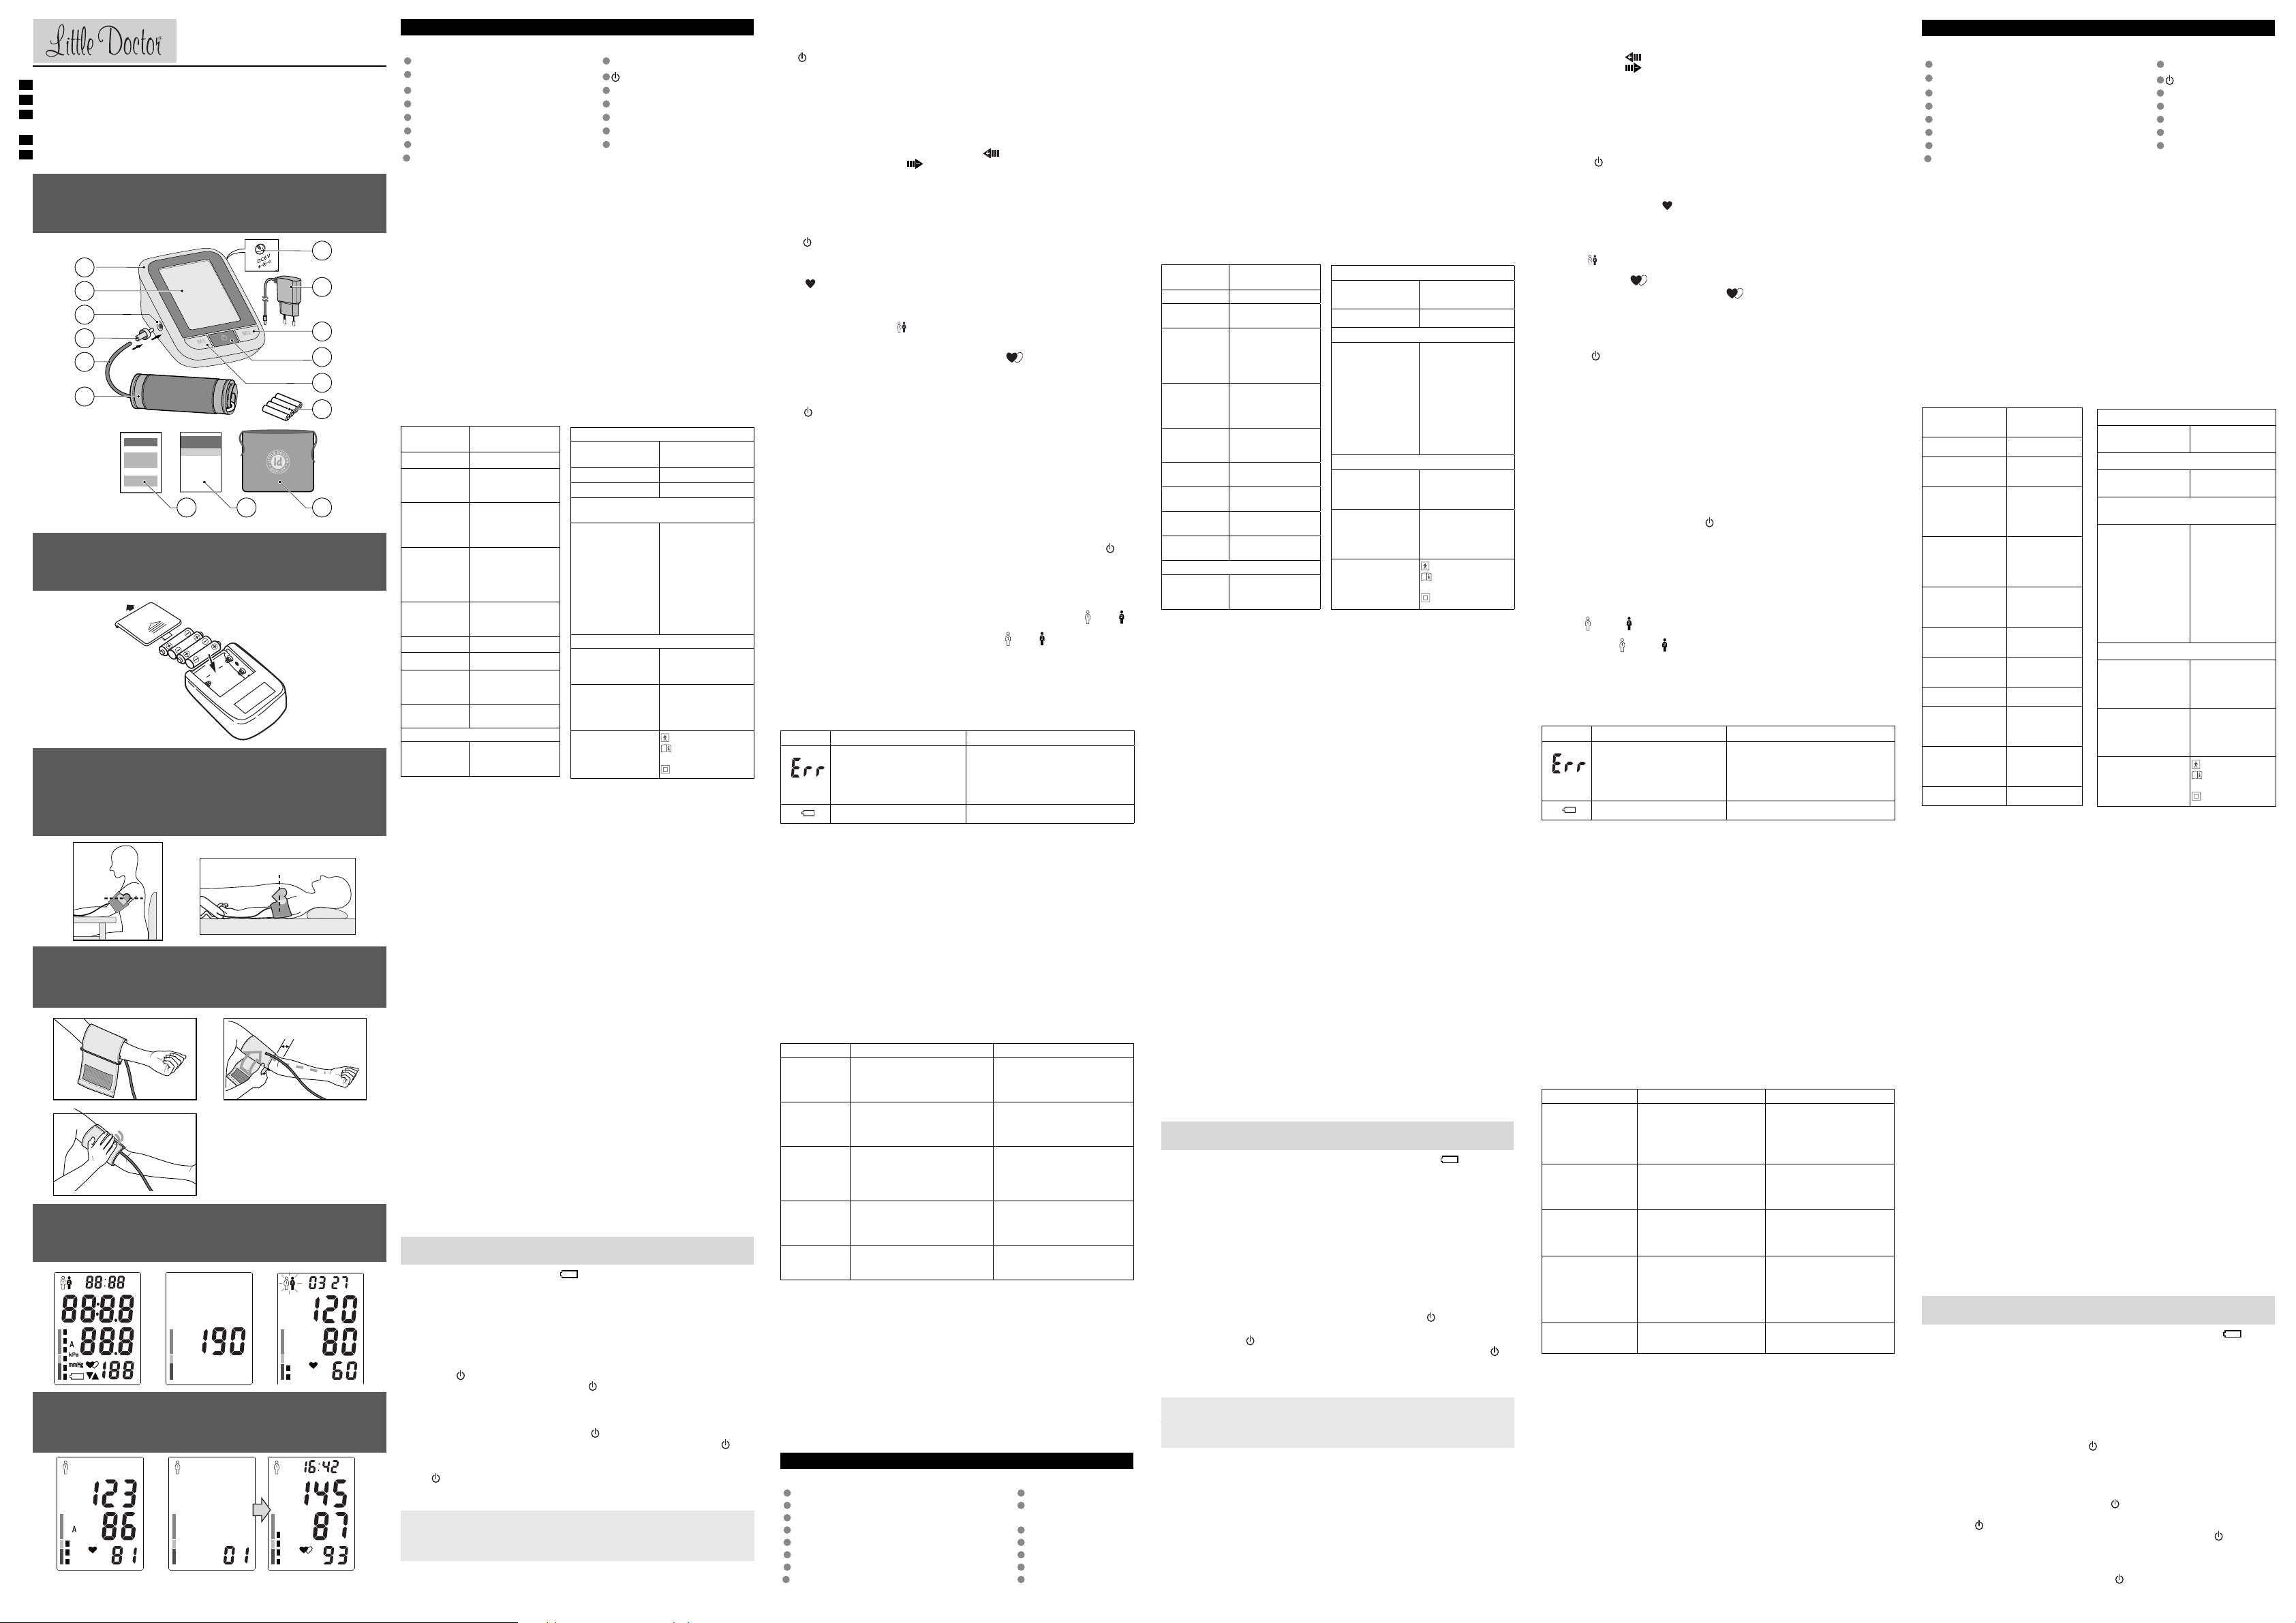
PARTS AND COMPONENTS (fi g.1)
1
ELECTRONIC UNIT.
9
M2 (MEMORY 2).
2
LCD.
10
(POWER ON/OFF).
3
ARM CUFF JACK
11
M1 (MEMORY 1).
4
AIR TUBE PLUG.
12
POWER ELEMENTS
5
AIR TUBE.
13
WARRANTY CARD.
6
ARM CUFF CUFF-LDA.
14
INSTRUCTION MANUAL.
7
POWER SOURCE JACK
15
STORAGE CASE.
8
ELECTRICAL POWER SUPPLY LD-N057 (IT IS ATTACHED TO
MODIFICATION LD51A AND LD51U).
GENERAL INFORMATION
This Instruction Manual is designed to assist the user with safe and eff ective operation of the automatic digital Device for
measurement of blood pressure and heartbeat rate LD, (modifi cation LD51, LD51A, LD51U) (hereinafter – the “Device”).
Use this Device according to the rules described in this Manual. Operate the Device only as intended. Do not use the
Device for any other purposes. Read and understand the whole Instruction Manual, in particular “Recommendations on
Correct Measurement”.
INDICATIONS FOR USE
Use this Device to measure your systolic and diastolic blood pressure and heartbeat rate in patients aged from 15. This
Device is recommended for use by persons with unstable blood pressure or known arterial hypertension at home as an
addition to medical surveillance.
OPERATION PRINCIPLE
This Device uses the oscillometric method of blood pressure and pulse rate measurement. Wrap the cuff around your up-
per arm and it starts to be infl ated automatically. The sensitive element of the Device feels the weak pressure oscillations
in the cuff generated by widening and contraction of the brachial artery in response to every heartbeat. Pumping in is
ceased when cuff is adequately pumped in to determine diastolic and systolic pressure (the amplitude of the pressure
waves is measured, converted into millimeters Hg and shown on the display as fi gures) after which air is released from
cuff . The Device has 2 memories, by 90 cells, for storage of measurement results. Remember that the Device will not
maintain the mentioned accuracy of a measurement if it is used or stored at a temperature or humidity other than
those specifi ed in Technical Specifi cations of this Manual. We are warning about possibility of mistakes in blood pressure
measurement with this Device in persons with pronounced cardiac arrhythmia. Consult the doctor concerning blood
pressure measurement of your child.
TECHNICAL SPECIFICATIONS
Storage and transportation conditions
Temperature, °C
Relative humidity, % Rh
from -20 to 50
85 and lower
Date and time
yes
Max power intake, W
3,6
ADAPTER LD-N057 ( (it is attached to modifi cation LD51A and
LD51U)
Output voltage
Max load current
Input voltage
Dimensions
Weight
Plug:
Polarity of terminals
Internal diameter, mm
External diameter, mm
Length of plug contact, mm
6 V ± 5%
not less than 600 mA
~200-240 V, 50/60 Hz
64 x 70 x 43 mm
not more 0,3 kg
«–» internal
2.1 ± 0.1
5.5 ± 0.1
10 ± 0.5
Dimensions
Size (electronic block), mm
Weight (without package, case,
batteries and adapter), g
129 x 105 x 61
424 (LD51, LD51A) / 422 (LD51U)
Year of manufacture
year the manufacture is given
in the bottom of the Device
body in a serial number after
symbols “AA”
Opisanie symboli
Type BF
Important: Read the
instructions
Type II
Measurement
method
oscillometric with Fuzzy
Algorithm
Display LCD
Pressure indication
range in an arm cuff ,
mmHg
from 0 to 300
Measurement range:
pressure in an arm
cuff , mmHg
pulse rate, 1/min
from 40 to 260
from 40 to 160
Range of admis-
sible absolute error
at measurement of
air pressure in an arm
cuff , mmHg
±3
Range of admissible
relative error at pulse
rate measurement, %
±5
Infl ation
automatic (air pump)
Defl ation automatic
Memory
2х90 recent measurements +
average value of the last three
measurements
Type of power supply: 4 “AA” size batteries (LR6) or
adapter not less than 600 mA
Operation conditions
Temperature, °C
Relative humidity,
% Rh
from 10 to 40
85 and lower
Revision date of the present Manual is indicated on the last page as EXXX/YYMM/NN, where YY is the year, MM is the
month and NN is the number of revision.
This Device manufacturing is certifi ed according to international standard ISO 13485. Devices LD51, LD51A, LD51U com-
ply with the requirements of European Directive MDD 93/42/ЕЕС, international standards, EN980, EN1041, EN1060-1,
EN1060-3, EN10601-1-2, ISO 14971.
Power source LD-N057 complies with international standard EN 55022 Class A, protection level against electric shock:
Class II, Type BF.
RECOMMENDATIONS ON CORRECT MEASUREMENTS
1.For correct measurement you should know that THE BLOOD PRESSURE IS SUBJECT TO SHARP VARIATIONS EVEN WITHIN
THE SHORT TIME INTERVALS. The blood pressure depends on many factors. It is usually lower in summer and higher in
winter. The blood pressure varies together with the atmospheric pressure, depends on physical loads, emotional excite-
ment, stresses and dietary regime. Drugs, drinking alcohol and smoking produce signifi cant eff ect. Even the very procedure
of blood pressure measurement in a polyclinic sends the blood pressure high in many people, thus, the blood pressure
measured at home often diff ers from the values received in a polyclinic. As the blood pressure tends to rise at low tempera-
tures, make measurements at an indoor temperature (approximately 20° C). If this Device stayed under a low temperature,
keep it for at least 1 hour at an indoor temperature before use, otherwise the measurement result may be incorrect. During
a day the diff erence in readings for healthy people may be 30-50 mmHg of systolic pressure and to 10 mmHg of diastolic
pressure. The dependence of the blood pressure on various factors is individual for each person. Accordingly, it is recom-
mended to keep a special book with blood pressure records. ONLY A CERTIFIED DOCTOR USING YOUR RECORDS IS CAPABLE
TO ANALYZE THE TENDENCY OF YOUR BLOOD PRESSURE VARIATIONS.
2. At cardiovascular and some other diseases requiring blood pressure monitoring make measurements in the hours fi xed
by your attending doctor. REMEMBER THAT THE DIAGNOSTIC AND ANY TREATMENT OF HYPERTENSION MAY BE CONDUCTED
ONLY BY A CERTIFIED DOCTOR ON THE BASIS OF BLOOD PRESSURE VALUES OBTAINED BY THIS DOCTOR. TAKING OF DRUGS
AND THEIR DOSES SHOULD BE PRESCRIBED ONLY BY YOUR ATTENDING DOCTOR.
3. At such disorders as deep vascular sclerosis, weak pulse wave and also in patients with the prominent distortions of
cardiac rhythm it may be diffi cult to measure the blood pressure accurately. IN SUCH CASES CONSULT A CERTIFIED DOCTOR
ABOUT APPLICATION OF THE ELECTRONIC DEVICE.
4. KEEP QUIET DURING A MEASUREMENT TO OBTAIN THE ACCURATE VALUES OF YOUR BLOOD PRESSURE WITH THE ELEC-
TRONIC DEVICE. Measure your blood pressure in the calm and comfortable conditions at the indoor temperature. No eating
an hour before measurement; no smoking, taking tonic agents, alcohol 1.5-2 hours before measurement.
5. The accuracy of blood pressure measurement depends on whether the cuff matches the size of your arm. THE CUFF SHOULD
NOT BE TOO SMALL OR TOO LARGE.
6. Wait 3 minutes between measurements for the blood to restore its circulation. However, the persons with prominent
atherosclerosis due to considerable loss of vascular elasticity may need to increase the wait time between measurements
(10-15 minutes). This also refers to the patients suff ering for long from diabetes. For more accurate determination of blood
pressure it is recommended to make a series of 3 consecutive measurements and to use the average value.
POWER SUPPLY OF THE DEVICE
BATTERY INSTALLATION (fi g.2)
1. Open the cover of the battery compartment and install 4 “AA” size batteries according to polarity marked inside the
compartment. Do not use much force to remove the cover of the battery compartment.
2. Close the battery cover.
The batteries supplied with the Device are intended for check of the Device performance at sale and their service life
may be shorter than of the recommended batteries.
• Replace all batteries when the Low Battery Indicator “ ”, appears on the screen or when there is no any indication
on the screen. The Low Battery Indicator does not show the discharge level.
•Replace all four batteries at the same time. Do not use the waste batteries.
• If the Device is unused for a long time, remove all batteries.
• Do not leave the waste batteries in the Device.
USE OF THE DEVICE WITH THE POWER SOURCE
The manufacturer recommends application of the stabilized power source LD-N057 (it is attached to modifi cation LD51A and
LD51U). The jack for connection of the power source is on the right side of the Device.
To use the device with electric power source (EPS), connect plug connector of EPS to the Device and insert plug of EPS into
mains socket, press
.
Measurement over, switch off the Device having depressed button
, remove plug of EPS from mains socket and disconnect
plug connector from the Device. To avoid resetting of date and time, do not remove the batteries when using the device with
power cells
.
SETTING OF DATE AND TIME
1.To shift to mode of date and time setting, it is necessary to press and hold for over 5 seconds.
2. If mode of date and time setting is switch on, to set date and time it is necessary, holding M1, depress button .
Parameter will blink. Change of selected parameter toward increasing is taking place when depressing button M2, towards
decreasing – when depressing button M1. To shift to setting of the next parameter, year/month/hours/min, it is necessary
to depress
.
3. If no actions are done in mode of date and time setting for more than 1 minute, the Device is independently changed over to
mode of date and time indication. In this case, all the changes that have been already made will come into eff ect.
After replacing the batteries the mode of date and time indication is always off . The factory setting of the clock mode is OFF.
When power cells are replaced, date and time will zero, and measurement results will be safe without date and time setting.
If the device does not take measurements while the date and time indication mode is ON, the display will show current date
and time.
CORRECT POSITION DURING MEASUREMENT
(fi g.3)
1. Sit at a table so that during blood pressure measurement your hand rests on its surface. Be sure that the cuff is placed
approximately at the level of your heart and that your arm lies freely on the table and does not move.
LD51, LD51A, LD51U
PL
INSTRUCTION MANUAL FOR DIGITAL BLOOD PRESSURE MONITOR LD51, LD51A, LD51U
BGINSTRUKCJA OBSŁUGI CIŚNIENIOMIERZA CYFROWEGO LD51, LD51A, LD51U
CZHASZNÁLATI ÚTMUTATÓ. LD51, LD51A, LD51U készülék a vérnyomás és pulzusszám
digitális mérésére
HUMANUAL DE UTILIZARE A TENSIOMETRULUI DIGITAL LD51, LD51A, LD51U
ROРЪКОВОДСТВО ЗА ЕКСПЛОАТАЦИЯ НА ЦИФРОВ ТОНОМЕТЪР LD51, LD51A, LD51U
fi g.1 rys. 1 1 . ábra imaginea 1 рис. 1
PARTS AND COMPONENTS DENUMIREA PĂRŢILOR ȘI COMPONENTELOR
PODSTAWOWE CZĘŚCI I KOMPONENTY НАЗВАНИЯ НА ЧАСТИ И КОМПОНЕНТИ
ALKATRÉSZEK MEGNEVEZÉSE
fi g.2 rys. 2 2 . ábra imaginea 2 рис. 2
BATTERY INSTALLATION INSTALAREA BATERIILOR
WYMIANA BATERII
ПОСТАВЯНЕ НА ЕЛЕМЕНТИТЕ НА ЗАХРАНВАНЕ
AZ ELEMEK BEHELYEZÉSE
fi g.3 rys. 3 3. ábra imaginea 3 рис. 3
CORRECT POSITION DURING MEASUREMENT
PRZYJĘCIE POZYCJI UMOŻLIWIAJĄCEJ POMIAR
A HELYES TESTHELYZET A MÉRÉSNÉL
POZIŢIA CORECTĂ ÎN TIMPUL PROCESULUI DE MĂSURARE
ПРАВИЛНА ПОЗА ПРИ ИЗМЕРВАНЕ
fi g.4 rys. 4 4 . ábra imaginea 4 рис. 4
CUFF PREPARATION PREGĂTIREA MANȘETEI
ZAKŁADANIE MANKIETU ПОДГОТОВКА НА МАНШЕТА
A MANDZSETTA ELŐKÉSZÍTÉSE
2~3cm
fi g.5 rys. 5 5 . ábra imaginea 5 рис. 5
MEASUREMENT PROCEDURE ORDINEA MĂSURĂRII
PROCEDURA POMIARU НАЧИН НА ИЗМЕРВАНЕ
A MÉRÉS MÓDSZERE
M
D
M
D
1. 2. 3.
fi g.6 rys. 6 6 . ábra imaginea 6 рис. 6s
MEMORY FUNCTION FUNCŢIA MEMORIE
FUNKCJA PAMIĘCI ФУНКЦИЯ НА ЗАПАМЕТЯВАНЕ
A MÉRÉS MÓDSZERE
1. 2.
INFORMACJA OGÓLNA
Niniejsza instrukcja ma służyć użytkownikom pomocą w bezpiecznym i efektywnym posługiwaniu się automatycznym
elektronicznym urządzeniem do pomiaru ciśnienia tętniczego krwi i pulsu LD, model LD51, LD51A, LD51U (dalej w tekście:
URZĄDZENIE). Urządzenie powinno być stosowane zgodnie z zasadami przedstawionymi w niniejszej instrukcji i nie
należy wykorzystywać go do celów innych, niż tu opisane. Należy przeczytać i zrozumieć całą instrukcję obsługi, zwłaszcza
rozdział “Zalecenia dotyczące prawidłowego pomiaru”.
WSKAZANIA DO STOSOWANIA
Urządzenie przeznaczone jest do pomiaru skurczowego i rozkurczowego ciśnienia tętniczego krwi oraz pulsu u pacjentów
w wieku od 15 lat. Ciśnieniomierz zalecany jest do stosowania u pacjentów z niestabilnym ciśnieniem tętniczym krwi lub
nadciśnieniem tętniczym w warunkach domowych jako uzupełnienie nadzoru lekarskiego. Mankiet dostosowany jest do
ramion o obwodzie 25-36 cm.
ZASADA DZIAŁANIA
Urządzenie wykorzystuje oscylometryczną metodę pomiaru ciśnienia tętniczego krwi. Mankiet jest owijany wokół
ramienia i pompowany automatycznie. Czujnik wychwytuje delikatne wahania zmiany ciśnienia w mankiecie, powodo-
wane rozszerzaniem się i kurczeniem się tętnicy ramiennej odpowiednio do bicia serca. Mierzona amplituda fal ciśnienia
przekładana jest na wartość wysokości słupa rtęci, wyświetlaną na wyświetlaczu LCD. Urządzenie posiada 90 komórek
pamięci do przechowywania wyników pomiarów. Należy pamiętać, że aby urządzenie wyświetlało poprawne wyniki,
musi ono być przechowywane i wykorzystywane w temperaturach i przy wilgotności, nie odbiegających od opisanych
w dziale ”Charakterystyki techniczne” danej instrukcji. Uprzedzamy o możliwości przekłamania pomiarów u osób z
rozrusznikami serca, arytmią serca, zwężeniem naczyń, zaburzeniami wątroby i cukrzycą. Przed pomiarem ciśnienia u
dzieci wskazane jest skonsultowanie się z lekarzem.
CHARAKTERYSTYKI TECHNICZNE
Warunki przechowywania i transportu
temperatura, °C
wilgotność względna, Rh
od -20 do 50
85 i mniej
Maksymalny pobór mocy, V
3,6
Zasilacz: LD-N057 (w zawartości kompletu do LD51A, LD51U)
Napięcie wyjściowe
Maksymalny prąd obciążenia
Napięcie wejściowe
Wymiary gabarytowe
Waga
Wtyczka:
biegunowość
średnica wewnętrzna, mm
średnica zewnętrzna, mm
długość, mm
6 V ± 5%
nie mniej niż 600 mA
~200-240 V, 50/60 Hz
64 x 70 x 43 mm
nie więcej niż 0,3 kg
«–» wewnętrzny
2.1 ± 0.1
5.5 ± 0.1
10 ± 0.5
Wymiary gabarytowe
wymiary (korpus), mm
waga (bez opakowania, torby,
baterii i zasilacza), g
129 x 105 x 61
424 (LD51, LD51A) / 422 (LD51U)
Rok produkcji
podany na obudowie w dolnej
części korpusu urządzenia w jego
numerze seryjnym, po symbolu
«AA».
Opisanie symboli
Urządzenie typu BF
Uwaga! Należy zapoznać
się z instrukcją
Klasa ochronna II
Metoda pomiaru oscylometryczna z Fuzzy
Algorithm
Wyświetlacz trzyliniowy wyświetlacz LCD
Zakres wyświetlania
3-300 mmHg (ciśnienie w
mankiecie)
Zakres pomiaru
ciśnienia w mankie-
cie, mmHg
częstotliwości
pulsum, 1/min
od 40 do 260
od 40 do 160
Granica błędu pomiaru
ciśnienia powietrza w
mankiecie kompre-
syjnym, mmHg
±3
Granica błędu po-
miaru częstotliwości
pulsu, %
±5
Pompowanie
automatyczne (pompa
powietrzna)
Spuszczanie powietr-
za podczas pomiaru automatyczne
Pamięć
2x90 pomiarów +średnia z
3 ostatnich
Typ zasilania
elektrycznego:
4 baterie AA (LR6) lub zasilacz,
nie mniej niż 600 mA
Warunki eksploatacji urządzenia
temperatura, °C
wilgotność względna,
% Rh
od 10 do 40
85 i mniej
Produkcja urządzeń certyfi kowana jest według międzynarodowego standardu ISO 13485:2003. Urządzenia spełniają
wymagania Dyrektywy Rady MDD 93/42/EEC, standardów międzynarodowych, EN980, EN1041, EN1060-1, EN1060-3,
EN10601-1-2, ISO 14971.
Zasilacz LD-N057 odpowiada międzynarodowemu standardowi EN 55022 Class A, typ i stopień ochrony przed poraże-
niem prądem elektrycznym: klasa II, typ BF.
ZALECENIA DOTYCZĄCE PRAWIDŁOWEGO POMIARU
1.Dla przeprowadzenia prawidłowego pomiaru należy pamiętać, że CIŚNIENIE TĘTNICZE PODLEGA SILNYM WAHANIOM
NAWET W KRÓTKIM PRZEDZIALE CZASOWYM. Wartość ciśnienia tętniczego krwi zależy od wielu czynników. Zwykle jest
ona niższa w okresie letnim i wyższa w okresie zimowym. Ciśnienie krwi zależy od ciśnienia atmosferycznego, wysiłku
fi zycznego, pobudliwości, stresu, diety. Duży wpływ mają używki; narkotyki, alkohol i palenie tytoniu. U wielu osób samo
przeprowadzenie pomiaru ciśnienia w przychodni wywołuje podniesienie wskaźników. Z tego powodu wyniki pomiarów
ciśnienia tętniczego przeprowadzonych w warunkach domowych często różnią się od wyników pomiarów, przeprowadzo-
nych w ośrodkach medycznych.
Z uwagi na fakt, że ciśnienie w niskiej temperaturze podwyższa się, należy je mierzyć w temperaturze pokojowej (około 20°
C). W przypadku, gdy urządzenie było przechowywane w niskiej temperaturze, przed użyciem trzeba je przynajmniej przez
godzinę przetrzymać w temperaturze pokojowej, inaczej wyniki pomiaru mogą być przekłamane. W ciągu doby wahania
ciśnienia u zdrowych ludzi mogą wynieść 30-50mmHg dla ciśnienia skurczowego (górnego) i do 10 mmHg dla ciśnienia
rozkurczowego (dolnego). Wahania ciśnienia u różnych ludzi mogą mieć różne podstawy, dlatego zaleca się prowadzenie
dziennika pomiarów. TYLKO LEKARZ NA PODSTAWIE DANYCH Z TAKIEGO DZIENNIKA MOŻE PRZEANALIZOWAĆ TENDENCJE
ZMIAN I STWIERDZIĆ EWENTUALNE PRZYCZYNY ZABURZEŃ CIŚNIENIA TĘTNICZEGO.
2. W chorobach układu krążenia, jak i wielu innych, które wymagają monitorowania ciśnienia tętniczego, ważne jest
dokonywanie pomiarów w porach zaleconych przez lekarza. PAMIĘTAJ, ŻE DIAGNOSTYKA I JAKIEKOLWIEK LECZENIE NAD-
CIŚNIENIA TĘTNICZEGO MOGĄ BYĆ PRZEPROWADZANE TYLKO PRZEZ LEKARZA NA ZASADZIE WSKAŹNIKÓW NADCIŚNIENIA
TĘTNICZEGO, UZYSKANYCH BEZPOŚREDNIO PRZEZ LEKARZA. PRZYJMOWANIE LEKÓW I ZMIANY W ICH DOZOWANIU NALEŻY
UPRZEDNIO SKONSULTOWAĆ Z LEKARZEM.
3. Przy zaburzeniach takich jak: miażdżyca naczyń krwionośnych, słaby puls, a także u pacjentów z poważnymi zaburzenia-
mi rytmu serca pomiar ciśnienia tętniczego może być utrudniony. W TAKICH PRZYPADKACH NALEŻY SKONSULTOWAĆ SIĘ Z
LEKARZEM W CELU OKREŚLENIA NAJLEPSZEJ METODY POMIARU.
4. ABY OTRZYMYWAĆ POPRAWNE WYNIKI POMIARU CIŚNIENIA TĘTNICZEGO PODCZAS PRZEPROWADZENIA POMIARU NALEŻY
ZACHOWYWAĆ CISZĘ. Pomiar ciśnienia tętniczego powinien być przeprowadzony w pozycji wygodnej dla pacjenta, w
temperaturze pokojowej. Na godzinę przed pomiarem nie należy spożywać posiłków, od półtorej do dwóch godzin nie
spożywać napojów gazowanych i alkoholu, w tym czasie należy również zrezygnować z palenia tytoniu.
5. Dokładność pomiaru ciśnienia tętniczego zależy również od prawidłowego dobrania mankietu do rozmiaru ramienia oraz
prawidłowego ułożenia mankietu. MANKIET NIE MOŻE BYĆ ZA MAŁY LUB ZA DUŻY.
6. Powtórzenie pomiaru jest możliwe po upływie około 3 min. Po takim czasie powraca normalne krążenie w ramieniu. W
przypadku osób z miażdżycą i innymi chorobami układu krążenia czas ten powinien być dłuższy, nawet do 10-15 min. Doty-
czy to również pacjentów z cukrzycą. Określenie dokładnego ciśnienia tętniczego krwi zaleca się na podstawie dokonania 3
pomiarów i wyciągnięcia średniej z uzyskanych wyników
.
ZASILANIE ELEKTRYCZNE URZĄDZENIA
WYMIANA BATERII (rys.2)
1. Otwórz pokrywę i włóż 4 baterie typu AA zgodnie ze schematem, zamieszczonym w wewnętrznej części komory.
Upewnij się, że została zachowana właściwa biegunowość. Nie stosuj nadmiernej siły podczas otwierania pokrywy
komory.
2. Zamknij pokrywę komory baterii.
Baterie dostarczone z urządzeniem służą do testowania poprawności działania ciśnieniomierza, ich żywotność jest
zatem o wiele niższa, niż żywotność nowych baterii.
• Zamień wszystkie baterie, kiedy na wyświetlaczu ciągle wyświetla się symbol wymiany baterii “ ”, lub nie wyświe-
tla się nic. Symbol wymiany baterii nie wskazuje poziomu naładowania.
• Podczas wymiany baterii należy zmienić je wszystkie, nie należy zakładać baterii używanych.
• Jeżeli urządzenie nie jest używane przez dłuższy czas, należy wyjąć z niego baterie.
• Nie zostawiaj zużytych baterii w urządzeniu.
STOSOWANIE URZĄDZENIA ZASILANEGO ZASILACZEM
Producent poleca zasilacz stabilizowany LD-N057 (urządzenia LD51A i LD51U mają go w komplecie).
Gniazdko dla zasilacza stabilizowanego znajduje się po prawej stronie urządzenia.
W celu korzystania z ciśnieniomierza zasilanego zasilaczem należy podłączyć złącze zasilacza do urządzenia i włożyć
wtyczkę do gniazdka.
Po zakończeniu pomiaru urządzenie należy wyłączyć naciskając przycisk, wyjąć wtyczkę z gniazdka i odłączyć zasilacz od
urządzenia.
Żeby uniknąć zerowania się daty i godziny, przy korzystaniu z urządzenia zasilanego zasilaczem nie należy wyjmować baterii.
USTAWIANIE DATY I GODZINY
1. W celu włączenia opcji wyświetlania daty i godziny należy nacisnąć i przytrzymać przycisk przez ponad 5 sekund.
2. Jeżeli opcja wyświetlania daty i godziny jest włączona, w celu ustawienia kalendarza i zegara należy przycisnąć jedno-
cześnie przycisk M1 i przycisk
. Zacznie migać ROK. Można go ustawić przy pomocy przycisków M1 i M2. Aby ustawić
kolejny parametr w kolejności MIESIĄC – DZIEŃ – GODZINA – MINUTA, można przejść do niego, naciskając przycisk
. W
celu zwiększenia/zmniejszenia wartości należy skorzystać z przycisków M1/M2.
3. Jeżeli włączona jest opcja ustawiania kalendarza i zegara, a w ciągu 1 minuty nie zostaną wykonane żadne czynności, urzą-
dzenie samo przełączy się do trybu wyświetlania daty i godziny, przy czym wszystkie dokonane już zmiany zostaną zapisane.
4. W celu wyłączenia opcji wyświetlania daty i godziny należy przycisnąć przycisk i przytrzymać go przez ponad 5 sekund.
Po wymianie baterii opcja wyświetlania daty i godziny jest zawsze wyłączona. Zgodnie z ustawieniami fabrycznymi opcja
zegara jest wyłączona. W przypadku wyłączenia opcji wyświetlania daty i godziny bieżące ustawienia zegara oraz kalen-
darza wyzerują się, a wyniki pomiarów zostaną zapisane bez daty i godziny. Jeżeli urządzenie nie dokonuje pomiaru, a
opcja wyświetlania daty i godziny jest włączona, na wyświetlaczu widać bieżącą datę i godzinę.
PRZYJĘCIE POZYCJI UMOŻLIWIAJĄCEJ POMIAR
(rys.3)
1. Usiądź przy stole tak, aby w trakcie dokonywania pomiaru twoja ręka leżała na jego powierzchni. Upewnij się, że mankiet
po założeniu na ramię jest na wysokości serca, a przedramię swobodnie leży na stole i nie porusza się.
2. Pomiaru można dokonywać również w pozycji leżącej na plecach. Podczas pomiaru trzeba patrzeć do góry, zachowywać
spokój i nie poruszać się. Należy pamiętać, aby mankiet był założony na ramieniu na wysokości serca.
ZAKŁADANIE MANKIETU (rys.4)
Naciśnij przycisk WŁĄCZ/WYŁĄCZ
1. Rozsuń mankiet tak, aby metalowy pierścień znajdował się około 5 cm od rzepu, jak pokazano na rysunku.
2. Wsuń lewe ramię w mankiet tak, aby rurka była skierowana w kierunku dłoni. Jeżeli pomiar na lewej ręce jest utrudniony,
można dokonać go na prawej. Należy pamiętać, że wynik może się różnić o 5-10 mmHg.
3. Owiń mankiet tak, aby jego dolna krawędź znajdowała się w odległości 2-3 cm od łokcia. Rurka i napis «ARTERY» (TĘTNICA)
powinny znajdować się nad tętnicą, od wewnętrznej strony stawu łokciowego.
4. Należy zabezpieczyć mankiet rzepem tak, aby leżał wygodnie i nie był za ciasny. Zbyt ciasne lub luźne założenie mankietu
może być przyczyną błędnych pomiarów.
5. Strzałka INDEX powinna wskazywać na napis NORMAL. Oznacza to, że mankiet jest właściwy dla tej grubości ramienia. Jeżeli
strzałka wskazuje na obszar
« »
na lewo od napisu, znaczy to że mankiet jest za mały i wyniki będą zawyżone. Jeżeli
strzałka wskazuje na obszar
« »
na prawo od napisu, oznacza to, że mankiet jest za duży i wyniki będą zaniżone.
6. W przypadku dużej objętości ręki zwężającej się stożkowo w kierunku łokcia, mankiet należy nawinąć spiralnie, jak pokazano
na rysunku.
7. Zbyt mocno zwinięty rękaw nad mankietem może powodować ucisk, tamując tym samym przepływ krwi, co może być
przyczyną błędnego pomiaru ciśnienia.
PROCEDURA POMIARU (rys.5)
1. Podłącz złącze mankietu do właściwego gniazda ciśnieniomierza. Przed pomiarem rozluźnij się i weź 3-5 głębokich odde-
chów. Nie poruszaj się, nie naprężaj ręki i nic nie mów w czasie pomiaru.
2. Naciśnij przycisk
.
3. Przez moment na wyświetlaczu zostaną podświetlone wszystkie znaki (rys. 31), usłyszysz dwa krótkie sygnały, a urządzenie
automatycznie zacznie pompować mankiet. Pierwsze pompowanie mankietu zatrzyma się na poziomie 190 mmHg (rys. 32).
4. Po osiągnięciu wartości 190 mmHg ciśnienie w mankiecie zacznie stopniowo spadać, a wyświetlana wartość będzie malała.
Puls oznaczony jest migającym symbolem “
”.
Z UWAGI NA TO, ŻE CIŚNIENIE TĘTNICZE I PULS MIERZONE SĄ PODCZAS UWALNIANIA POWIETRZA Z MANKIETU, STARAJ SIĘ NIE
PORUSZAĆ RĘKĄ I NIE OBCIĄŻAĆ RAMIENIA.
5. Na koniec pomiaru rozlegnie się sygnał dźwiękowy, po czym urządzenie wypuści z mankietu całe powietrze, a na wyświetla-
czu pojawi się wynik pomiaru.
Migający znak «
» przypomina, że w celu zapisania wyników należy wybrać pamięć 1 lub 2, naciskając odpowiednio M1 lub
M2. Wynik można zapisać przed rozpoczęciem kolejnego pomiaru lub wyłączeniem urządzenia.
Migający na wyświetlaczu znak “ ” informuje o nieregularnym rytmie serca. Pojawienie się wskaźnika arytmii może być
spowodowane również ruchem ciała w trakcie pomiaru. Jeżeli znak “
” pojawia się okresowo, należy skonsultować się z
lekarzem prowadzącym.
Oprócz wysokości ciśnienia w postaci liczbowej wynik pomiaru widać też na skali Światowej Organizacji Zdrowia (rys. 34).
znajdującej się z lewej strony wyświetlacza.Jest to trójkolorowa skala klasyfi kacji wyniku pomiaru ciśnienia tętniczego. Pozwala
ona ocenić otrzymane wartości zgodnie z następującą klasyfi kacją: normalne ciśnienie, podwyższone ciśnienie lub jeden ze stopni
nadciśnienia tętniczego.
6. Wciśnij przy
cisk – urządzenie się wyłączy. W celu powtórnego przeprowadzenia pomiaru powtórz od początku wszystkie
działania opisane w danym rozdziale instrukcji.
DLA OTRZYMANIA DOKŁADNYCH WYNIKÓW NALEŻY ROBIĆ PRZERWY MIĘDZY POMIARAMI, ŻEBY PRZYWRÓCIĆ KRĄŻENIE KRWI.
DLATEGO POWTÓRNY POMIAR ZALECA SIĘ PRZEPROWADZAĆ NIE WCZEŚNIEJ NIŻ 3 MINUTY OD OSTATNIEGO POMIARU. DANE
TE ZOSTANĄ ZACHOWANE NAWET PO WYJĘCIU BATERII Z URZĄDZENIA. USUNĄĆ ZACHOWANE W PAMIĘCI URZĄDZENIA WYNIKI
MOŻNA PO DOKONANIU CZYNNOŚCI OPISANYCH W ROZDZIALE «FUNKCJA PAMIĘCI».
Jeśli źródło zasilania nie zostało odłączone, a w ciągu 3 minut nie korzystano z urządzenia, wyłączy się ono automatycznie.
POMPOWANIE AUTOMATYCZNE
Jeżeli początkowe pompowanie mankietu do wartości 190 mmHg nie jest wystarczające lub zostanie wykonany ruch ręką,
urządzenie napompuje mankiet do wyższej wartości. Ciśnieniomierz posiada 4 stałe poziomy pompowania mankietu: 190, 230,
270, 300 mmHg.
Automatyczne pompowanie mankietu jest powtarzane, dopóki pomiar nie zakończy się powodzeniem. Nie oznacza to wady
urządzenia.
WYMUSZONE SPUSZCZANIE POWIETRZA Z MANKIETU
Jeżeli podczas pompowania mankietu lub podczas pomiaru (w trakcie powolnego spuszczania powietrza) zajdzie potrzeba
szybkiego spuszczenia powietrzna, należy wcisnąć przycisk
. Urządzenie szybko wypuści resztę powietrza z mankietu i
wyłączy się.
FUNKCJA PAMIĘCI (rys.6)
1. Wynik każdego pomiaru (ciśnienie, puls, godzina i data) można zapisać w pamięci urządzenia. W tym celu należy w ciągu 3
minut po zakończeniu pomiaru wybrać pamięć M1 lub M2.
WYNIK POMIARU NIE ZOSTANIE ZAPISANY W PRZYPADKU POJAWIENIA SIĘ POWIADOMIENIA O BŁĘDZIE.
2. W każdej z pamięci urządzenia można zapisać maksymalnie 90 wyników pomiarów oraz średnią wartość ostatnich 3 wyni-
ków. Kiedy liczba pomiarów przewyższa 90, najstarsze dane są automatycznie zamieniane wynikami kolejnych pomiarów.
3. To, co zostało zapisane w pamięci urządzenia, można przejrzeć, naciskając przycisk M1 lub M2. Po pierwszym naciśnięciu
przycisku M1
« »
(lub M2
« »
) na wyświetlaczu pojawi się średnia wartość 3 ostatnich pomiarów zapisanych w pamięci
M1 (lub M2) oznaczona symbolem «A» . Po powtórnym naciśnięciu przycisku M1 (lub M2) na wyświetlaczu pojawi się wskaź-
nik wybranej pamięci M1
« »
(lub M2
« »
) i numer komórki pamięci, a po upływie 1 sekundy wyświetli się jej zawartość.
W przypadku wyświetlania zawartości komórki pamięci data i czas pomiaru wyświetlane są naprzemiennie w dolnej linii
wyświetlacza. Każde naciśnięcie przycisku M1 (lub M2) powoduje przejście do kolejnej komórki pamięci.
CZYSZCZENIE PAMIĘCI URZĄDZENIA
W celu usunięcia z pamięci urządzenia wszystkich zapisanych w niej wyników pomiarów, należy nacisnąć przycisk M i przytrzy-
mać go przez ponad 5 sekund. Na wyświetlaczu pojawi się znak «Clr» i pamięć urządzenie zostanie wyczyszczona.
ZAWIADOMIENIA O BŁĘDACH
Symbol Prawdopodobna przyczyna Sposób wyeliminowania
Niepoprawnie założony mankiet lub luźno
podłączony wąż mankietu.
P
omiary nie mogą być wykonane ze
względu na ruch ręką lub rozmowę podczas
przeprowadzenia pomiaru.
Upewnij się, że mankiet został prawidłowo połączo-
ny z ciśnieniomierzem i powtórz procedurę pomiaru.
Wykonaj ponowny pomiar stosując się do wskazó-
wek zawartych w instrukcji.
Baterie są rozładowane.
Należy wymienić wszystkie baterie na nowe.
KONSERWACJA, PRZECHOWYWANIE, NAPRAWA I UTYLIZACJA
1. Ciśnieniomierz należy chronić przed nadmierną wilgocią, bezpośrednim światłem słonecznym, wstrząsami i wibracjami.
URZĄDZENIE NIE JEST WODOSZCZELNE!
2. Nie należy przechowywać lub używać ciśnieniomierza w pobliżu grzejników i otwartego ognia.
3. Jeżeli urządzenie było przechowywane w niskiej temperaturze, przed przeprowadzeniem pomiaru należy przynajmniej
przez 1 godzinę pozostawić w temperaturze pokojowej.
4. Jeśli urządzenie nie jest używane przez dłuższy czas należy wyjąć z niego baterie. Wylanie baterii może spowodować
uszkodzenie urządzenia. BATERIE NALEŻY PRZECHOWYWAĆ W MIEJSCU NIEDOSTĘPNYM DLA DZIECI!
5. Nie wystawiać urządzenia na działanie kurzu. Aby wyczyścić urządzenie należy użyć suchej, miękkiej ściereczki.
6. Niedopuszczalny jest kontakt urządzenia ani jego części z wodą, rozpuszczalnikami, alkoholem, benzyną.
7. Należy chronić mankiet od kontaktu z ostrymi przedmiotami. Nie należy próbować rozciągać lub skracać mankietu.
8. Należy chronić urządzenie przed uderzeniami i upadkami.
9. Urządzenie nie zawiera elementów ustawienia dokładności pomiaru. Nie wolno samoczynnie otwierać panelu przednie-
go. Naprawa urządzenia, w razie zaistnienia takiej konieczności, może być przeprowadzona tylko w wyspecjalizowanych
punktach serwisowych.
10. Po upływie ustalonego okresu używalności urządzenia zalecane jest co jakiś czas zgłaszać się do punktu serwisowego w
celu sprawdzenia technicznego stanu ciśnieniomierza.
11. Utylizacja urządzenia przeprowadzana jest według zasad, obowiązujących w danym kraju. Specjalne warunki utylizacji
nie zostały ustalone przez producenta.
12. Mankiet można czyścić wielokrotnie. Jego wewnętrzną stronę (która styka się z ręką pacjenta) należy przetrzeć waci-
kiem zwilżonym w 3-procentowym roztworze nadtlenku wodoru. Długotrwałe stosowanie może spowodować częściowe
odbarwienia mankietu. Nie wolno go prać, jak również prasować.
13. Przed użyciem zasilacza należy sprawdzić czy kabel nie został uszkodzony.
WYKRYWANIE USTEREK
PROBLEM PRAWDOPODOBNY POWÓD SPOSÓB WYELIMINOWANIA
Na wyświetlaczu nic się nie
wyświetla
Baterie są rozładowane.
Nie zachowano biegunowości baterii.
Brudne styki baterii.
Zasilacz nie został podpięty do gniazda.
Należy wymienić wszystkie baterie
na nowe.
Włóż baterie poprawnie.
Wytrzyj styki suchą szmatką.
Podłącz zasilacz do gniazda sieciowego.
Pompowanie mankietu jest
samoczynnie przerywane i
wznawiane.
Urządzenie przeprowadza automatyczne
dopompowywanie mankietu.
Może mówiłeś czy poruszałeś ręką
podczas pomiaru?
Zapoznaj się z rozdziałem “PROCEDURA
POMIARU”.
Zrelaksuj się i powtórz pomiar.
Wartość pulsu jest zbyt
wysoka (lub zbyt niska)
Może mówiłeś czy poruszałeś ręką
podczas pomiaru?
Pomiar został wykonany zaraz po wysiłku
fi zycznym?
Zachowuj ciszę i spokój podczas przepro-
wadzenia pomiaru.
Powtórz pomiar po 5 minutach.
Ciśnienie krwi za każdym
razem jest inne. Mierzone
wartości są za niskie (wy-
sokie).
Czy mankiet znajduje się na wysokości
serca?
Czy mankiet jest poprawnie założony?
Czy ramię nie jest naprężone?
Może mówiłeś czy poruszałeś ręką
podczas pomiaru?
Należy przybrać odpowiednią pozycję
do pomiaru.
Prawidłowo umieść mankiet na ramieniu.
Zrelaksuj się, rozluźnij.
Zachowuj ciszę i spokój podczas przepro-
wadzenia pomiaru.
Nie można przeprowadzić
większej ilości pomiarów.
Baterie są zużyte lub słabej jakości. Używaj tylko baterii alkaicznych, wypro-
dukowanych przez znanych producentów.
Jeśli pomimo stosowania się do powyższych wskazówek nie uda się dokonać prawidłowego pomiaru, należy zaprzestać
korzystania z urządzenia i skontaktować się z serwisem (adresy i telefony wyspecjalizowanych punktów serwisowych
znajdują się w karcie gwarancyjnej). W żadnym przypadku nie wolno naprawiać urządzenia samodzielnie.
WARUNKI GWARANCJI
Na sprzęt LD jest ustalony okres gwarancji, który określono w karcie gwarancyjnej produktu.
Zobowiązania gwarancyjne potwierdzone są kartą gwarancyjną, otrzymywaną przez nabywcę przy zakupie urządzenia.
Adresy punktów serwisowych realizujących obsługę gwarancyjną, podane są na karcie gwarancyjnej.
Wykonywane jest pod nadzorem i dla Little Doctor International (S) Pte. Ltd. (35 Selegie Road #09-02 Parklane Shopping Mall,
Singapore 188307, Singapore. adres pocztowy: Yishun Central P.O. Box 9293 Singapore 917699).
Producent: Little Doctor Electronic (Nantong) Co. Ltd. (No.8, Tongxing Road Economic & Technical Development Area, 226010 Nantong,
Jiangsu, People’s Republic of China).
Dystrybutor w Unii Europejskiej: Little Doctor Europe Sp. z o. o. (ul. Zawiła 57G, 30-390 Kraków Polska, tel.: +48 12 2684746, 12
2684747, fax: +48 12 268 47 53, e-mail: biuro@littledoctor.pl).
Więcej informacji można znaleźć na stronie www.littledoctor.pl
HU
ALKATRÉSZEK MEGNEVEZÉSE (1. ábra)
1
AZ ELEKTRONIKUS BLOKK.
9
M2 GOMB (2. MEMÓRIA)
2
LCD KIJELZŐ.
10
GOMB (START / STOP) .
3
JACK A MANDZSETTA ÖSSZEKÖTÉSÉRE
11
M1 GOMB (1. MEMÓRIA).
4
A LEVEGŐTÖMLŐ DUGÓJA.
12
ELEMEK
5
A LEVEGŐTÖMLŐ.
13
HASZNÁLATI ÚTMUTATÓ
.
6
A MANDZSETTA.
14
JÓTÁLLÁSI KÁRTYA.
7
ALJZAT A TÁPEGYSÉG CSATLAKOZTATÁSÁHOZ.
15
TÁSKA.
8
TÁPEGYSÉG LD-N057 (AZ LD51A ÉS AZ LD51U ESETÉBEN).
ÁLTALÁNOS INFORMÁCIÓK
Ez a kézikönyv segítséget nyújt a felhasználónak az automatikus digitális készülék ( továbbiakban: készülék) biztonságos
és hatékony működtetéséhez, a vérnyomás és az LD pulzusszám mérésére, ( LD51, LD51A, LD51U végrehajtása) A
készüléket az ebben a kézikönyvben lefektetett szabályok szerint kell használni, és nem szabad felhasználni az itt
leírtaktól eltérő célokra. Fontos, hogy olvassa el és értse meg a teljes kézikönyvet, különösen az “Ajánlások a helyes
méréshez” fejezetet.
HASZNÁLATI UTASÍTÁSOK
Az eszközt úgy tervezték, hogy mérje a szisztolés és diasztolés vérnyomást, és meghatározza a pulzusszámot a 15
évesnél idősebb betegeknél. Az eszköz az instabil artériás nyomás, vagy az ismert magas artériás vérnyomás kezelésére
ajánlott , az orvosi megfi gyelés kiegészítéseként.
A MŰKÖDÉS ELVE
A készülék oszcillometrikus módszert alkalmaz a vérnyomás és a pulzusszám mérésére. A mandzsettát a felkarra kell
helyezni, mely automatikusan felfújódik. A készülék érzékelő eleme érzékeli a mandzsettában lévő nyomás gyenge in-
gadozását, amelyeket a brachialis artéria terjesztése és összehúzása állítja elő a szív minden egyes lökésére. A nyomási
hullamok amplitúdója mérhető, átalakítható higanymilliméterbe és az megjelenik a kijelzőn digitális érték formájában.
A készülék memóriája 90 cellát tartalmaz a mérési eredmények tárolására. Kérjük, vegye fi gyelembe, hogy a készülék
nem adhatja meg ezt a mérési pontosságot, ha azt a kézikönyv “Műszaki adatok” szakaszában meghatározottaktól
eltérő hőmérsékleten vagy páratartalomban használja vagy tárolja. Figyelmeztetjük a súlyos aritmiában szenvedő
személyek vérnyomásának mérésénél történő lehetséges hibákról. Forduljon orvosához, amennyiben gyermek
vérnyomását szeretné mérni.
MŰSZAKI JELLEMZŐK
Működési körülmények
Hőmérséklet, °C
Relatív páratartalom, % Rh
10-től 40-ig
85 és alacsonyabb
Tárolási és szállítási feltételek
Hőmérséklet, °C
Relatív páratartalom, % Rh
-20-tól 50-ig
85 és alacsonyabb
LD-N057 TÁPEGYSÉG (a készlet tartalmazza LD51A-t és
LD51U-t )
Kimeneti feszültség, V
Maximális terhelési áram, mA
Bemeneti feszültség, V/Hz
Külméretek
Tömeg, kg
Dugó:
Az érintkezők polaritása
Belső átmérő, mm
Külső átmérő, mm
Dugaszolócsatlakozó hossza
hossz, mm
6 V ± 5%
legfeljebb 600 mA
~200-240 V, 50/60 Hz
64 x 70 x 43 mm
nie więcej niż 0,3 kg
«–» belső
2.1 ± 0.1
5.5 ± 0.1
10 ± 0.5
Külméretek
Méret (elektronikus vezérlőe-
gység), mm
Tömeg (csomagolás, táska, elemek
és tápegység nélkül), g
129 x 105 x 61
424 (LD51, LD51A) /
422 (LD51U)
A gyártás éve, hónapja
A gyártás éve, hónapja az “A”
jelzés után sorszámmal van
megjelölve. A sorozatszám a
készülék alján található
JELMAGYARÁZAT
Termék típusa BF
Fontos: Olvassa el az
utasításokat
Védelmi osztály II
Mérési módszer oszcillometriás Fuzzy Al-
gorithm technológiával
Indikátor Folyadékkristályos
Nyomásjelző tartomány a
mandzsettában, Hg mm
0-tól 300-ig
Mérési tartomány:
Nyomás mandzsettában,
Hg mm
pulzusszám, 1 / min
40-tól 260-ig
40-tól 160-ig
A megengedhető abszolút
hiba határai a préselő
mandzsetta légnyomásának
mérésekor, Hgmm
±3
A megengedett relatív
hiba határai a pulzusszám
mérésénél, %
±5
Nyomás Automatikus (légszi-
vattyú)
A nyomás leeresztése
mérésnél Automatikus
Óra és dátum Van - kikapcsolható
Memória
90 utolsó mérés + a
legutóbbi három mérés
átlagos értéke
Teljesítmény típusa
4 dB AA (LR6) elem vagy
áramforrás, legalább
600 mA
Max. Energiafogyasztás, W
3,6
A jelen Útmutató kiadásának dátuma az utolsó oldalon látható EXXX / YYMM / XX formában, ahol YY a kiadási év, MM
a kiadási hónap.
A készülékek gyártása az ISO 13485 nemzetközi szabvány szerint tanusított.
LD51,LD51A és LD51U készülék megfelel az MDD 93/42 / EGK számú európai irányelvnek, a nemzetközi szabványoknak,
az EN980-nak.
LD-N057 tápegység megfelel az EN 55022 Class A osztályú szabványnak, az áramütés elleni védelmi szint II osztály, BF típus.
JAVASLATOK A HELYES MÉRÉSRE
1. A helyes méréshez tudnia kell, a következőket. A vérnyomásszint számos tényezőtől függ. Általában nyáron az
alacsonyabb és télen magasabb. Az artériás nyomás a légköri nyomás mellett változik, a fi zikai terheléstől, az érzelmi
ingerlékenységtől, a stressztől és az étrendtől függ. Nagy befolyást tesznek a gyógyszerek, az alkoholtartalmú italok
és a dohányzás. Sok esetben még a poliklinikában a nyomás mérésére szolgáló eljárás is növeli az indexeket. Ezért
az otthon mért vérnyomás gyakran különbözik a poliklinikában mért nyomásértéktől. Mivel a vérnyomás alacsony
hőmérsékleten emelkedik, szobahőmérsékleten (kb. 20 ° C) mérjük. Ha a készüléket alacsony hőmérsékleten tárolták,
a használata előtt hagyja azt a szobahőmérsékleten állni legalább 1 óráig, ellenkező esetben a mérési eredmény hibás
lehet. Egy napon belül az egészséges emberek javulási különbsége 30-50 mm Hg. szisztolés (felső) érték, és legfeljebb
10 mm Hg. diasztolés (alsó) érték. A vérnyomás különböző tényezőktől függ és minden ember számára egyedi. Ezért
ajánlott speciális naplót vezetni a vérnyomásmérésről. CSAK A DIPLOMÁS ORVOS ELEMEZHETI A NAPLÓ ADATAI ALAPJÁN
AZ ARTERIÁLIS NYOMÁS VÁLTOZÁSAIT.
2. A szív- és érrendszeri megbetegedéseknél és számos egyéb betegségnél, ahol a vérnyomás ellenőrzése szükséges,
végezzen méréseket az orvos által meghatározott időpontokban. NEM SZABAD FIGYELMEN KÍVÜL HAGYNI, HOGY A
DIAGNÓZIS FELÁLLÍTÁSÁT ÉS A HIPERTÓNIA BÁRMILYEN KEZELÉSÉT, CSAK DIPLOMÁS ORVOS VÉGEZHETI, A MÉRT ADATOK
FÜGGVÉNYÉBEN. A KEZELÉSRE, A GYÓGYSZEREK SZEDÉSÉRE, VAGY MEGVÁLTOZTATÁSÁRA VONATKOZÓ DÖNTÉST CSAK A
KEZELŐORVOS HOZHATJA MEG.
3. A súlyos vaszkuláris szklerózis, a gyenge impulzus hullám, valamint a súlyos szívritmuszavarok esetén a vérnyomás
pontos mérése nehéz lehet. Ezekben az esetekben az ELEKTRONIKUS KÉSZÜLÉK ALKALMAZÁSÁRA VONATKOZÓ KONZUL-
TÁCIÓ SZÜKSÉGES A SZAKORVOSSAL.
4. AZ ELEKTRONIKUS KÉSZÜLÉK HASZNÁLATÁRA VONATKOZÓAN, AZ ARTERIÁLIS NYOMÁS JELZÉSEINEK JOBB MEGFIG-
YELHETŐSÉGE ÉRDEKÉBEN AZ ALÁBBIAK JAVASOLTAK: a vérnyomás mérését szobahőmérsékleten, nyugodt, kényelmes
környezetben kell elvégezni. Egy órával a mérés előtt zárja ki az élelmiszerfogyasztást, 1,5-2 órával a mérés előtt a
dohányzást, valamint a tonikos italok, alkohol fogyasztását.
5. A vérnyomásmérés pontossága attól függ, hogy a készülék mandzsettája megfelel-e az ön karméterének. A MANDZ-
SETTA NEM LEHET SEM SZOROS, SEM LAZA.
6. A vérkeringés visszaállítása céljából a mérések ismételhetőek 3 percenként. Azonban a súlyos ateroszklerózisban
szenvedő személyek a vascularis rugalmasság jelentős csökkenése miatt hosszabb időtartamot igényelnek a mérések
(10-15 perc) között. Ez vonatkozik olyan betegekre is, akik hosszú ideje szenvednek a cukorbetegségben. A vérnyomás
pontosabb meghatározásához ajánlott 3 x egymást követő méréssorozatot végrehajtani, és a mérési eredmények
átlagértékét használni.
A KÉSZÜLÉK ÁRAMELLÁTÁSA
AZ ELEMEK BEHELYEZÉSE (2. ábra)
1. Nyissa ki az elemtartó rekesz fedelét, és helyezze be a 4 darab AA típusú elemet a rekeszen belüli ábrának megfelelően.
Győződjön meg arról, hogy a polaritásnak megfelelően vannak-e bent az elemek. Ne nyomja meg az elemtartó fedelet túl
nagy erővel, az eltávolításakor (1. ábra).
2. Zárja le az elemtartó fedelét.
A mellékelt akkumulátorok csak a készülék rendelkezésre állásának/ működőképességének ellenőrzésére szolgálnak
az értékesítés során, élettartamuk alacsonyabb lehet, mint az ajánlott akkumulátoroké.
• Cserélje ki az összes elemet, ha a kijelzőn folyamatosan megjelenik az akkumulátorcserére utaló jel “ ”, vagy a
kijelzõn nincs jel. Az akkumulátorcsere jelzője nem mutatja a merülés mértékét.
• Az elemek cseréjekor egyszerre cserélje ki azokat. Ne használjon használt elemeket.
• Ha a készüléket hosszabb ideig nem használja, vegye ki az elemeket a készülékből.
• A használt elemeket ne hagyja a készülékben.
A KÉSZÜLÉK HASZNÁLATA ÁRAMFORRÁSSAL
A gyártó az LD-N057 stabilizált tápegység használatát ajánlja (az LD51A és LD51U készüléknél ez a tápegység a
csomaghoz tartozik). A stablilzált tápegység jackdugója a készülék jobb oldalán található.
Ha a készüléket áramforrással szeretné használni, dugja be a tápkábelt a készülékbe, és dugja be a tápkábelt a
konnektorba, nyomja meg a gombot.
Amikor a mérés befejeződött, kapcsolja ki a készüléket a
gombbal, húzza ki a tápkábelt a konnektorból, és húzza ki a
tápegység dugóját a készülékből.
A dátum- és időbeállítás visszaállításának elkerülése érdekében, ha a készüléket áramforrással használja, ne távolítsa
el az elemeket.
A DÁTUM ÉS AZ IDŐ BEÁLLÍTÁSA
1. A dátum és az idő kijelzésének aktiválásához tartsa nyomva a
gombot 5 másodpercnél hosszabb ideig
.
2. Ha a dátum és az idő kijelzés be van kapcsolva, akkor a naptár és az óra beállításához tartsa lenyomva az M1 gombot,
és nyomja meg a
gombot. Ezután villogni kezd az ÉV. Az M1/M2 gombok segítségével növelheti / csökkentheti
az értéket. A következő paraméter kiválasztása a HÓNAP-NAP-ÓRA-PERC sorrendben beállítására a
. gomb
megnyomásával történik. Az érték növeléséhez / csökkentéséhez használja az M1 / M2 gombokat.
3. Ha nem végez semmilyen műveletet több mint 1 percig a naptár és az órabeállítás üzemmódban, akkor a készülék
magától a dátum- és időmegjelenítési módra vált. Ebben az esetben a már elvégzett módosítások lépnek érvénybe.
4. A dátum és az idő kijelzésének kikapcsolásához tartsa nyomva a
gombot több mint 5 másodpercig.


Alăturați-vă conversației despre acest produs
Aici puteți împărtăși ce părere aveți despre Little Doctor LD-51 Tensiometru. Dacă aveți o întrebare, citiți mai întâi cu atenție manualul. Solicitarea unui manual se poate face folosind formularul nostru de contact.